初识httpd服务
Posted
tags:
篇首语:本文由小常识网(cha138.com)小编为大家整理,主要介绍了初识httpd服务相关的知识,希望对你有一定的参考价值。
HTTP概述:
Apache HTTP Server(简称Apache)是Apache软件基金会的一个开放源代码的网页服务器软件,可以在大多数电脑操作系统中运行,由于其跨平台和安全性。被广泛使用,是最流行的Web服务器软件之一。它快速、可靠并且可通过简单的API扩充,将Perl/Python等解释器编译到服务器中。
http协议:
应用层协议:超文本传输
http/0.9
http/1.0:cache, MIME
MIME: multipurpose internet mail extensions
http/1.1:缓存功能,条件式请求;
speedy: SPDY
http/2.0:
一次完整的Http请求处理过程:
(1) 建立或处理连接请求;
(2) 接收请求;
(3) 解析请求,处理请求;
(4) 加载用户请求的资源;
(5) 构建响应报文;
(6) 发送响应报文;
(7) 记录访问于日志中;
httpd的特性:
高度模块化设计:core modules + standard modules + 3rd party modules
DSO: Dynamic Shared Object
MPM: multipath process modules
prefork:process
每进程响应一个请求;
worker: thread
每线程响应一个请求;
event: thread
每进程响应多个请求;
丰富功能:
CGI:动态网站;
虚拟主机:IP,PORT,ServerName
反向代理:http, fcgi, wsgi, ajp, ...
负载均衡:
httpd的安装基础应用
1、yum安装httpd
[[email protected] ~]# yum install httpd
Loaded plugins: fastestmirror, langpacks
Loading mirror speeds from cached hostfile
Package httpd-2.4.6-40.el7.centos.x86_64 already installed and latest version
Nothing to do
2、程序环境
主程序文件:
/usr/sbin/httpd
模块文件:
/usr/lib64/httpd/modules/*.so
主配置文件:
/etc/httpd/conf/httpd.conf
/etc/httpd/conf.d/*.conf
/etc/httpd/conf.modules.d/*.conf
站点文档路径:
/var/www/html
日志文件路径:
/var/log/httpd/
access_log:访问日志
error_log:错误日志
Unit File:
/usr/lib/systemd/system/httpd.service
自带脚本:
/usr/sbin/apachectl
3、httpd常见配置的修改
1)监听的地址和修改
编辑主配置文件/etc/httpd/conf/httpd.conf
2)保持连接
tcp连接建立后,资源获取完成之后不会断开连接,而是继续等待请求其它资源,当时间超出规定时间或者传输的数量超过限制,则会断开
#定义一个页面文件
[[email protected] httpd]# cat /var/www/html/index.html
<h1> Hello World<h1>
使用浏览器访问
添加一个配置文件,将保持链接关闭,查看效果
[[email protected] httpd]# vi conf.d/keepalive.conf
[[email protected] httpd]# cat conf.d/keepalive.conf
KeepAlive Off
[[email protected] httpd]# systemctl restart httpd
[[email protected] httpd]#
3)DSO
模块的动态装卸机制,如果想禁止哪个模块,即在配置文件中将其注释掉即可
httpd命令:
-t -D DUMP_MODULES : show all loaded modules
-M : a synonym for -t -D DUMP_MODULES
httpd -M 发现所装载的模块中有个suexec模块
在/etc/httpd/conf.modules.d/00-base.conf里将这个模块注释掉
4)定义站点主页:
DirectoryIndex filename1 filename2 ...
访问网站时候时如果没有指定URL路径,系统会根据DirectoryIndex的配置找到主页文件,如果没有找到,则会被重定向到一个错误页面。DirectoryIndex可以有多个值,如果第一个存在,就是使用第一个,如果不存在,自左而右找,直到找到为止。
编辑配置文件并在DirectoryIndex中添加index.php
 将之前的主页文件改名,并新建一个名为index.php的文件
[[email protected] httpd]# mv /var/www/html/index.html /var/www/html/index.html.bak
[[email protected] httpd]# vi /var/www/html/index.php
[[email protected] httpd]# cat /var/www/html/index.php
<h1>Index Php<h1>
[[email protected] httpd]#
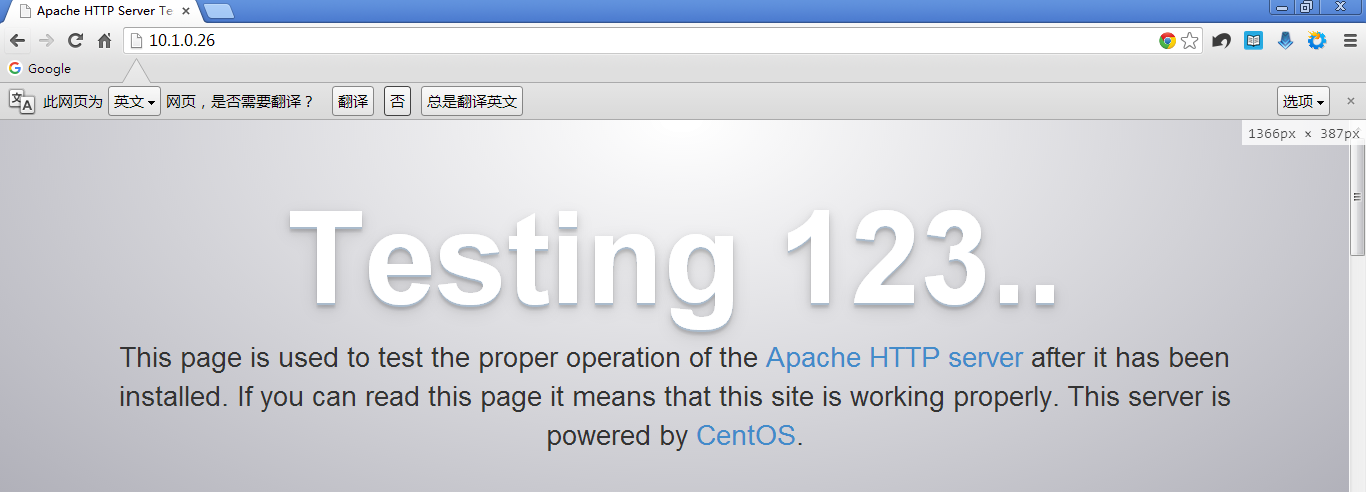
重启服务并访问ip地址
因为之前的index.html找不到,所以向右找到了index.php
5)Main Server相关配置
(1) DocumentRoot
站点文档根路径;
更改站点根目录问/web/htdocs
创建目录并添加主页文件
[[email protected] httpd]# mkdir -pv /web/htdocs
mkdir: created directory ‘/web’
mkdir: created directory ‘/web/htdocs’
[[email protected] httpd]# echo "<h1>Web Htdocs<h1>" /web/htdocs/index.html
<h1>Web Htdocs<h1> /web/htdocs/index.html
[[email protected] httpd]# echo "<h1>Web Htdocs<h1>" > /web/htdocs/index.html
访问站点,但好像不是我们期望的结果
这是因为,虽然指定了新的DocumentRoot,但是并没有给新的目录授权!查看错误日志可看出
让我们给新的站点根目录授权
重载服务并访问
(2)站点文档访问授权及众多服务特性的配置:
基于文件系统路径:
<Directory "/PATH/TO/DIR">
</Directory>
<File "">
</File>
....
基于URL进行:
<Location "URL">
...
</Location>
<LocationMatch ~ "URL_PATTERN">
...
</LocationMatch>
其中的各属性配置:
Options
Indexes Includes FollowSymLinks SymLinksifOwnerMatch ExecCGI MultiViews
None表示都不启用,All表示都启用
Indexes:索引
FollowSymLinks:允许跟踪符号链接
ExecCGI:允许执行CGI脚本
AllowOverride(通常都使用None)
httpd的访问控制配置,允许每目录单独进行;在每个目录下建立一个.htaccess文件;
AllowOverride表示是否允许目录中的.htaccess文件中的配置来覆盖当前配置段中的配置;
Options FileInfo AuthConfig Limit
All
None
基于源地址的访问控制
允许所有地址访问:Require all granted
拒绝所有地址访问:Require all denied
<RequireAll>
</RequireAll>
基于IP控制:
Require ip ADDRESS
Require not ip ADDRESS
ADDRESS可以是单个ip,也可以写某个网段
基于主机名控制:
Require host HOSTNAME
Require not host HOSTNAME
HOSTNAME可以是主机名也可以是域名
6)User/Group
进程的运行者身份;
 http进程运行时是以apache用户apache组来进行的。
7)路径别名
Alias /URL/ /PATH/TO/SOME_DIR/
通过别名映射到真正的目录上
创建一个目录,并在此目录下创建一个index.html的文件
[[email protected] ~]# mkdir /data/bbs -pv
mkdir: created directory ‘/data/bbs’
[[email protected] ~]# echo "<h1>Alias BBS Page<h1>" > /data/bbs/index.html
在主配置文件中添加以下代码
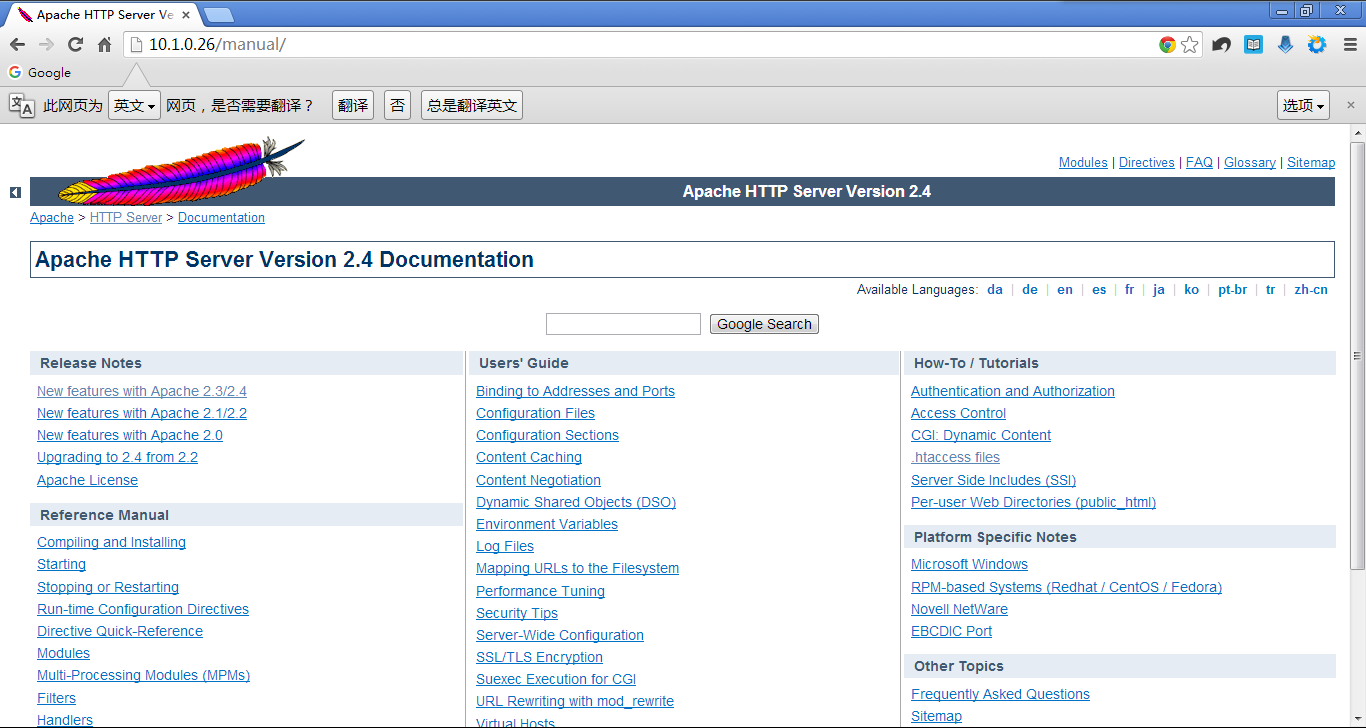
httpd的官方手册页,需要安装httpd-manual包然后进行相应的配置,便能正常访问
安装httpd-manual包
[[email protected] ~]# yum install httpd-manual
Loaded plugins: fastestmirror, langpacks
Loading mirror speeds from cached hostfile
Package httpd-manual-2.4.6-40.el7.centos.noarch already installed and latest version
Nothing to do
配置文件:conf.d/manual.conf
[[email protected] ~]# cat /etc/httpd/conf.d/manual.conf
#
# This configuration file allows the manual to be accessed at
# http://localhost/manual/
#
AliasMatch ^/manual(?:/(?:de|en|fr|ja|ko|ru))?(/.*)?$ "/usr/share/httpd/manual$1"

<Directory "/usr/share/httpd/manual">
    Options Indexes
    AllowOverride None
    Require all granted
</Directory>
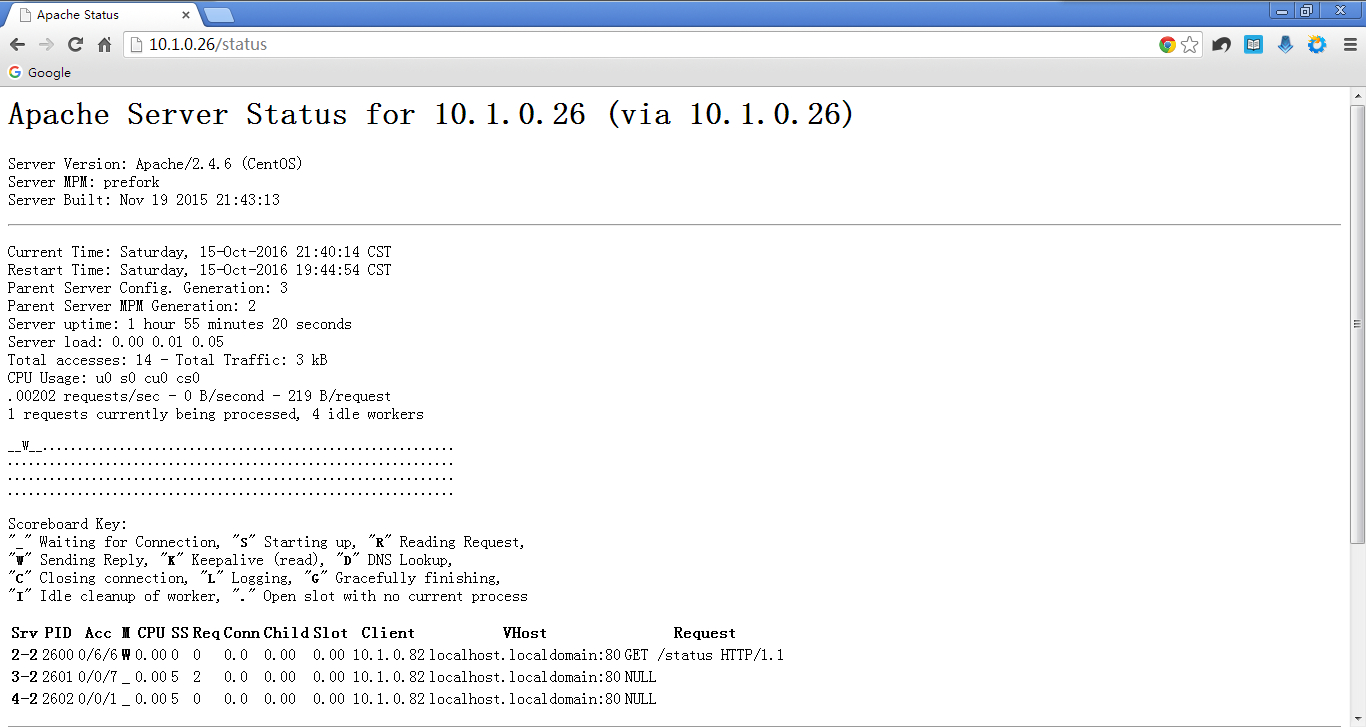
 9)status page(通过status模块扩展以后生成)
编辑配置文件/etc/httpd/conf.d/status.conf
错误日志:
ErrorLog "/var/log/httpd/error_log"
警告级别:Possible values include: debug, info, notice, warn, error, crit, alert, emerg.
访问日志:
LogFormat "FORMAT_STRINGS" LOG_FORMAT_NAME
CustomLog "/PATH/TO/LOG_FILE" LOG_FORMAT_NAME
11)虚拟主机
主机标识方式:
IP不同
PORT不同
ServerName
<VirtualHost IP:PORT>
ServerName
DocumentRoot
<Directory "">
...
Require all granted
</DIrective>
ErrorLog
CustomLog
</VirtualHost>
实例:
基于ip和端口方式混合的方式
创建一系列文件夹以及网站主页文件
[[email protected] ~]# mkdir -pv /vhosts/www{1,2,3}
mkdir: created directory ‘/vhosts’
mkdir: created directory ‘/vhosts/www1’
mkdir: created directory ‘/vhosts/www2’
mkdir: created directory ‘/vhosts/www3’
[[email protected] ~]# echo "<h1>Vhosts www1<h1>" > /vhosts/www1/index.html
[[email protected] ~]# echo "<h1>Vhosts www2<h1>" > /vhosts/www2/index.html
[[email protected] ~]# echo "<h1>Vhosts www3<h1>" > /vhosts/www3/index.html
[[email protected] ~]#
添加/etc/httpd/conf.d/vhosts.conf文件
[[email protected] ~]# vi /etc/httpd/conf.d/vhosts.conf

<VirtualHost 10.1.0.26:80>
        ServerName www1.xiaoshui.com
        DocumentRoot "/vhosts/www1"
        <Directory "/vhosts/www1">
                Options None
                AllowOverride None
                Require all granted
        </Directory>
</VirtualHost>
<VirtualHost 10.1.0.26:8080>
        ServerName www2.xiaoshui.com
        DocumentRoot "/vhosts/www2"
        <Directory "/vhosts/www2">
                Options None
                AllowOverride None
                Require all granted
        </Directory>
</VirtualHost>
<VirtualHost 10.1.0.27:80>
        ServerName www3.xiaoshui.com
        DocumentRoot "/vhosts/www3"
        <Directory "/vhosts/www3">
                Options None
                AllowOverride None
                Require all granted
"/etc/httpd/conf.d/vhosts.conf" 27L, 605C
添加临时地址10.1.0.27
[[email protected] ~]# ifconfig eno16777736:0 10.1.0.27/16
[[email protected] ~]# ifconfig
eno16777736: flags=4163<UP,BROADCAST,RUNNING,MULTICAST>  mtu 1500
        inet 10.1.0.26  netmask 255.255.0.0  broadcast 10.1.255.255
        inet6 fe80::20c:29ff:fe27:9b0e  prefixlen 64  scopeid 0x20<link>
        ether 00:0c:29:27:9b:0e  txqueuelen 1000  (Ethernet)
        RX packets 4769  bytes 445376 (434.9 KiB)
        RX errors 0  dropped 0  overruns 0  frame 0
        TX packets 1137  bytes 151773 (148.2 KiB)
        TX errors 0  dropped 0 overruns 0  carrier 0  collisions 0

eno16777736:0: flags=4163<UP,BROADCAST,RUNNING,MULTICAST>  mtu 1500
        inet 10.1.0.27  netmask 255.255.0.0  broadcast 10.1.255.255
        ether 00:0c:29:27:9b:0e  txqueuelen 1000  (Ethernet)
重启服务并分别访问之
基于主机名的方式
更改/etc/httpd/conf.d/vhosts.conf文件,将ip地址改为相同的,如下
[[email protected] ~]# vi /etc/httpd/conf.d/vhosts.conf

<VirtualHost *:80>
        ServerName www1.xiaoshui.com
        DocumentRoot "/vhosts/www1"
        <Directory "/vhosts/www1">
                Options None
                AllowOverride None
                Require all granted
        </Directory>
</VirtualHost>
<VirtualHost *:80>
        ServerName www2.xiaoshui.com
        DocumentRoot "/vhosts/www2"
        <Directory "/vhosts/www2">
                Options None
                AllowOverride None
                Require all granted
        </Directory>
</VirtualHost>
<VirtualHost *:80>
        ServerName www3.xiaoshui.com
        DocumentRoot "/vhosts/www3"
        <Directory "/vhosts/www3">
                Options None
                AllowOverride None
                Require all granted
        </Directory>
</VirtualHost>
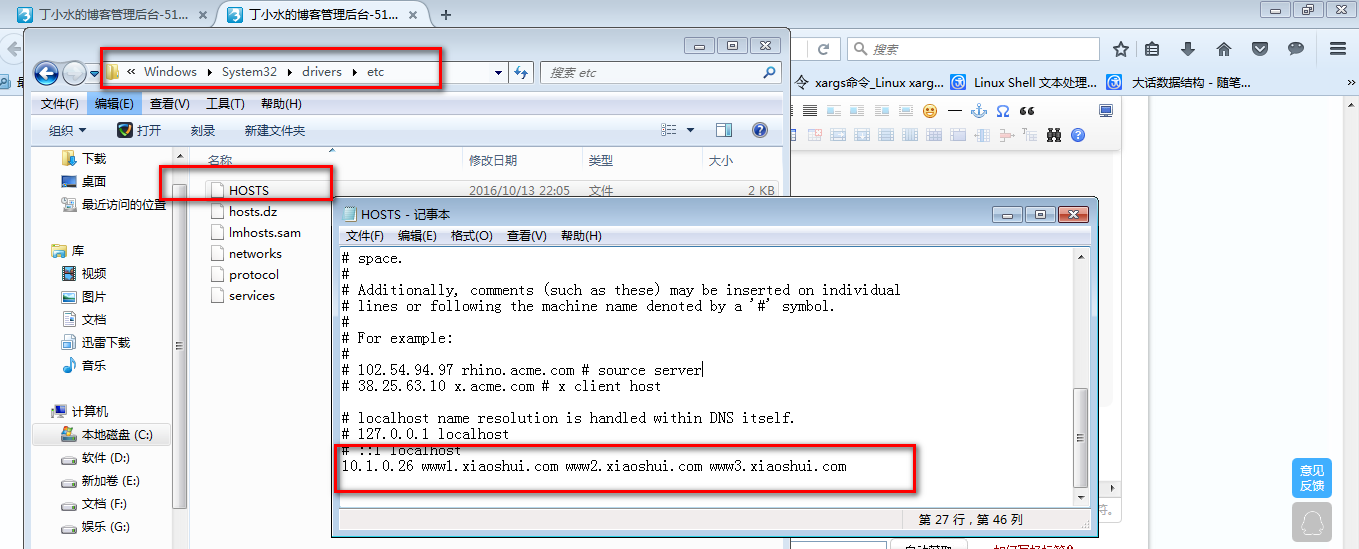
在windows的HOSTS文件中添加相对的主机名和ip地址的解析
12)基于用户的访问控制
◆上面提到的Require的机制
Require user USERLIST
Require group GRPLIST
◆虚拟用户 (需要账号密码验证)
认证方式:
basic
digest
<Directory "">
Options None
AllowOverride None
AuthType Basic
AuthName "STRING"
AuthUserFile ""
Require user USER1 USER2 ...
</Directory>
账号文件生成工具htpasswd
htpasswd [options] "/PATH/TO/HT_PASSWD_FILE" username
-c:创建此文件;
-m:md5加密密码存放;
-s:sha加密
-D: 删除指定用户
基于组进行认证:
<Directory "/vhosts/www1/admin">
Options None
AllowOverride None
AuthType Basic
AuthName "Admin Area, Enter your name/pass"
AuthUserFile "/etc/httpd/conf/.htpasswd"
AuthGroupFile "/etc/httpd/conf/.htgroup"
Require group GRPNAME1 GRPNAME 2
</Directory>
组账号文件:
每行定义一个组
group_name: user1 user2 ...
实例:
在上面的/etc/httpd/conf.d/vhost.conf文件中做以下修改
#第一次创建时需要加-m选项,以后添加用户时只需-m选项,如果再加-c选项,会将以前的用户抹掉
[[email protected] ~]# htpasswd -c -m "/etc/httpd/conf/.htpasswd" tom
New password:
Re-type new password:
Adding password for user tom
[[email protected] ~]# htpasswd -m "/etc/httpd/conf/.htpasswd" xiaoshui
New password:
Re-type new password:
Adding password for user xiaoshui
重启服务并访问之
本文出自 “学無止境” 博客,请务必保留此出处http://dashui.blog.51cto.com/11254923/1862321
以上是关于初识httpd服务的主要内容,如果未能解决你的问题,请参考以下文章


