34补3-3 rhcs集群基础应用
Posted
tags:
篇首语:本文由小常识网(cha138.com)小编为大家整理,主要介绍了34补3-3 rhcs集群基础应用相关的知识,希望对你有一定的参考价值。
03rhcs集群基础应用
配置luci/ricci(图形界面,重点掌握)
配置环境
node1:192.168.1.151CentOS6.5
node2:192.168.1.152CentOS6.5
node3:192.168.1.153CentOS6.5
node3:192.168.1.154CentOS6.5
[[email protected] ~]# ansible ha -m shell -a ‘service NetworkManager stop‘
[[email protected] ~]# ansible ha -m shell -a ‘chkconfig NetworkManager off‘
[[email protected] ~]# ansible ha -m shell -a ‘yum -y install httpd‘
[[email protected] ~]# yum -y install ricci
[[email protected] ~]# service ricci start
[[email protected] ~]# netstat -tunlp
Active Internet connections (only servers)
Proto Recv-Q Send-Q Local Address Foreign Address State PID/Program name
tcp 0 0 0.0.0.0:111 0.0.0.0:* LISTEN 1181/rpcbind
tcp 0 0 0.0.0.0:22 0.0.0.0:* LISTEN 1485/sshd
tcp 0 0 127.0.0.1:631 0.0.0.0:* LISTEN 1372/cupsd
tcp 0 0 127.0.0.1:25 0.0.0.0:* LISTEN 1561/master
tcp 0 0 0.0.0.0:47549 0.0.0.0:* LISTEN 1310/rpc.statd
tcp 0 0 :::111 :::* LISTEN 1181/rpcbind
tcp 0 0 :::22 :::* LISTEN 1485/sshd
tcp 0 0 ::1:631 :::* LISTEN 1372/cupsd
tcp 0 0 ::1:25 :::* LISTEN 1561/master
tcp 0 0 :::46746 :::* LISTEN 1310/rpc.statd
tcp 0 0 :::11111 :::* LISTEN 28236/ricci
udp 0 0 0.0.0.0:111 0.0.0.0:* 1181/rpcbind
udp 0 0 0.0.0.0:631 0.0.0.0:* 1372/cupsd
udp 0 0 0.0.0.0:638 0.0.0.0:* 1310/rpc.statd
udp 0 0 0.0.0.0:56208 0.0.0.0:* 1310/rpc.statd
udp 0 0 0.0.0.0:932 0.0.0.0:* 1181/rpcbind
udp 0 0 :::111 :::* 1181/rpcbind
udp 0 0 :::932 :::* 1181/rpcbind
udp 0 0 :::35625 :::* 1310/rpc.statd
[[email protected] ~]# yum -y install ricci && service ricci start
[[email protected] ~]# yum -y install ricci && service ricci start
[[email protected] ~]# ansible ha -m shell -a ‘echo ricci:mageedu | chpasswd‘
[[email protected] ~]# yum -y install luci
[[email protected] ~]# service luci start
Point your web browser to https://node4:8084 (or equivalent) to access luci
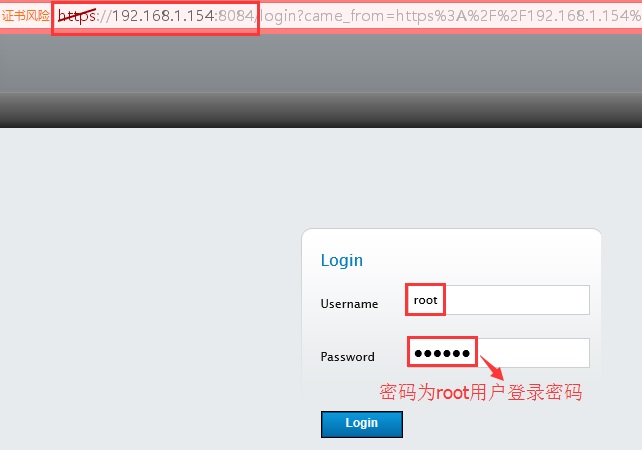
#可通过https://192.168.1.154:8084端口访问luci
以下操作通过浏览器进行
1、登录luci
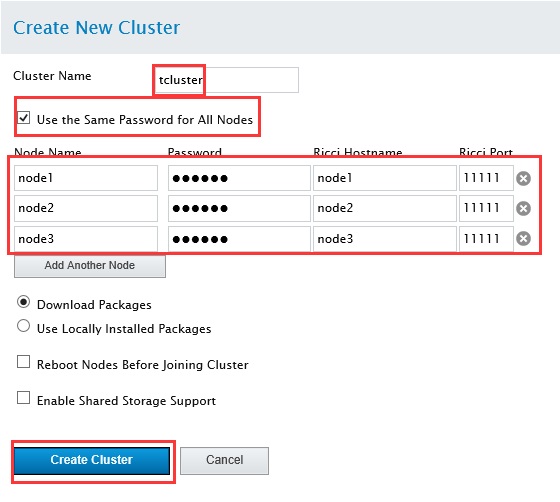
2、创建集群
备注:node结点的密码为ricci的密码,此处为mageedu,而不是root用户的登录密码
3、创建Fence Devices
依次选择“tcluster”、“Fence Devices”、“Add”
在出现的对话框中选择合适的配置,本次实验不作配置
4、创建Failover Domains(故障转移域)
依次选择“tcluster”、“Failover Domains”、“Add”
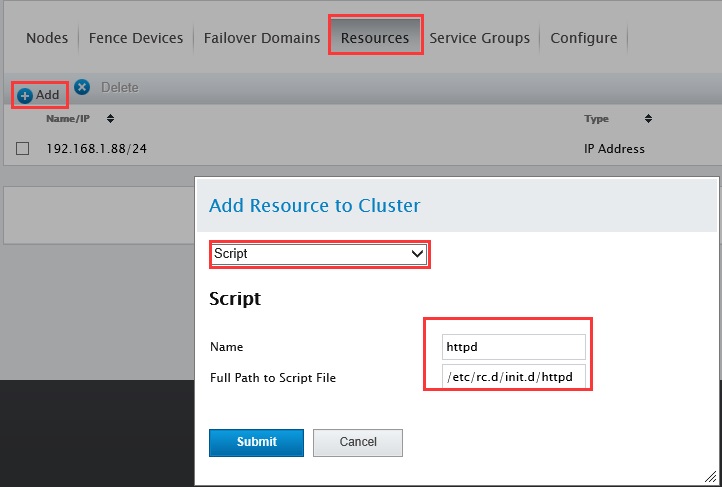
5、配置Resources
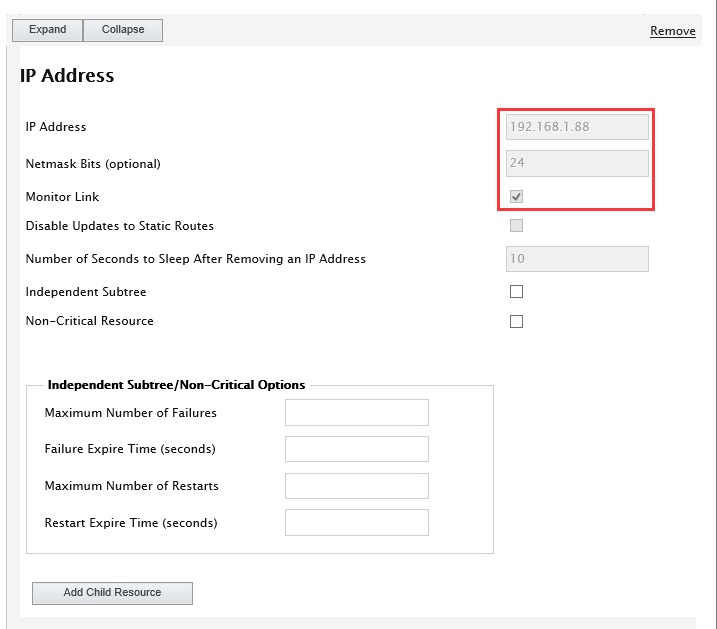
1)IP Address
点击“Apply”
2)添加Script资源
点击“Apply”
6、配置Service Groups
1)创建webservice group
2)在webservice group中添加资源
添加之前定义的IP Address和Script资源
3)启动webservice组资源
发现服务正运行在node2结点
测试:
[[email protected] ~]# vim /var/www/html/index.html
<h1>node2</h1>
[[email protected] ~]# vim /var/www/html/index.html
<h1>node3</h1>
测试1:转移运行结点至node3
配置cman/rgmanager(命令行界面,了解)
[[email protected] ~]# ansible ha -m shell -a ‘service NetworkManager stop‘
[[email protected] ~]# ansible ha -m shell -a ‘chkconfig NetworkManager off‘
#程序安装
[[email protected] ~]# yum -y install cman rgmanager
[[email protected] ~]# yum -y install cman rgmanager
[[email protected] ~]# yum -y install cman rgmanager
#创建集群
[[email protected] ~]# ccs_tool create tcluster
[[email protected] ~]# cd /etc/cluster/
[[email protected] cluster]# ls
cluster.conf cman-notify.d
[[email protected] cluster]# vim cluster.conf
[[email protected] cluster]# ccs_tool addfence meatware fence-manual
[[email protected] cluster]# ccs_tool lsfence
Name Agent
meatware fence-manual
[[email protected] cluster]# ccs_tool addnode -n 1 -f meatware node1
[[email protected] cluster]# ccs_tool addnode -n 2 -f meatware node2
[[email protected] cluster]# ccs_tool addnode -n 3 -f meatware node3
[[email protected] cluster]# ccs_tool lsnode
Cluster name: tcluster, config_version: 5
Nodename Votes Nodeid Fencetype
node1 1 1 meatware
node2 1 2 meatware
node3 1 3 meatware
[[email protected] ~]# ansible ha -m copy -a ‘src=/etc/cluster/cluster.conf dest=/etc/cluster/‘
#启动cman
[[email protected] cluster]# service cman start
[[email protected] ~]# service cman start
[[email protected] ~]# service cman start
[[email protected] cluster]# clustat
Cluster Status for tcluster @ Fri Oct 14 10:25:14 2016
Member Status: Quorate
Member Name ID Status
------ ---- ---- ------
node1 1 Online, Local
node2 2 Online
node3 3 Online
[[email protected] cluster]# service rgmanager start
[[email protected] ~]# service rgmanager start
[[email protected] ~]# service rgmanager start
[[email protected] cluster]# cman_tool status
Version: 6.2.0
Config Version: 5
Cluster Name: tcluster
Cluster Id: 10646
Cluster Member: Yes
Cluster Generation: 16
Membership state: Cluster-Member
Nodes: 3
Expected votes: 3
Total votes: 3
Node votes: 1
Quorum: 2
Active subsystems: 8
Flags:
Ports Bound: 0 177
Node name: node3
Node ID: 3
Multicast addresses: 239.192.41.191
Node addresses: 192.168.1.153
[[email protected] cluster]# cman_tool nodes
Node Sts Inc Joined Name
1 M 8 2016-10-14 10:23:55 node1
2 M 12 2016-10-14 10:24:04 node2
3 M 16 2016-10-14 10:24:09 node3
[[email protected] cluster]# cman_tool services
fence domain
member count 3
victim count 0
victim now 0
master nodeid 1
wait state none
members 1 2 3
dlm lockspaces
name rgmanager
id 0x5231f3eb
flags 0x00000000
change member 3 joined 1 remove 0 failed 0 seq 3,3
members 1 2 3
[[email protected] cluster]# service ricci start
[[email protected] cluster]# service ricci start
[[email protected] cluster]# service ricci start
[[email protected] ~]# yum -y install luci
[[email protected] cluster]# yum groupinfo "High availability"
Group: High Availability
Description: Infrastructure for highly available services and/or shared storage.
Mandatory Packages:
cman
Default Packages:
ccs
omping
rgmanager
Optional Packages:
cluster-cim
cluster-glue-libs-devel
cluster-snmp
clusterlib-devel
corosynclib-devel
fence-virtd-checkpoint
foghorn
libesmtp-devel
openaislib-devel
pacemaker
pacemaker-doc
pacemaker-libs-devel
pcs
python-repoze-what-quickstart
resource-agents
sbd
[[email protected] ~]# service luci start
本文出自 “追梦” 博客,请务必保留此出处http://sihua.blog.51cto.com/377227/1861947
以上是关于34补3-3 rhcs集群基础应用的主要内容,如果未能解决你的问题,请参考以下文章
Cluster基础:创建RHCS集群环境创建高可用Apache服务


