多进程协程事件驱动及select poll epoll
Posted coder
tags:
篇首语:本文由小常识网(cha138.com)小编为大家整理,主要介绍了多进程协程事件驱动及select poll epoll相关的知识,希望对你有一定的参考价值。
目录
-多线程使用场景
-多进程
--简单的一个多进程例子
--进程间数据的交互实现方法
---通过Queues和Pipe可以实现进程间数据的传递,但是不能实现数据的共享
---Queues
---Pipe
---通过Manager可以不同进程间实现数据的共享
--进程同步,即进程锁
--进程池
-协程
--先用yield实现简单的协程
--Greenlet
--Gevent
--用协程gevent写一个简单并发爬网页
-事件驱动
--IO多路复用
---用户空间和内核空间
---文件描述符fd
---缓存IO
--IO模式
---阻塞I/O(blocking IO)
---非阻塞I/O
---I/O多路复用(IO multiplexing)
---异步I/O(asynchronous IO)
-关于select poll epoll
--select
--poll
--epoll
--以select方法为例子进行理解
多线程的使用场景
IO操作不占用CPU
计算占用cpu
python多线程不适合cpu密集型操作的任务,适合IO操作密集型的任务
多进程
简单的一个多进程例子:(用于理解对多线程方法的使用)
和线程的方法类似,下面是一个简单的多进程代码
 1 #AUTHOR:FAN
 2 import time,multiprocessing
 3
 4 def run(name):
 5     time.sleep(2)
 6     print("hello",name)
 7
 8 if __name__ =="__main__":
 9     for i in range(6):
10         p = multiprocessing.Process(target=run,args=("dean",))
11       p.start()
和之前学习的多线程结合在一起使用,代码如下:
 1 #AUTHOR:FAN
 2
 3 import time,threading
 4 import multiprocessing
 5
 6 def thread_run():
 7     print(threading.get_ident())   #这里表示获取线程id
 8
 9
10 def run(name):
11     time.sleep(2)
12     print("hello",name)
13     t=threading.Thread(target=thread_run)
14     t.start()
15
16 if __name__ =="__main__":
17     for i in range(6):
18         p = multiprocessing.Process(target=run,args=("dean",))
19         p.start()
运行结果如下:

 1 D:\\python35\\python.exe D:/python培训/s14/day10/进程与线程结合使用.py
 2 hello dean
 3 10008
 4 hello dean
 5 9276
 6 hello dean
 7 8096
 8 hello dean
 9 1308
10 hello dean
11 hello dean
12 10112
13 8032
14
15 Process finished with exit code 0
接着我们查看下面代码:
 1 #AUTHOR:FAN
 2
 3 from multiprocessing import Process
 4 import os
 5
 6
 7 def info(title):
 8     print(title)
 9     print(\'module name:\', __name__)
10     print(\'parent process:\', os.getppid())
11     print(\'process id:\', os.getpid())
12     print("\\n\\n")
13
14
15 def f(name):
16     info(\'\\033[31;1mcalled from child process function f\\033[0m\')
17     print(\'hello\', name)
18
19 if __name__ == \'__main__\':
20     info(\'\\033[32;1mmain process line\\033[0m\')
运行结果如下:

 1 D:\\python35\\python.exe D:/python培训/s14/day10/获取进程id.py
 2 main process line
 3 module name: __main__
 4 parent process: 8368
 5 process id: 7664
 6
 7
 8
 9
10 Process finished with exit code 0
我们这里可以看到父进程id:8368,并且会发现无论程序运行多少次都是这个,然后我们在windows任务管理器查看发现这个是pycharm的进程id,如下图:
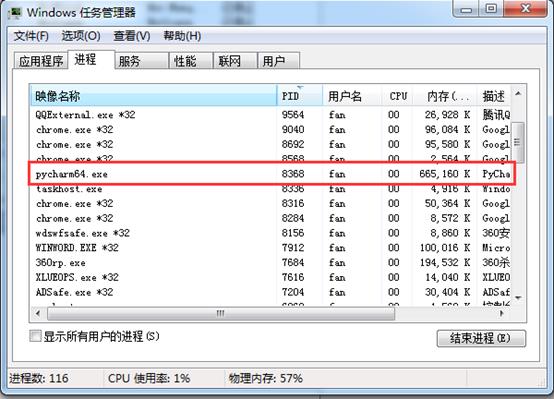
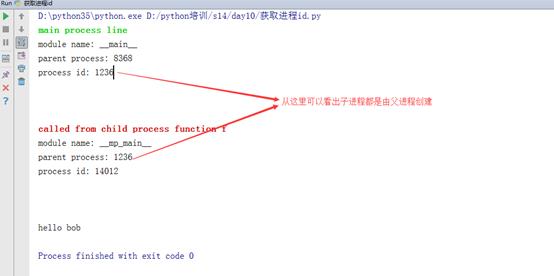
这里要记住:每一个子进程都是由父进程启动的
我们将上面代码中if __name__=”__main__”进行修改,如下:
1 if __name__ == \'__main__\':
2     info(\'\\033[32;1mmain process line\\033[0m\')
3     p = Process(target=f, args=(\'bob\',))
4     p.start()
运行结果如下:
进程间数据的交互,实现方法
通过Queues和Pipe可以实现进程间数据的传递,但是不能实现数据的共享
不同进程间内存不是共享的,要想实现两个进程间的数据交换,有一下方法:
Queues
使用方法和threading里的queue使用差不多
先回忆一下线程之间的数据共享,通过下面代码理解:
 1 #AUTHOR:FAN
 2 import threading
 3 import queue
 4
 5 def func():
 6     q.put([22,"dean",\'hello\'])
 7
 8 if __name__=="__main__":
 9     q = queue.Queue()
10     t = threading.Thread(target=func)
11     t.start()
12     print(q.get(q))
运行结果:

1 D:\\python35\\python.exe D:/python培训/s14/day10/线程之间数据的共享.py
2 [22, \'dean\', \'hello\']
3
4 Process finished with exit code 0
从上述代码可以看出线程之间的数据是共享的:父线程可以访问子线程放入的数据
如果是多进程之间呢?
将代码进行修改如下,让子进程调用父进程数据:
 1 from multiprocessing import Process
 2 import queue
 3
 4
 5
 6 def f():
 7     q.put([11,None,"hello"])
 8
 9
10 if __name__=="__main__":
11     q = queue.Queue()
12     p = Process(target=f)
13     p.start()
14     print(q.get())
运行结果如下:
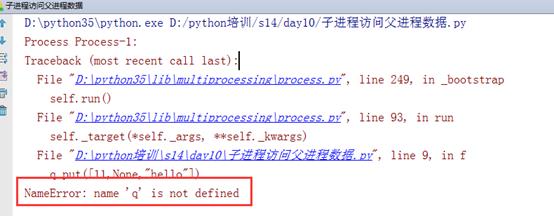
从这里我们也可以看出子进程是访问不到父进程的数据
我们再次将代码进行修改,写f方法的时候直接将q给线程传入,也就是,只有启动线程,就自动传入线程q,代码如下:
 1 #AUTHOR:FAN
 2
 3 from multiprocessing import Process
 4 import queue
 5
 6
 7 def f(data):
 8     data.put([11,None,"hello"])
 9
10 if __name__=="__main__":
11     q = queue.Queue()   #切记这里是线程q
12     p = Process(target=f,args=(q,))
13     p.start()
14     print(q.get())
运行结果如下:
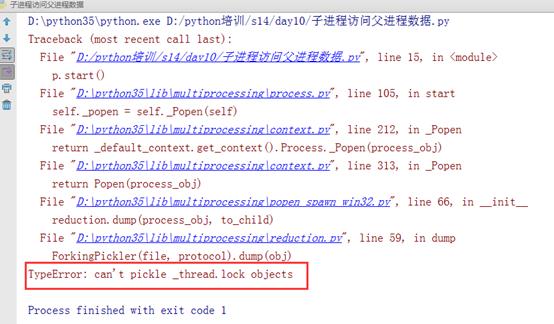
这里我们需要知道:进程不能访问线程q
所以我们需要改成进程,代码如下:
 1 #AUTHOR:FAN
 2
 3 from multiprocessing import Process,Queue
 4
 5
 6 def f(data):
 7     data.put([11,None,"hello"])
 8
 9 if __name__=="__main__":
10     q = Queue()    这里的q是进程q
11     p = Process(target=f,args=(q,))
12     p.start()
13     print(q.get())
运行结果如下:

1 D:\\python35\\python.exe D:/python培训/s14/day10/子进程访问父进程数据.py
2 [11, None, \'hello\']
3
4 Process finished with exit code 0
这次我们就发现在父进程里就可以调用到子进程放入的数据
这里我们需要明白:这里的q其实是被克隆了一个q,然后将子线程序列化的内容传入的克隆q,然后再反序列化给q,从而实现了进程之间数据的传递
Pipe
实现代码例子:
 1 #AUTHOR:FAN
 2
 3 from multiprocessing import Process,Pipe
 4
 5 def f(conn):
 6     conn.send([22,None,"hello from child"])
 7     conn.send([22,None,"hello from child2"])
 8     print(conn.recv())
 9     conn.close()
10
11 if __name__=="__main__":
12     left_conn,right_conn = Pipe()
13     p = Process(target=f,args=(right_conn,))
14     p.start()
15     print(left_conn.recv())
16     print(left_conn.recv())
17     left_conn.send("我是left_conn")
运行结果如下:

1 D:\\python35\\python.exe D:/python培训/s14/day10/通过pipes实现进程间数据传递.py
2 [22, None, \'hello from child\']
3 [22, None, \'hello from child2\']
4 我是left_conn
5
6 Process finished with exit code 0
对上面代码分析:pip()会生成两个值,上面的left_conn和right_conn,这就如同一条网线的两头,两头都可以发送和接收数据
通过Manager可以不同进程间实现数据的共享
通过下面代码进行理解:
 1 #AUTHOR:FAN
 2 from multiprocessing import Manager,Process
 3 import os
 4
 5 def f(d,l):
 6     d[1]="1"
 7     d["2"] = 2
 8     d[0.25] = None
 9     l.append(os.getpid())
10     print(l)
11
12 if __name__ == "__main__":
13     with Manager() as manager:  #这种方式和直接manager=Manager()一样
14         d = manager.dict()  #生成一个字典,可以在多个进程间共享
15         l = manager.list(range(5))  #生成一个列表,可以在多个进程间共享
16         p_list = []
17         for i in range(10):
18             p = Process(target=f,args=(d,l))
19             p.start()
20             p_list.append(p)
21         for res in p_list:
22             res.join()
23
24         print(d)
25         print(l)
运行结果如下:

 1 D:\\python35\\python.exe D:/python培训/s14/day10/Manager实现进程间数据的共享.py
 2 [0, 1, 2, 3, 4, 9756]
 3 [0, 1, 2, 3, 4, 9756, 3352]
 4 [0, 1, 2, 3, 4, 9756, 3352, 9220]
 5 [0, 1, 2, 3, 4, 9756, 3352, 9220, 9736]
 6 [0, 1, 2, 3, 4, 9756, 3352, 9220, 9736, 9724]
 7 [0, 1, 2, 3, 4, 9756, 3352, 9220, 9736, 9724, 9860]
 8 [0, 1, 2, 3, 4, 9756, 3352, 9220, 9736, 9724, 9860, 7084]
 9 [0, 1, 2, 3, 4, 9756, 3352, 9220, 9736, 9724, 9860, 7084, 7452]
10 [0, 1, 2, 3, 4, 9756, 3352, 9220, 9736, 9724, 9860, 7084, 7452, 7376]
11 [0, 1, 2, 3, 4, 9756, 3352, 9220, 9736, 9724, 9860, 7084, 7452, 7376, 9952]
12 {0.25: None, 1: \'1\', \'2\': 2}
13 [0, 1, 2, 3, 4, 9756, 3352, 9220, 9736, 9724, 9860, 7084, 7452, 7376, 9952]
14
15 Process finished with exit code 0
通过结果可以看出已经实现了不同进程间数据的共享
进程同步,即进程锁
 1 #AUTHOR:FAN
 2 from multiprocessing import Process, Lock
 3
 4
 5 def f(l, i):
 6     l.acquire()
 7     print(\'hello world\', i)
 8     l.release()
 9
10 if __name__ == \'__main__\':
11     lock = Lock()
12     for num in range(10):
13         Process(target=f, args=(lock, num)).start()
打印结果如下:

 1 D:\\python35\\python.exe D:/python培训/s14/day10/进程锁.py
 2 hello world 3
 3 hello world 2
 4 hello world 1
 5 hello world 0
 6 hello world 7
 7 hello world 6
 8 hello world 4
 9 hello world 5
10 hello world 9
11 hello world 8
12
13 Process finished with exit code 0
可能会觉得这个加锁没有上面作用,其实是这样的,当在屏幕上打印这些内容的时候,不同进程之间是共享这个屏幕的,锁的作用在于当一个进程开始打印的时候,其他线程不能打印,从而防止打印乱内容
在windows上可能看不到效果,当不同进程打印的东西比较多的时候,就可以看到打印数据出现乱的情况
进程池
进程池内部维护一个进程序列,当使用时,则去进程池中获取一个进程,如果进程池序列中没有可供使用的进进程,那么程序就会等待,直到进程池中有可用进程为止。
进程池中有两个方法:
apply
apply_async(这个就表示异步)
从下面代码一点一点分析
 1 #AUTHOR:FAN
 2
 3 from  multiprocessing import Process, Pool
 4 import time
 5 import os
 6
 7
 8 def Foo(i):
 9     time.sleep(2)
10     print("in the process",os.getpid())
11     return i + 100
12
13
14 def Bar(arg):
15     print(\'-->exec done:\', arg)
16
17 if __name__ == "__main__":
18     pool = Pool(5)
19
20     for i in range(10):
21         pool.apply(func=Foo, args=(i,))
22     print(\'end\')
23     pool.close()
24     pool.join()  # 进程池中进程执行完毕后再关闭,如果注释,那么程序直接关闭。
这样运行结果发现,程序变成了串行了。
将上述代码中的:
pool.apply(func=Foo, args=(i,))
替换为:
pool.apply_async(func=Foo,args=(i,))
之后就解决了之前的的问题
这个时候我们再次将
pool.apply_async(func=Foo,args=(i,))
替换为,这里的callback叫做回调函数
pool.apply_async(func=Foo, args=(i,), callback=Bar)
运行结果如下:

 1 D:\\python35\\python.exe D:/python培训/s14/day10/进程池.py
 2 end
 3 in the process 10876
 4 -->exec done: 100
 5 in the process 5084
 6 -->exec done: 101
 7 in the process 9648
 8 -->exec done: 102
 9 in the process 11028
10 -->exec done: 103
11 in the process 8528
12 -->exec done: 104
13 in the process 10876
14 -->exec done: 105
15 in the process 5084
16 -->exec done: 106
17 in the process 9648
18 -->exec done: 107
19 in the process 11028
20 -->exec done: 108
21 in the process 8528
22 -->exec done: 109
23
24 Process finished with exit code 0
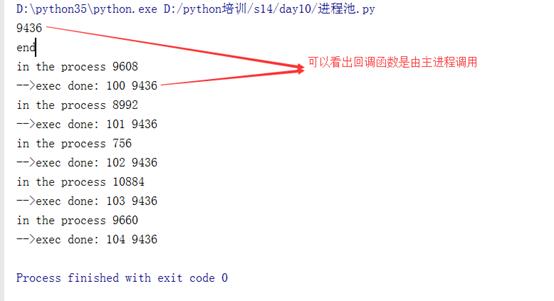
下面将代码进行修改,确定回调函数是由子进程还是主进程调用
 1 #AUTHOR:FAN
 2
 3 from  multiprocessing import Process, Pool
 4 import time
 5 import os
 6
 7
 8 def Foo(i):
 9     time.sleep(2)
10     print("in the process",os.getpid())
11     return i + 100
12
13
14 def Bar(arg):
15     print(\'-->exec done:\', arg,os.getpid())
16
17 if __name__ == "__main__":
18     pool = Pool(5)
19     print(os.getpid())
20     for i in range(5):
21         pool.apply_async(func=Foo, args=(i,), callback=Bar)
22         #pool.apply(func=Foo, args=(i,))
23         #pool.apply_async(func=Foo,args=(i,))
24
25     print(\'end\')
26     pool.close()
27     pool.join()  # 进程池中进程执行完毕后再关闭,如果注释,那么程序直接关闭。
运行结果如下,可以看出回调函数的pid和主进程是一样的
协程
协程,又称微线程,纤程。英文名Coroutine。一句话说明什么是线程:协程是一种用户态的轻量级线程。
协程拥有自己的寄存器上下文和栈。协程调度切换时,将寄存器上下文和栈保存到其他地方,在切回来的时候,恢复先前保存的寄存器上下文和栈。因此:
协程能保留上一次调用时的状态(即所有局部状态的一个特定组合),每次过程重入时,就相当于进入上一次调用的状态,换种说法:进入上一次离开时所处逻辑流的位置。
协程的好处:
无需线程上下文切换的开销
无需原子操作锁定及同步的开销
方便切换控制流,简化编程模型
高并发+高扩展性+低成本:一个CPU支持上万的协程都不是问题。所以很适合用于高并发处理。
缺点:
无法利用多核资源:协程的本质是个单线程,它不能同时将 单个CPU 的多个核用上,协程需要和进程配合才能运行在多CPU上.当然我们日常所编写的绝大部分应用都没有这个必要,除非是cpu密集型应用。
进行阻塞(Blocking)操作(如IO时)会阻塞掉整个程序
先用yield实现简单的协程
 1 #AUTHOR:FAN
 2
 3 import time
 4 import queue
 5
 6
 7 def consumer(name):
 8     print("--->starting eating baozi...")
 9     while True:
10         new_baozi = yield
11         print("[%s] is eating baozi %s" % (name, new_baozi))
12         time.sleep(1)
13 def producer():
14     r = con.__next__()
15     r = con2.__next__()
16     n = 0
17     while n < 5:
18         n += 1
19         con.send(n)
20         con2.send(n)
21         print("\\033[32;1m[producer]\\033[0m is making baozi %s" % n)
22 if __name__ == \'__main__\':
23     con = consumer("c1")
24     con2 = consumer("c2")
25     p = producer()
运行结果如下:
