LVS-DR模式 搭建过程详解
Posted
tags:
篇首语:本文由小常识网(cha138.com)小编为大家整理,主要介绍了LVS-DR模式 搭建过程详解相关的知识,希望对你有一定的参考价值。
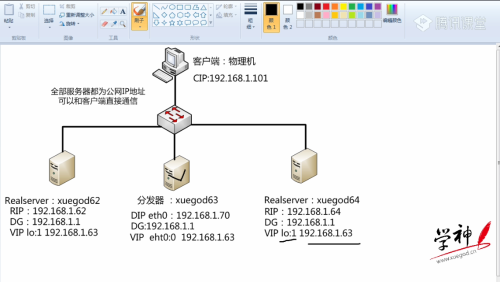
LVS-DR(director route)模式框架图:
说明:(图上IP地址有误,以下表为准)
分发器 | Realserver1 | Realserver2 |
DIP eth0 : 192.168.11.70 | RIP eth0 : 192.168.11.62 | RIP eth0 : 192.168.11.64 |
DG : 192.168.11.1 | DG : 192.168.11.1 | DG : 192.168.11.1 |
VIP eth0:1 192.168.11.63 | VIP lo:1 192.168.11.63 | VIP lo:1 192.168.11.63 |
一、配置分发器的网络环境
[[email protected] ~]# cd /etc/sysconfig/network-scripts/
[[email protected] network-scripts]# cat ifcfg-eth0
DEVICE=eth0
HWADDR=00:0c:29:db:62:b6
NM_CONTROLLED=yes
ONBOOT=yes
IPADDR=192.168.11.70
BOOTPROTO=none
NETMASK=255.255.255.0
DNS2=8.8.8.8
TYPE=Ethernet
GATEWAY=192.168.11.1
DNS1=192.168.11.1
IPV6INIT=no
USERCTL=no
[[email protected] network-scripts]# cp ifcfg-eth0 ifcfg-eth0:1
[[email protected] network-scripts]# vim ifcfg-eth0:1
[[email protected] network-scripts]# cat ifcfg-eth0:1
DEVICE=eth0:1
HWADDR=00:0c:29:db:62:b6
NM_CONTROLLED=yes
ONBOOT=yes
IPADDR=192.168.11.63
BOOTPROTO=none
NETMASK=255.255.255.0
IPV6INIT=no
USERCTL=no
[[email protected] network-scripts]# service NetworkManager stop
# 这里必须关闭NetworkManager 服务,否则eth0:1不出来
[[email protected] network-scripts]# service network restart
[[email protected] network-scripts]# ifconfig
eth0      Link encap:Ethernet  HWaddr 00:0C:29:DB:62:B6
          inet addr:192.168.11.70  Bcast:192.168.11.255  Mask:255.255.255.0
          inet6 addr: fe80::20c:29ff:fedb:62b6/64 Scope:Link
          UP BROADCAST RUNNING MULTICAST  MTU:1500  Metric:1
          RX packets:7657 errors:0 dropped:0 overruns:0 frame:0
          TX packets:5466 errors:0 dropped:0 overruns:0 carrier:0
          collisions:0 txqueuelen:1000
          RX bytes:3521642 (3.3 MiB)  TX bytes:540272 (527.6 KiB)
          Interrupt:19 Base address:0x2000

eth0:1    Link encap:Ethernet  HWaddr 00:0C:29:DB:62:B6
          inet addr:192.168.11.63  Bcast:192.168.11.255  Mask:255.255.255.0
          UP BROADCAST RUNNING MULTICAST  MTU:1500  Metric:1
          Interrupt:19 Base address:0x2000

lo        Link encap:Local Loopback
          inet addr:127.0.0.1  Mask:255.0.0.0
          inet6 addr: ::1/128 Scope:Host
          UP LOOPBACK RUNNING  MTU:16436  Metric:1
          RX packets:16 errors:0 dropped:0 overruns:0 frame:0
          TX packets:16 errors:0 dropped:0 overruns:0 carrier:0
          collisions:0 txqueuelen:0
          RX bytes:960 (960.0 b)  TX bytes:960 (960.0 b)
二、配置LVS-DR的规则(首先安装 ipvsadm)
[[email protected] ~]# rpm -ivh /mnt/Packages/ipvsadm-1.25-9.el6.x86_64.rpm
[[email protected] ~]# rpm -qa | grep ipvsadm
ipvsadm-1.25-9.el6.x86_64
[[email protected] ~]# ipvsadm -A -t 192.168.11.63:80 -s rr
[[email protected] ~]# ipvsadm -a -t 192.168.11.63:80 -r 192.168.11.62 -g
[[email protected] ~]# ipvsadm -a -t 192.168.11.63:80 -r 192.168.11.64 -g
# -g DR模式  -m NAT模式 -i IPtun模式
[[email protected] ~]# ipvsadm -L -n
IP Virtual Server version 1.2.1 (size=4096)
Prot LocalAddress:Port Scheduler Flags
  -> RemoteAddress:Port           Forward Weight ActiveConn InActConn
TCP  192.168.11.63:80 rr
  -> 192.168.11.62:80             Route   1      0          0
  -> 192.168.11.64:80             Route   1      0          0
三、真实机(192.168.11.62)上配置
1) 安装httpd 服务,并开启
[[email protected] ~]# yum install -y httpd
[[email protected] ~]# echo 192.168.11.62 >  /var/www/html/index.html
[[email protected] ~]# /etc/init.d/httpd start
正在启动 httpd:                                           [确定]
[[email protected] ~]# netstat -tunpl | grep 80
tcp        0      0 :::80           :::*         LISTEN      4245/httpd
2)配置网络环境
[[email protected] ~]# cd /etc/sysconfig/network-scripts/
[[email protected] network-scripts]# cp ifcfg-lo ifcfg-lo:1
[[email protected] network-scripts]# vim ifcfg-lo:1
[[email protected] network-scripts]# cat ifcfg-lo:1
DEVICE=lo:1
IPADDR=192.168.11.63
NETMASK=255.255.255.255
# If you‘re having problems with gated making 127.0.0.0/8 a martian,
# you can change this to something else (255.255.255.255, for example)
ONBOOT=yes
NAME=loopback
[[email protected] network-scripts]# service NetworkManager stop
[[email protected] network-scripts]# service network restart
[[email protected] network-scripts]# ifconfig
eth0      Link encap:Ethernet  HWaddr 00:0C:29:9D:0C:1E
          inet addr:192.168.11.62  Bcast:192.168.11.255  Mask:255.255.255.0
          inet6 addr: fe80::20c:29ff:fe9d:c1e/64 Scope:Link
          UP BROADCAST RUNNING MULTICAST  MTU:1500  Metric:1
          RX packets:8515 errors:0 dropped:0 overruns:0 frame:0
          TX packets:5649 errors:0 dropped:0 overruns:0 carrier:0
          collisions:0 txqueuelen:1000
          RX bytes:6454017 (6.1 MiB)  TX bytes:514102 (502.0 KiB)
          Interrupt:19 Base address:0x2000

lo        Link encap:Local Loopback
          inet addr:127.0.0.1  Mask:255.0.0.0
          inet6 addr: ::1/128 Scope:Host
          UP LOOPBACK RUNNING  MTU:16436  Metric:1
          RX packets:16 errors:0 dropped:0 overruns:0 frame:0
          TX packets:16 errors:0 dropped:0 overruns:0 carrier:0
          collisions:0 txqueuelen:0
          RX bytes:960 (960.0 b)  TX bytes:960 (960.0 b)

lo:1      Link encap:Local Loopback
          inet addr:192.168.11.63  Mask:255.255.255.255
          UP LOOPBACK RUNNING  MTU:16436  Metric:1
3)关闭ARP包转发
[[email protected] ~]# vim /etc/sysctl.conf     #文件末尾加上如下两行
net.ipv4.conf.eth0.arp_ignore = 1
net.ipv4.conf.eth0.arp_announce = 2
[[email protected] ~]# sysctl -p
或者
[[email protected] ~]# echo 1 > /proc/sys/net/ipv4/conf/eth0/arp_ignore
[[email protected] ~]# echo 2 > /proc/sys/net/ipv4/conf/eth0/arp_announce
四、测试
在客户机(实体机)浏览器中测试,不要在分发器机器上测试。效果如下:
-------------------------------------------------------------------------------------

在分发器上查看链接数据状态
[[email protected] network-scripts]# ipvsadm -L -n --stats
IP Virtual Server version 1.2.1 (size=4096)
Prot LocalAddress:Port               Conns   InPkts  OutPkts  InBytes OutBytes
  -> RemoteAddress:Port
TCP  192.168.11.63:80                   35      173        0    23145        0
  -> 192.168.11.62:80                   17       85        0    11709        0
  -> 192.168.11.64:80                   18       88        0    11436        0
至此,LVS-DR模式就搭建成功!
更多ipvsadm命令的用法,请见我另外一篇博文‘ipvsadm命令的用法’
http://autophp.blog.51cto.com/8062337/1858071
本文出自 “dongdongのhome” 博客,请务必保留此出处http://autophp.blog.51cto.com/8062337/1858104
以上是关于LVS-DR模式 搭建过程详解的主要内容,如果未能解决你的问题,请参考以下文章

