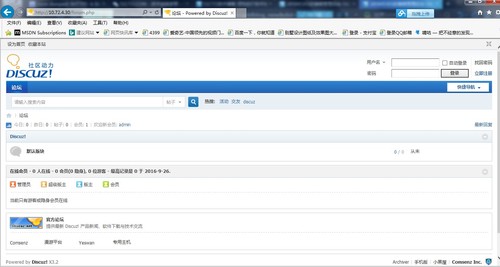
LAMP 之四 Discuz 论坛搭建(实例)
Posted
tags:
篇首语:本文由小常识网(cha138.com)小编为大家整理,主要介绍了LAMP 之四 Discuz 论坛搭建(实例)相关的知识,希望对你有一定的参考价值。
创建一个存放Dizcuz 的根目录
[[email protected] ~]# mkdir /data/www
[[email protected] ~]# cd /data/www/
[[email protected] www]# wget http://download.comsenz.com/DiscuzX/3.2/Discuz_X3.2_SC_GBK.zip
[[email protected] www]# unzip Discuz_X3.2_SC_GBK.zip
解压完之后生成三个目录
[[email protected] www]# ls
Discuz_X3.2_SC_GBK.zip readme upload utility
但是程序目录是在 upload 下,所以把upload 文件全部移出来
[[email protected] www]# mv upload/* ./
[[email protected] www]# ls
admin.php connect.php favicon.ico install readme template utility
api cp.php forum.php member.php robots.txt uc_client
api.php crossdomain.xml group.php misc.php search.php uc_server
archiver data home.php plugin.php source upload
config Discuz_X3.2_SC_GBK.zip index.php portal.php static userapp.php
删除目录下所有的文件
[[email protected] www]# rm -rf readme/ utility/ upload/ Discuz_X3.2_SC_GBK.zip
虚拟机的配置文件在
[[email protected] www]# vim /usr/local/apache2/conf/httpd.conf
打开虚拟主机的开关
#Include conf/extra/httpd-vhosts.conf(去掉前面的#号)
打开虚可拟主机以后,进入到虚拟主机的配置文件
[[email protected] www]# vim /usr/local/apache2/conf/extra/httpd-vhosts.conf
看到以下配置文件。删除掉最下的一个样例。
# Use name-based virtual hosting.
#
NameVirtualHost *:80
#
# VirtualHost example:
# Almost any Apache directive may go into a VirtualHost container.
# The first VirtualHost section is used for all requests that do not
# match a ServerName or ServerAlias in any <VirtualHost> block.
#
<VirtualHost *:80>
ServerAdmin [email protected] #管理员的邮箱
DocumentRoot "/usr/local/apache2/docs/dummy-host.example.com #创建的/data/www目录"
ServerName dummy-host.example.com #可以自已写
ServerAlias www.dummy-host.example.com # 网站的别名
ErrorLog "logs/dummy-host.example.com-error_log"# 错误日志
CustomLog "logs/dummy-host.example.com-access_log" common # 访问日志
</VirtualHost>
<VirtualHost *:80>
ServerAdmin [email protected]
DocumentRoot "/usr/local/apache2/docs/dummy-host2.example.com"
ServerName dummy-host2.example.com
ErrorLog "logs/dummy-host2.example.com-error_log"
CustomLog "logs/dummy-host2.example.com-access_log" common
</VirtualHost>
配置虚拟主机。删除最下面一个样例。配置如下
# Use name-based virtual hosting.
#
NameVirtualHost *:80
#
# VirtualHost example:
# Almost any Apache directive may go into a VirtualHost container.
# The first VirtualHost section is used for all requests that do not
# match a ServerName or ServerAlias in any <VirtualHost> block.
#
<VirtualHost *:80>
DocumentRoot "/data/www"
ServerName www.test.com
ServerAlias www.aaa.com
# ErrorLog "logs/dummy-host.example.com-error_log" #注释掉
# CustomLog "logs/dummy-host.example.com-access_log" common #注释掉
</VirtualHost>
配置完成后,检测配置有没有错误
[[email protected] www]# /usr/local/apache2/bin/apachectl -t
httpd: apr_sockaddr_info_get() failed for OBird
httpd: Could not reliably determine the server‘s fully qualified domain name, using 127.0.0.1 for ServerName
Syntax OK
此处报错了,是因为没有定义 ServerName
[[email protected] www]# vim /usr/local/apache2/conf/httpd.conf
编辑配置文件定义ServerName
#ServerName www.example.com:80 去掉前面的 # 。
[[email protected] www]# /usr/local/apache2/bin/apachectl -t
Syntax OK
再检测就不会报错了。
此时就可访问Discuz 了,在访问之前需要先配置一下 hosts
在本地主机 C:\Windows\System32\drivers\etc 目录下写入
192.168.31.xxx www.test.com
此时通过网页来访问,是无法访问该网页的,因为80 端口还没有启动。启动以后还是不能访问
发现是配置文件的问题
[[email protected] www]# cat /etc/hosts
127.0.0.1 localhost localhost.localdomain localhost4 localhost4.localdomain4
::1 localhost localhost.localdomain localhost6 localhost6.localdomain6
#192.168.1.1 www.qq.com
192.168.31.170 www.test.com #在/etc/hosts 文件中写入
[[email protected] www]# vim /usr/local/apache2/conf/httpd.conf
<Directory />
Options FollowSymLinks
AllowOverride None
Order deny,allow
Allow from all # 加入这一行,允许所有访问
# Deny from all #注释或是删除此行
此处遇到一些问题请在另一篇博客里查找
###########################################################################################
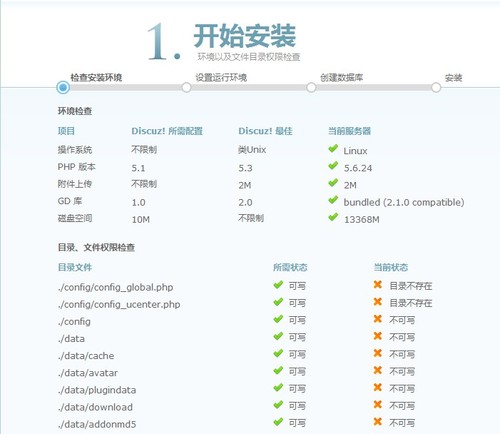
在IE 内输入 IP 地址访问,会出现一个Discuz的安装界面。
解决掉那些目录不可写的报错
首先我们要查看httpd 的进程是以哪个用户身份来运行的
httpd 当前是以daemon 用户的身份在运行
[email protected] www]# ls -l
total 116
-rw-r--r-- 1 root root 2739 May 31 11:08 admin.php
drwxr-xr-x 11 root root 4096 May 31 11:08 api
-rw-r--r-- 1 root root 727 May 31 11:08 api.php
drwxr-xr-x 2 root root 4096 May 31 11:08 archiver
drwxr-xr-x 2 root root 4096 May 31 11:08 config
-rw-r--r-- 1 root root 922 May 31 11:08 connect.php
-rw-r--r-- 1 root root 253 May 31 11:08 cp.php
-rw-r--r-- 1 root root 106 May 31 11:08 crossdomain.xml
drwxr-xr-x 13 root root 4096 May 31 11:08 data
-rw-r--r-- 1 root root 5558 May 31 11:08 favicon.ico
-rw-r--r-- 1 root root 2242 May 31 11:08 forum.php
-rw-r--r-- 1 root root 821 May 31 11:08 group.php
-rw-r--r-- 1 root root 1290 May 31 11:08 home.php
-rw-r--r-- 1 root root 5669 May 31 11:08 index.php
drwxr-xr-x 5 root root 4096 May 31 11:08 install
-rw-r--r-- 1 root root 1025 May 31 11:08 member.php
-rw-r--r-- 1 root root 2462 May 31 11:08 misc.php
-rw-r--r-- 1 root root 1757 May 31 11:08 plugin.php
设置可写目录权限,然后再刷新安装界面
[[email protected] www]# chown -R daemon config data uc_client/data uc_server/data
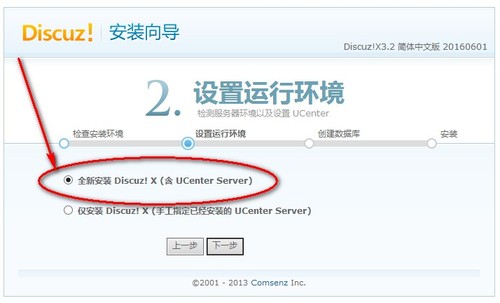
下一步,选择全新安装
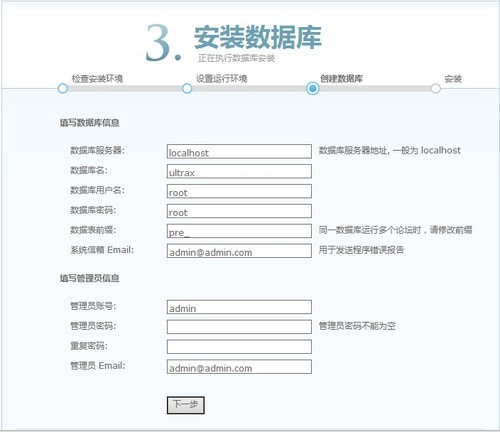
下一步是与mysql 相关的数据
接下来是设置 mysql,我们每次用自已安装的myqls
需要输入 /usr/local/mysql/bin/mysql,而不能直接输入mysql ,
那么我们就需更改 PATH
[[email protected] www]# which mysql (mysql不是/usr/local/mysql/bin/mysql,注意区分)
/usr/bin/mysql (系统自带的mysql)
用以下命令查找到系统自带的mysql,然后卸载。因为楼主已经卸载过,所以没有截图。
[[email protected] www]# rpm -qf /usr/local/mysql
file /usr/local/mysql is not owned by any package
编写一个path.sh 的脚本
[[email protected] www]# vim /etc/profile.d/path.sh
#!/bin/bash
export PATH=$PATH:/usr/local/mysql/bin
[[email protected] www]# source /etc/profile.d/path.sh
然后就可以使用了。
首先创建一个库
[[email protected] ~]# mysql
Welcome to the MySQL monitor. Commands end with ; or \g.
Your MySQL connection id is 6
Server version: 5.1.73-log Source distribution
Copyright (c) 2000, 2013, Oracle and/or its affiliates. All rights reserved.
Oracle is a registered trademark of Oracle Corporation and/or its
affiliates. Other names may be trademarks of their respective
owners.
Type ‘help;‘ or ‘\h‘ for help. Type ‘\c‘ to clear the current input statement.
mysql> create database discuz;
Query OK, 1 row affected (0.00 sec)
mysql> grant all on discuz.* to ‘aming‘@‘localhost‘ identified by ‘aminglinux‘;
Query OK, 0 rows affected (0.00 sec
all 是所有的权限。 discuz.* 表示discuz 里所有的表。identified by ‘aminglinux‘;这是密码。
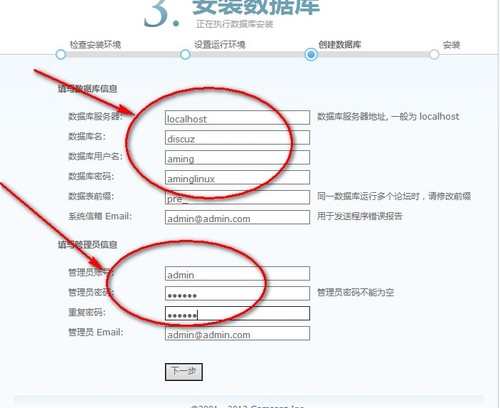
数据库信息: localhost ,discuz ,aming, aminglinux ,剩下的黙认。
管理员信息:admin / ps :123456
至此 Discuz 安装完成。
本文出自 “CBO#Boy_Linux之路” 博客,请务必保留此出处http://20151213start.blog.51cto.com/9472657/1856791
以上是关于LAMP 之四 Discuz 论坛搭建(实例)的主要内容,如果未能解决你的问题,请参考以下文章

