cocoa pods 安装 转载
Posted
tags:
篇首语:本文由小常识网(cha138.com)小编为大家整理,主要介绍了cocoa pods 安装 转载相关的知识,希望对你有一定的参考价值。
1.打开终端
终端输入 $ruby -v 查看ruby的版本
打印代码:
ruby 2.0.0p648 (2015-12-16 revision 53162) [universal.x86_64-darwin15]
2. 更换ruby镜像
终端输入如下命令(把Ruby镜像指向taobao,避免被墙,你懂得)
a.移除现有 Ruby 默认源输入以下指令
$gem sources --remove https://rubygems.org/
b.使用新的源输入以下指令
$gem sources -a https://ruby.taobao.org/
c.验证新源是否替换成功输入以下指令
$gem sources -l (用来检查使用替换镜像位置成功)
打印代码:
bogon:~ LiuWenqiang$ gem sources --remove https://rubygems.org/
source https://rubygems.org/ not present in cache
bogon:~ LiuWenqiang$ gem sources -a https://ruby.taobao.org/
source https://ruby.taobao.org/ already present in the cache
bogon:~ LiuWenqiang$ gem sources -l
*** CURRENT SOURCES ***
3.安装cocoapods
终端 $sudo gem install cocoa pods
这就遇到我的第一个问题:
如果你的ruby 版本过低 就会报错:
ERROR:  Error installing cocoa:
    activesupport requires Ruby version >= 2.2.2.
ERROR:  Error installing pods:
    activesupport requires Ruby version >= 2.2.2.
前几天,我就搞到这个地方,尝试了好几种方法更新ruby 但是都没有成功,今天偶然看到一个文章,(有种淡淡的忧伤:http://www.jianshu.com/p/ad98a3364803
)并得到作者的帮助,才得以解决
解决方案:
(1)安装 RVM baby 版本管理器
$curl -L get.rvm.io | bash -s stable
打印代码:
In case of problems: https://rvm.io/help and https://twitter.com/rvm_io
说明安装成功
(2)
$ source ~/.bashrc
$source ~/.bash_profile
$rvm -v
打印代码:
rvm 1.27.0 (latest) by Wayne E. Seguin <[email protected]>, Michal Papis <[email protected]> [https://rvm.io/]
(3)用RVM升级Ruby查看当前ruby版本
$ruby -v
$rvm list known
打印代码:
# MRI Rubies
[ruby-]1.8.6[-p420]
[ruby-]1.8.7[-head] # security released on head
[ruby-]1.9.1[-p431]
[ruby-]1.9.2[-p330]
[ruby-]1.9.3[-p551]
[ruby-]2.0.0[-p648]
[ruby-]2.1[.8]
[ruby-]2.2[.4]
[ruby-]2.3[.0]
[ruby-]2.2-head
ruby-head

# for forks use: rvm install ruby-head-<name> --url https://github.com/github/ruby.git --branch 2.2

# JRuby
jruby-1.6[.8]
jruby-1.7[.23]
jruby[-9.0.5.0]
jruby-head

# Rubinius
rbx-1[.4.3]
rbx-2.3[.0]
rbx-2.4[.1]
rbx[-2.5.8]
rbx-head
(4)安装ruby 2.2.2 版本
$rvm install 2.2.2
如果打印:
……  ruby-2.2.2 - #validate archive
    ruby-2.2.2 - #extract
    ruby-2.2.2 - #validate binary
    ruby-2.2.2 - #setup
    ruby-2.2.2 - #gemset created /Users/abc/.rvm/gems/[email protected]
    ruby-2.2.2 - #importing gemset
   /Users/abc/.rvm/gemsets/global.gems..............................
    ruby-2.2.2 - #generating global wrappers........
    ruby-2.2.2 - #gemset created /Users/abc/.rvm/gems/ruby-2.2.2
    ruby-2.2.2 - #importing gemsetfile /Users/abc/.rvm/gemsets/default.gems
   evaluated to empty gem list
    ruby-2.2.2 - #generating default wrappers........
    Updating certificates in ‘/etc/openssl/cert.pem‘.
    mkdir: /etc/openssl: Permission denied
    mkdir -p "/etc/openssl" failed, retrying with sudo
    LiuWenqiang password required for ‘mkdir -p /etc/openssl‘:
    and sudo mkdir worked
则说明安装成功了
打印代码:
Done with Command Line Tools (OS X 10.11) for Xcode
Done.
==> /usr/bin/sudo /bin/rm -f /tmp/.com.apple.dt.CommandLineTools.installondemand.in-progress
==> Installing the Command Line Tools (expect a GUI popup):
==> /usr/bin/sudo /usr/bin/xcode-select --install
xcode-select: error: command line tools are already installed, use "Software Update" to install updates
Failed during: /usr/bin/sudo /usr/bin/xcode-select --install
Requirements installation failed with status: 1.
如果安装失败
第二个问题:
解决方案:
$ sudo xcode-select --switch /Library/Developer/CommandLineTools/
Password: (输入电脑权限密码)
$ git
usage: git [--version] [--help] [-C <path>] [-c name=value]

[--exec-path[=<path>]] [--html-path] [--man-path] [--info-path]

[-p | --paginate | --no-pager] [--no-replace-objects] [--bare]

[--git-dir=<path>] [--work-tree=<path>] [--namespace=<name>]

<command> [<args>]
第二个问题就解决了
然后再重新执行:安装2.2.2版本 步骤 就可以解决
(5)查看当前ruby 版本
$ruby -v
ruby 2.2.2p95 (2015-04-13 revision 50295) [x86_64-darwin14]
现在ruby版本已经是2.2.2了
第一个问题就解决了
4. 继续安装 CocoaPods
$sudo gem install cocoa pods
$sudo gem install -n /usr/local/bin cocoapods
$pod setup
5. 更新 gem
$sudo gem update --system
6. 新建一个项目,名字PodTest

7. $ cd 项目路径 (中间有空格,)
cd /Users/lucky/Desktop/PodTest
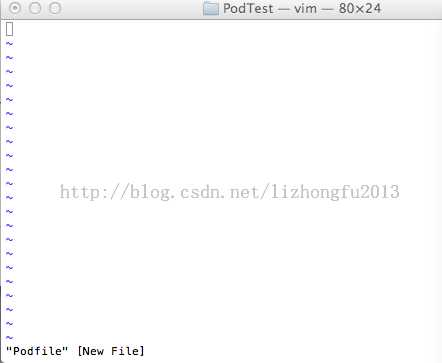
8. 建立Podfile(配置文件)
$vim Podfile

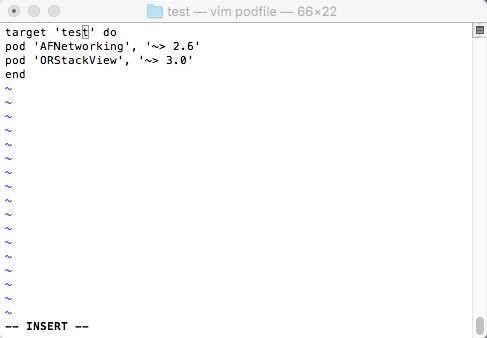
键盘输入 i 进入编辑模式,输入
platform :ios, ‘7.0‘
pod ‘MBProgressHUD‘, ‘~> 0.8’ (之前的,我的电脑上已经无效了,报错: [!] The dependency `MBProgressHUD (~> 0.8)` is not used in any concrete target.)
(现在使用:MyApp 替换成自己的项目名)
target ‘MyApp‘ do
pod ‘AFNetworking‘, ‘~> 2.6‘
pod ‘ORStackView‘, ‘~> 3.0‘
end

然后按Esc,并且输入“ :”号进入vim命令模式,然后在冒号后边输入wq
再输入 $pod install
注意:现在打开项目不是点击 PodTest.xodeproj了,而是点击 PodTest.xcworkspace
为了确定AFNetworking是否支持CocoaPods,可以用CocoaPods的搜索功能验证一下。在终端中输入:
$ pod search AFNetworking
(文中的$ 符号 是表示在终端输入的意思,符号本身不用添加终端)
参考资料来源:(谢谢这些作者)
http://blog.csdn.net/showhilllee/article/details/38398119
http://blog.csdn.net/zhaojinqiang12/article/details/51682191
以上是关于cocoa pods 安装 转载的主要内容,如果未能解决你的问题,请参考以下文章
