5分钟 搞定UIButton的文本与图片的布局
Posted brave-sailor
tags:
篇首语:本文由小常识网(cha138.com)小编为大家整理,主要介绍了5分钟 搞定UIButton的文本与图片的布局相关的知识,希望对你有一定的参考价值。
UIButton内部文本和图片的布局是我们日常代码中,不可缺少的部分,按钮默认左边图片右边文本,那要实现左边文本,右边图片,我们该怎么解决呢,上面图片,下面文本又该怎么办呢
其实很简单,今天总结下,目前主要用两种方式,一种就是重写按钮,另一种就是通过setTitleEdgeInsets和setImageEdgeInsets方法解决
下图是按钮默认情况下的图文布局

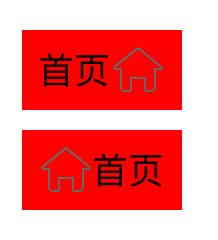
左边文本,右边图片
首先介绍重写按钮吧,新建一个按钮继承UIButton,
- (void)layoutSubviews
{    [super layoutSubviews];
     CGRect imageRect = self.imageView.frame;
     imageRect.size = CGSizeMake(30, 30);
     imageRect.origin.x = (self.frame.size.width - 30) ;
     imageRect.origin.y = (self.frame.size.height  - 30)/2.0f;
     CGRect titleRect = self.titleLabel.frame;
     titleRect.origin.x = (self.frame.size.width - imageRect.size.width- titleRect.size.width);
     titleRect.origin.y = (self.frame.size.height - titleRect.size.height)/2.0f;
     self.imageView.frame = imageRect;    self.titleLabel.frame = titleRect;

}
效果如下:

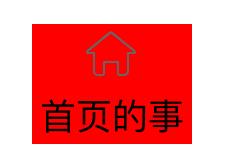
上面图片,下面文本
同样用重写按钮的方法
- (void)layoutSubviews{
    [super layoutSubviews];    CGRect imageRect = self.imageView.frame;

    imageRect.size = CGSizeMake(30, 30);
    imageRect.origin.x = (self.frame.size.width - 30) * 0.5;
    imageRect.origin.y = self.frame.size.height * 0.5 - 40;    CGRect titleRect = self.titleLabel.frame;

    titleRect.origin.x = (self.frame.size.width - titleRect.size.width) * 0.5;

    titleRect.origin.y = self.frame.size.height * 0.5 ;    self.imageView.frame = imageRect;    self.titleLabel.frame = titleRect;
}
效果如下:
; [btn1 setImage:[UIImage imageNamed:@"icon_shouye"] forState:UIControlStateNormal]; [btn1 setTitle:@"首页" forState:UIControlStateNormal]; [btn1 setTitleColor:[UIColor blackColor] forState:UIControlStateNormal]; btn1.backgroundColor = [UIColor redColor]; UIButton *btn = [UIButton buttonWithType:UIButtonTypeCustom]; btn.frame = CGRectMake(50, 50, 80, 40); [btn setImage:[UIImage imageNamed:@"icon_shouye"] forState:UIControlStateNormal]; [btn setTitle:@"首页" forState:UIControlStateNormal]; [btn setTitleColor:[UIColor blackColor] forState:UIControlStateNormal]; btn.backgroundColor = [UIColor redColor]; //上左下右 btn.imageEdgeInsets = UIEdgeInsetsMake(0, btn.frame.size.width - btn.imageView.frame.origin.x - btn.imageView.frame.size.width, 0, 0); btn.titleEdgeInsets = UIEdgeInsetsMake(0, -(btn.frame.size.width - btn.imageView.frame.size.width ), 0, 0); [self.view addSubview:btn1]; [self.view addSubview:btn];
完全颠倒的效果

上面图片下面文本
代码如下:
 UIButton *btn = [UIButton buttonWithType:UIButtonTypeCustom];
    btn.frame = CGRectMake(50, 50, 80, 60);
    [btn setImage:[UIImage imageNamed:@"icon_shouye"] forState:UIControlStateNormal];
    [btn setTitle:@"首页的事" forState:UIControlStateNormal];
    [btn setTitleColor:[UIColor blackColor] forState:UIControlStateNormal];
    btn.backgroundColor = [UIColor redColor];

    btn.imageEdgeInsets = UIEdgeInsetsMake(- (btn.frame.size.height - btn.titleLabel.frame.size.height- btn.titleLabel.frame.origin.y),(btn.frame.size.width -btn.titleLabel.frame.size.width)/2.0f -btn.imageView.frame.size.width, 0, 0);
    btn.titleEdgeInsets = UIEdgeInsetsMake(btn.frame.size.height-btn.imageView.frame.size.height-btn.imageView.frame.origin.y, -btn.imageView.frame.size.width, 0, 0);
    [self.view addSubview:btn];
效果图:

关于setTitleEdgeInsets和setImageEdgeInsets下面进行一些解释:
UIButton内有两个控件titleLabel和imageView,可以用来显示一个文本和图片,这里的图片区别于背景图片。给UIButton设置了title和image后,它们会图片在左边,文本在图片右边显示。它们两个做为一个整体依赖于button的contentHorizontalAlignment居左居右或居中显示。
显示格式区分:
1.当button.width < image.width时,只显示被压缩后的图片,图片是按照fillXY的方式压缩。
2.当button.width > image.width,且button.width < (image.width+text.width)时,图片正常显示,文本被压缩。
3.当button.width > (image.width+text.width)时,两者并列默认居中显示,可通过button的属性contentHorizontalAlignment改变对齐方式。
想改变两个子控件的显示位置,可以分别通过setTitleEdgeInsets和setImageEdgeInsets来实现。对titleLabel和imageView设置偏移是针对他当前的位置起作用的,并不是针对距离button边框的距离的。
typedefNS_ENUM(NSInteger, UIControlContentHorizontalAlignment) {
UIControlContentHorizontalAlignmentCenter =0,//居中
UIControlContentHorizontalAlignmentLeft =1,//居左
UIControlContentHorizontalAlignmentRight =2,//居右
UIControlContentHorizontalAlignmentFill =3,//
想两改变两个子控件的显示位置,可以分别通过setTitleEdgeInsets和setImageEdgeInsets来实现。需要注意的是,对titleLabel和imageView设置偏移,是针对它当前的位置起作用的,并不是针对它距离button边框的距离的。感觉设置不设置UIControlContentHorizontalAlignmentCenter居中都没有影响,这个网上也找了些相关的信息,感觉都没有说到重点,我这里也没有完全理解透彻,之前都是在设置setTitleEdgeInsets和setImageEdgeInsets这些参数时都是不停的尝试得到的结果。目前这是我理解后,代码实现最后的答案,希望可以帮到大家。
以上是关于5分钟 搞定UIButton的文本与图片的布局的主要内容,如果未能解决你的问题,请参考以下文章
将 UIButton 的 titleLabel 文本与自动布局匹配在固定的恒定宽度上
使用自动布局创建带有文本和图像的 iOS 7 UIButton