32.210内存的知识
Posted
tags:
篇首语:本文由小常识网(cha138.com)小编为大家整理,主要介绍了32.210内存的知识相关的知识,希望对你有一定的参考价值。
32.210内存的知识
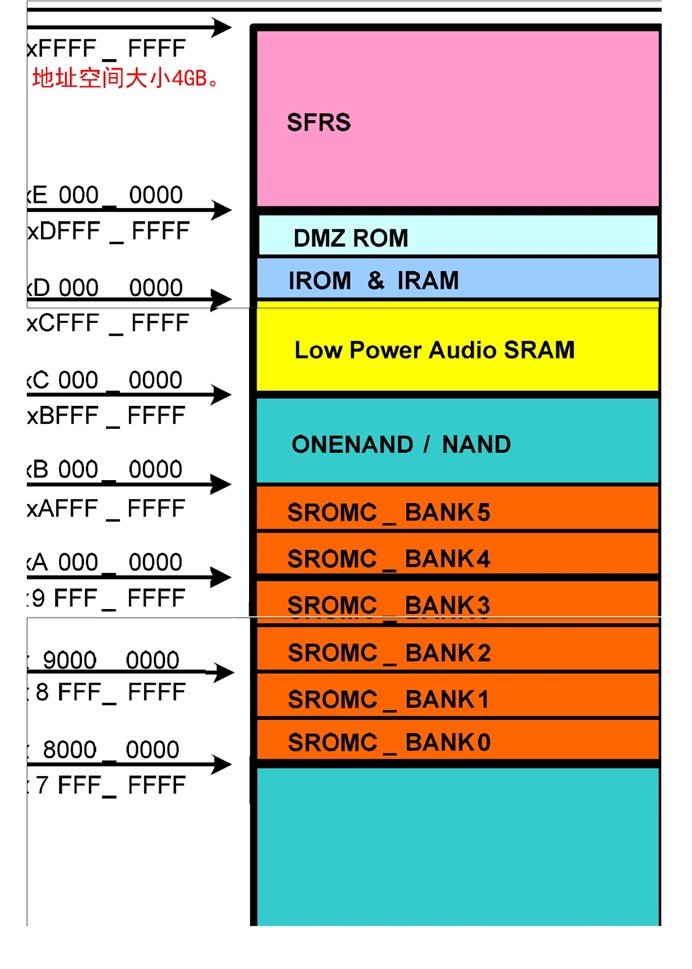
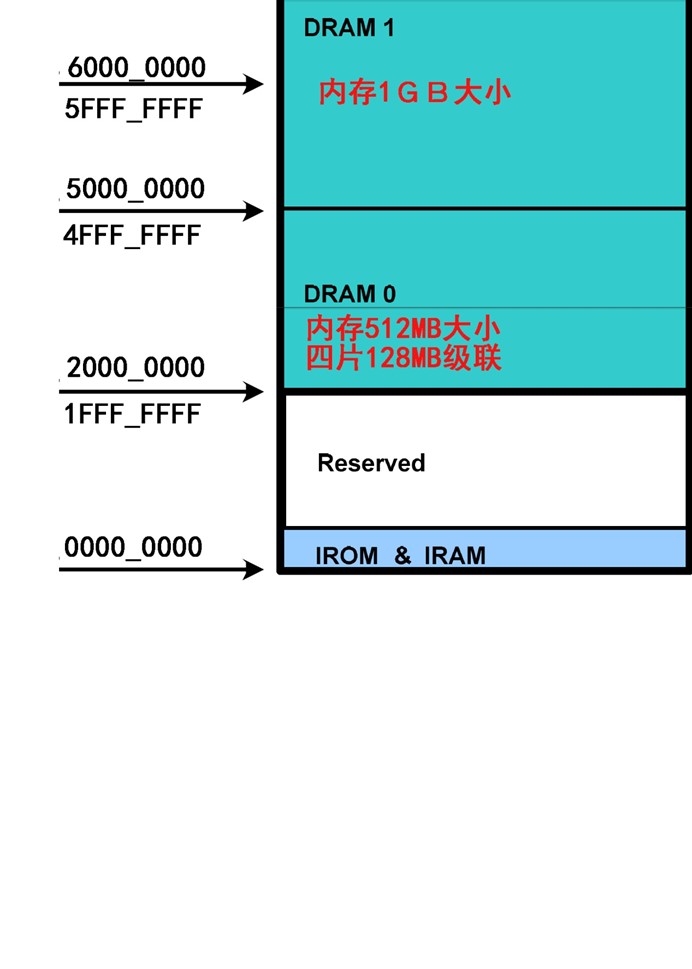
210可寻址的空间是4GB大小,内存的起始地址是20000000,前面知道2440使用的内存是SDRAM,6410使用的内存是DDR,这里210使用的是DDR2.在210的地址空间中零地址处跟6410一样也是映射镜像区,例如当选择从NandFlash启动的使用,就会把IROM的空间映射到0地址处。
内存芯片连接:
在2440和6410两款芯片中,它们的数据宽度是16bits,为了得到32bits的数据宽度,采用的是两片芯片级联的方式。而210采用的数据宽度是8bits的,要扩张成32bits,所以需要4片级联。每一片的大小是128MB,有四片总大小512MB。有一些芯片是8片的,构成1GB*32的内存芯片。
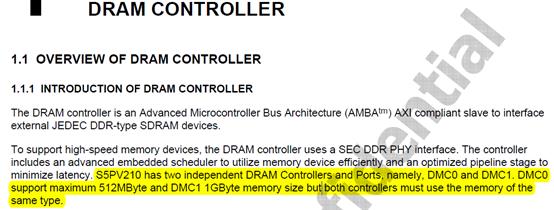
芯片手册里DMC0对应的是上图中的DRAM0,DMC1对应DRAM1.
接下来就是初始化DRAM0这512MB内存。
初始化流程:
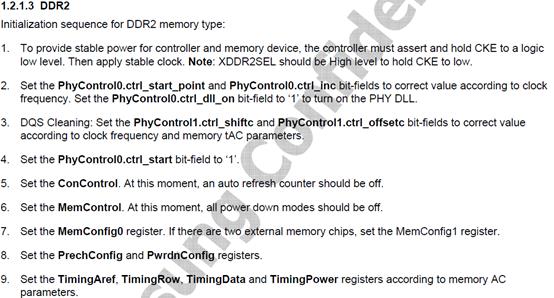

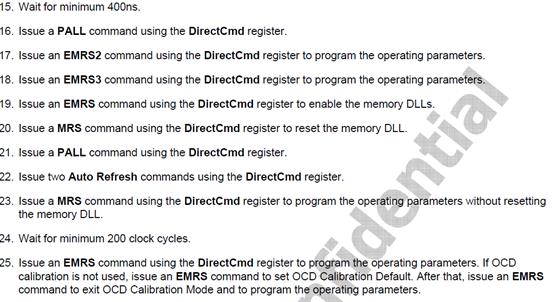

Initialization sequence for DDR2 memory type:
1. To provide stable power for controller and memory device, the controller must assert and hold CKE to a logic low level. Then apply stable clock. Note: XDDR2SEL should be High level to hold CKE to low.
2. Set the PhyControl0.ctrl_start_point and PhyControl0.ctrl_inc bit-fields to correct value according to clock frequency. Set the PhyControl0.ctrl_dll_on bit-field to ‘1‘ to turn on the PHY DLL.
3. DQS Cleaning: Set the PhyControl1.ctrl_shiftc and PhyControl1.ctrl_offsetc bit-fields to correct value according to clock frequency and memory tAC parameters.
4. Set the PhyControl0.ctrl_start bit-field to ‘1‘.
5. Set the ConControl. At this moment, an auto refresh counter should be off.
6. Set the MemControl. At this moment, all power down modes should be off.
7. Set the MemConfig0 register. If there are two external memory chips, set the MemConfig1 register.
8. Set the PrechConfig and PwrdnConfig registers.
9. Set the TimingAref, TimingRow, TimingData and TimingPower registers according to memory AC parameters.
10. If QoS scheme is required, set the QosControl0~15 and QosConfig0~15 registers.
11. Wait for the PhyStatus0.ctrl_locked bit-fields to change to ‘1‘. Check whether PHY DLL is locked.
12. PHY DLL compensates the changes of delay amount caused by Process, Voltage and Temperature (PVT) variation during memory operation. Therefore, PHY DLL should not be off for reliable operation. It can be off except runs at low frequency. If off mode is used, set the PhyControl0.ctrl_force bit-field to correct value according to the PhyStatus0.ctrl_lock_value[9:2] bit-field to fix delay amount. Clear the PhyControl0.ctrl_dll_on bit-field to turn off PHY DLL.
13. Confirm whether stable clock is issued minimum 200us after power on
14. Issue a NOP command using the DirectCmd register to assert and to hold CKE to a logic high level.
15. Wait for minimum 400ns.
16. Issue a PALL command using the DirectCmd register.
17. Issue an EMRS2 command using the DirectCmd register to program the operating parameters.
18. Issue an EMRS3 command using the DirectCmd register to program the operating parameters.
19. Issue an EMRS command using the DirectCmd register to enable the memory DLLs.
20. Issue a MRS command using the DirectCmd register to reset the memory DLL.
21. Issue a PALL command using the DirectCmd register.
22. Issue two Auto Refresh commands using the DirectCmd register.
23. Issue a MRS command using the DirectCmd register to program the operating parameters without resetting the memory DLL.
24. Wait for minimum 200 clock cycles.
25. Issue an EMRS command using the DirectCmd register to program the operating parameters. If OCD calibration is not used, issue an EMRS command to set OCD Calibration Default. After that, issue an EMRS command to exit OCD Calibration Mode and to program the operating parameters.
26. If there are two external memory chips, perform steps 14~25 for chip1 memory device.
27. Set the ConControl to turn on an auto refresh counter. 28. If power down modes is required, set the MemControl registers.
先建立框架:
-
在原来的过程里创建一个mem.S文件:

-
在mem.S里声明一个全局的标号:

-
接着把mem.S加入到Makefile工程文件里:

4.是在start.S里加入内存初始化的标识:
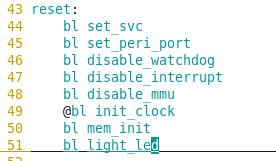
5.编译一下,看看是否出错:

没有报错说明框架没问题,接下来就是mem.S的初始化代码。
1. To provide stable power for controller and memory device, the controller must assert and hold CKE to a logic low level. Then apply stable clock. Note: XDDR2SEL should be High level to hold CKE to low.
这是电源为控制器和内存设备提供稳定电压的要求,是硬件的,略过。
2. Set the PhyControl0.ctrl_start_point and PhyControl0.ctrl_inc bit-fields to correct value according to clock frequency. Set the PhyControl0.ctrl_dll_on bit-field to ‘1‘ to turn on the PHY DLL.
这里是要设置PhyControl0寄存器的ctrl_start_point位和ctrl_inc位,根据时钟频率,还有就是设置ctrl_dll_on来打开PHY DLL。
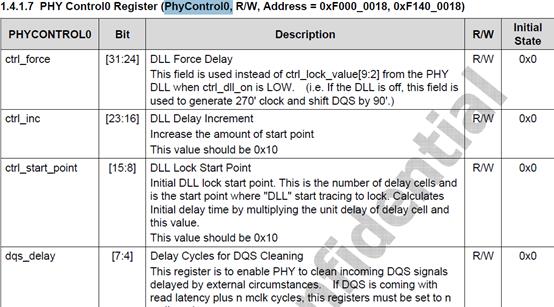
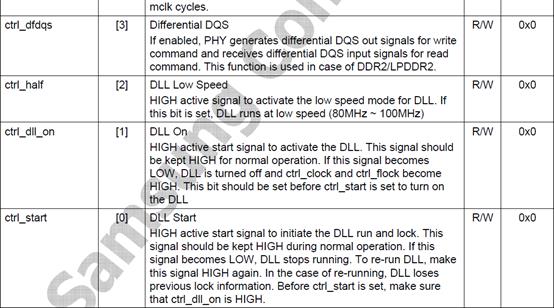
@ step 2.1
ldr r0, =DMC_PHYCONTROL0
ldr r1, =0x00101000
str r1, [r0]
@ step 2.2
ldr r0, =DMC_PHYCONTROL0
ldr r1, =0x00101002
str r1, [r0]
3. DQS Cleaning: Set the PhyControl1.ctrl_shiftc and PhyControl1.ctrl_offsetc bit-fields to correct value according to clock frequency and memory tAC parameters.
没有使用跳过。
4. Set the PhyControl0.ctrl_start bit-field to ‘1‘.
@ step 4
ldr r0, =DMC_PHYCONTROL0
ldr r1, =0x00101003
str r1, [r0]
5. Set the ConControl. At this moment, an auto refresh counter should be off.
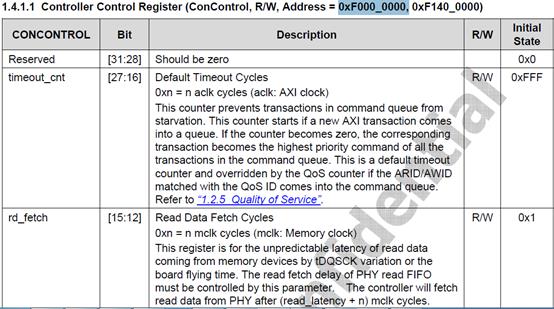
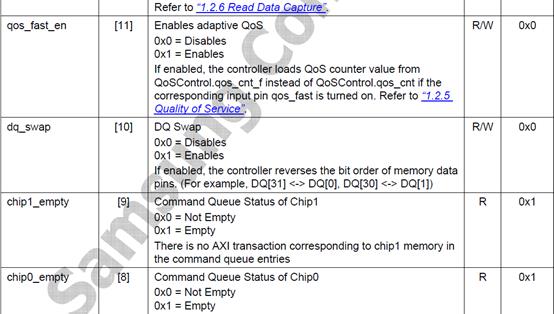

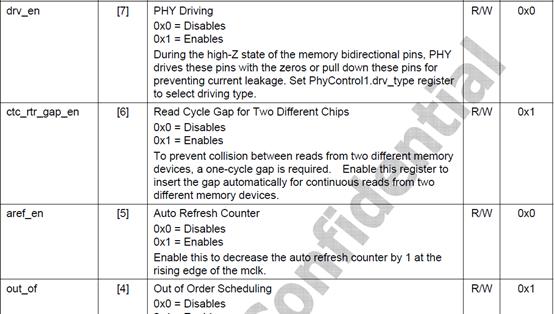

@ step 5
ldr r0, =DMC_CONCONTROL
ldr r1, =0x0FFF1350
str r1, [r0]
6. Set the MemControl. At this moment, all power down modes should be off.
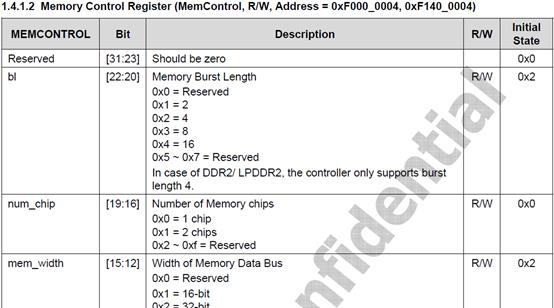
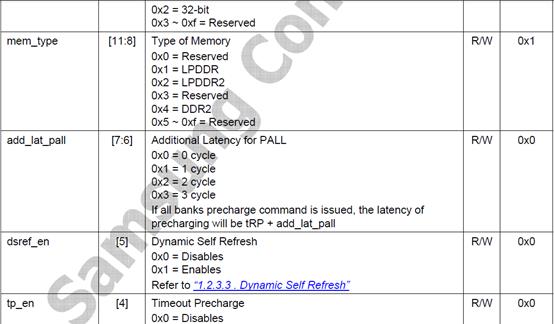

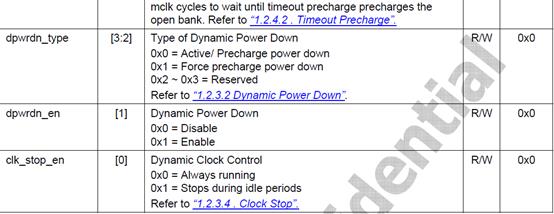
@ step 6
ldr r0, =DMC_MEMCONTROL
ldr r1, =DMC0_MEMCONTROL
str r1, [r0]
7. Set the MemConfig0 register. If there are two external memory chips, set the MemConfig1 register.
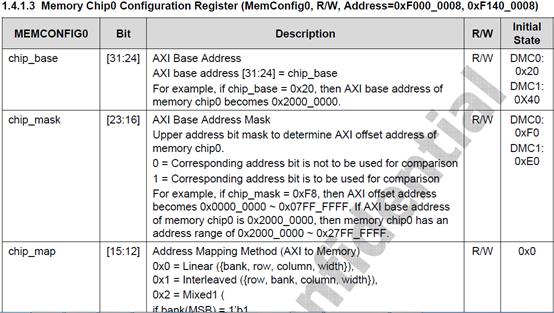
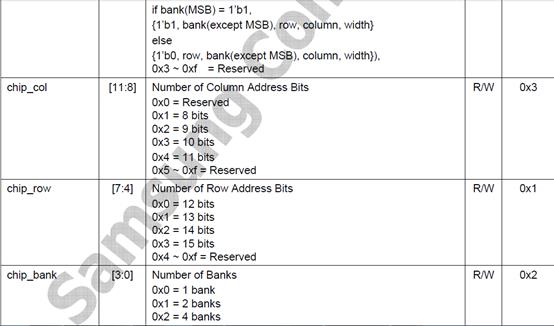

@ step 7
ldr r0, =DMC_MEMCONFIG0
ldr r1, =DMC0_MEMCONFIG_0
str r1, [r0]
8. Set the PrechConfig and PwrdnConfig registers.
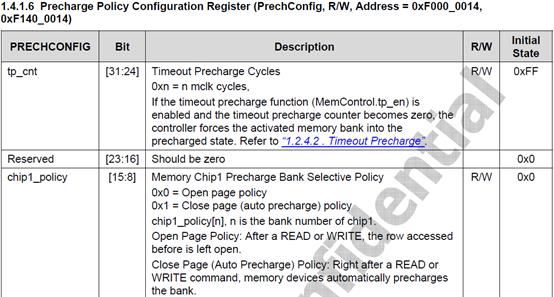

@ step 8
ldr r0, =DMC_PRECHCONFIG
ldr r1, =0xFF000000
str r1, [r0]
9. Set the TimingAref, TimingRow, TimingData and TimingPower registers according to memory AC parameters.
#define DMC_PHYCONTROL0 0xf0000018
#define DMC_PHYCONTROL1 0xf000001c
#define DMC_CONCONTROL 0xf0000000
#define DMC_MEMCONTROL 0xf0000004
#define DMC_MEMCONFIG0 0xf0000008
#define DMC_MEMCONFIG1 0xf000000c
#define DMC_PRECHCONFIG 0xf0000014
#define DMC_TIMINGAREF 0xf0000030
#define DMC_TIMINGROW 0xf0000034
#define DMC_TIMINGDATA 0xf0000038
#define DMC_TIMINGPOWER 0xf000003c
#define DMC_PHYSTATUS 0xf0000040
#define DMC_DIRECTCMD 0xf0000010
#define DMC_PWRDNCONFIG 0xf0000028
#define DMC0_MEMCONTROL 0x00202400
#define DMC0_MEMCONFIG_0 0x20F00313
#define DMC0_MEMCONFIG_1 0x00F00313
#define DMC0_TIMINGA_REF 0x00000618
#define DMC0_TIMING_ROW 0x2B34438A
#define DMC0_TIMING_DATA 0x24240000
#define DMC0_TIMING_PWR 0x0BDC0343
.globl mem_init
mem_init:
@ step 2.1 Set the PhyControl0.ctrl_start_point and PhyControl0.ctrl_inc
ldr r0, =DMC_PHYCONTROL0
ldr r1, =0x00101000
str r1, [r0]
@ step 2.2 Set the PhyControl0.ctrl_dll_on bit-field to ‘1‘ to turn on the PHY DLL.
ldr r0, =DMC_PHYCONTROL0
ldr r1, =0x00101002 @是在上面的基础上修改
str r1, [r0]
@ step 4
ldr r0, =DMC_PHYCONTROL0
ldr r1, =0x00101003
str r1, [r0]
@ step 5
ldr r0, =DMC_CONCONTROL
ldr r1, =0x0FFF1350
str r1, [r0]
@ step 6
ldr r0, =DMC_MEMCONTROL
ldr r1, =DMC0_MEMCONTROL
str r1, [r0]
@ step 7
ldr r0, =DMC_MEMCONFIG0
ldr r1, =DMC0_MEMCONFIG_0
str r1, [r0]
@ step 8
ldr r0, =DMC_PRECHCONFIG
ldr r1, =0xFF000000
str r1, [r0]
@ step 9.1
ldr r0, =DMC_TIMINGAREF
ldr r1, =DMC0_TIMINGA_REF
str r1, [r0]
@ step 9.2
ldr r0, =DMC_TIMINGROW
ldr r1, =DMC0_TIMING_ROW
str r1, [r0]
@ step 9.3
ldr r0, =DMC_TIMINGDATA
ldr r1, =DMC0_TIMING_DATA
str r1, [r0]
@ step 9.4
ldr r0, =DMC_TIMINGPOWER
ldr r1, =DMC0_TIMING_PWR
str r1, [r0]
@ step 11
wait_lock:
ldr r0, =DMC_PHYSTATUS
ldr r1, [r0]
and r2, r1, #0x4
cmp r2, #0x4
bne wait_lock
@ step 14
ldr r0, =DMC_DIRECTCMD
ldr r1, =0x07000000
str r1, [r0]
@ step 16
ldr r1, =0x01000000
str r1, [r0]
@ step 17
ldr r1, =0x00020000
str r1, [r0]
@ step 18
ldr r1, =0x00030000
str r1, [r0]
@ step 19
ldr r1, =0x00010400
str r1, [r0]
@ step 20
ldr r1, =0x00000542
str r1, [r0]
@ step 21
ldr r1, =0x01000000
str r1, [r0]
@ step 22.1
ldr r1, =0x05000000
str r1, [r0]
@ step 22.2
ldr r1, =0x05000000
str r1, [r0]
@ step 23
ldr r1, =0x00000442
str r1, [r0]
@ step 25.1
ldr r1, =0x00010780
str r1, [r0]
@ step 25.2
ldr r1, =0x00010400
str r1, [r0]
@ step 26, repeat step14~step25
ldr r1, =0x07100000
str r1, [r0]
ldr r1, =0x01100000
str r1, [r0]
ldr r1, =0x00120000
str r1, [r0]
ldr r1, =0x00130000
str r1, [r0]
ldr r1, =0x00110400
str r1, [r0]
ldr r1, =0x00100542
str r1, [r0]
ldr r1, =0x01100000
str r1, [r0]
ldr r1, =0x05100000
str r1, [r0]
ldr r1, =0x05100000
str r1, [r0]
ldr r1, =0x00100442
str r1, [r0]
ldr r1, =0x00110780
str r1, [r0]
ldr r1, =0x00110400
str r1, [r0]
@ step 27
ldr r0, =DMC_CONCONTROL
ldr r1, =0x0FF02030
str r1, [r0]
ldr r0, =DMC_PWRDNCONFIG
ldr r1, =0xFFFF00FF
str r1, [r0]
ldr r0, =DMC_CONCONTROL
ldr r1, =0x00202400
str r1, [r0]
mov pc, lr
以上是关于32.210内存的知识的主要内容,如果未能解决你的问题,请参考以下文章