FlexBox布局的重要属性
Posted 玉思盈蝶
tags:
篇首语:本文由小常识网(cha138.com)小编为大家整理,主要介绍了FlexBox布局的重要属性相关的知识,希望对你有一定的参考价值。
/**
 * Sample React Native App
 * https://github.com/facebook/react-native
 * @flow
 */

import React, { Component } from ‘react‘;
import {
  AppRegistry,
  StyleSheet,
  Text,
  View
} from ‘react-native‘;

/*--------------------第一个示例程序------------------*/

class FlexBoxDemo extends Component {
  render() {
    return (
      <View style={styles.container}>
         <Text style = {{backgroundColor: ‘red‘,height: 30}}>第一个</Text>
         <Text style = {{backgroundColor: ‘green‘,height: 30}}>第二个</Text>
         <Text style = {{backgroundColor: ‘yellow‘,height: 30}}>第三个</Text>
         <Text style = {{backgroundColor: ‘blue‘,height: 30}}>第四个</Text>
    </View>
    );
  }
}

const styles = StyleSheet.create({
  container: {

    // 注意: 父视图的高度是随子视图而决定的

    // 改变主轴的方向
    flexDirection: ‘row‘,
    backgroundColor: ‘purple‘,
    // 距离顶部间距
    marginTop:25,
    // 设置主轴的对齐方式
    justifyContent:‘center‘,
    // 设置侧轴的对齐方式
    alignItems: ‘flex-end‘
  },
});

/*--------------------第二个示例程序------------------*/

class FlexBoxDemo1 extends Component {
  render() {
    return (
        <View style={styles1.container}>
  <Text style = {{backgroundColor: ‘red‘,width: 100}}>第一个</Text>
    <Text style = {{backgroundColor: ‘green‘,width: 200}}>第二个</Text>
    <Text style = {{backgroundColor: ‘yellow‘,width: 100}}>第三个</Text>
    <Text style = {{backgroundColor: ‘blue‘,width: 120}}>第四个</Text>
    </View>
  );
  }
}

const styles1 = StyleSheet.create({

  container: {

    // 注意: 父视图的高度是随子视图而决定的

    // 改变主轴的方向
    flexDirection: ‘row‘,
    backgroundColor: ‘purple‘,
    // 距离顶部间距
    marginTop:25,
    // 设置主轴的对齐方式
    justifyContent:‘center‘,
    // 设置侧轴的对齐方式
    alignItems: ‘flex-end‘,
    // 设置图像换行显示,默认是不换行
    flexWrap: ‘wrap‘,
    // 决定盒子的宽度  宽度 = 弹性宽度 * (flexGrow / 父View宽度)
    flex: 1,

  },
})

/*--------------------第三个示例程序------------------*/

class FlexBoxDemo2 extends Component {
  render() {
    return (
        <View style={styles2.container}>

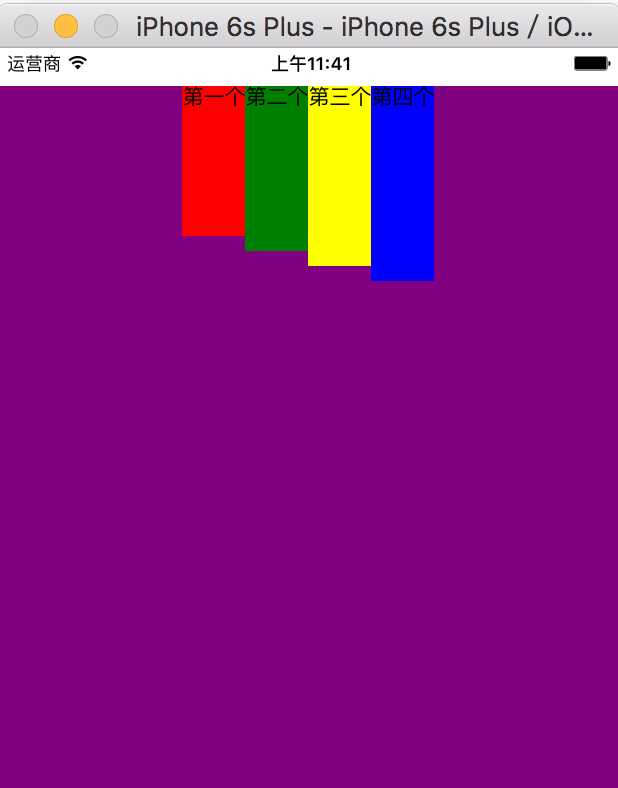
    <Text style = {{backgroundColor: ‘red‘,height: 100,alignSelf: ‘flex-start‘}}>第一个</Text>
    <Text style = {{backgroundColor: ‘green‘,height: 110}}>第二个</Text>
    <Text style = {{backgroundColor: ‘yellow‘,height: 120}}>第三个</Text>
    <Text style = {{backgroundColor: ‘blue‘,height: 130}}>第四个</Text>
    </View>
  );
  }
}

const styles2 = StyleSheet.create({

  container: {

    // 注意: 父视图的高度是随子视图而决定的

    // 改变主轴的方向
    flexDirection: ‘row‘,
    backgroundColor: ‘purple‘,
    // 距离顶部间距
    marginTop:25,
    // 设置主轴的对齐方式
    justifyContent:‘center‘,
    // 设置侧轴的对齐方式
    alignItems: ‘flex-start‘,
    // 设置图像换行显示,默认是不换行
    flexWrap: ‘wrap‘,
    // 决定盒子的宽度  宽度 = 弹性宽度 * (flexGrow / 父View宽度)
    flex: 1,
  },
})


AppRegistry.registerComponent(‘FlexBoxDemo‘, () => FlexBoxDemo2);

以上是关于FlexBox布局的重要属性的主要内容,如果未能解决你的问题,请参考以下文章