C++学习基础七——深复制与浅复制
Posted bky2016
tags:
篇首语:本文由小常识网(cha138.com)小编为大家整理,主要介绍了C++学习基础七——深复制与浅复制相关的知识,希望对你有一定的参考价值。
一、深复制与浅复制基本知识
深复制和浅复制,又称为深拷贝和浅拷贝。
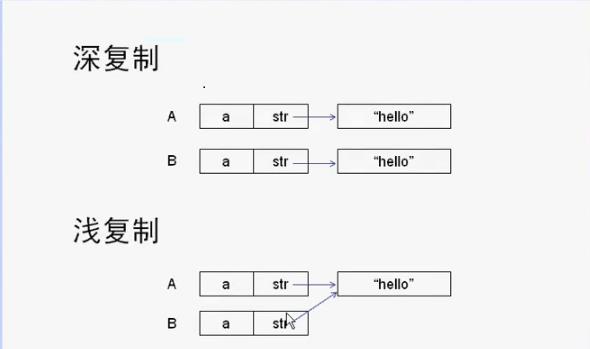
深复制和浅复制的区别如下图1所示:

图1
图1表示的是,定义一个类CDemo,包含int a和char *str两个成员变量,
当深复制时,A中的指针str与B中的指针str指向不同的地址,只是地址所指向的数据相同。
当浅复制时,A中的指针str与B中的指针str指向相同的地址。
1.浅复制:如果我们自己不实现复制构造函数,则C++会自动合成一个复制构造函数,又称为浅复制构造函数。
2.深复制:如果使用指针或者系统资源(如数据库,流对象等),则需要自己实现深复制的复制构造函数。
3.深复制与浅复制的代码区别:
 1 Demo(const Demo &other)
 2 {
 3    this->id= other.id;
 4     this->str = new char[1024];//深复制 ,该指针与 other内的指针变量指向两个不同的地址,只是数据相同
 5     strcpy(this->str,other.str);
 6 }
 7 或者
 8 Demo(const Demo &other)
 9 {
10      this->id= other.id;
11       //深复制 ,该指针与 other内的指针变量指向两个不同的地址,只是数据相同
12    this->str = other.str;
13 }
14 Demo(const Demo &other)
15 {
16      this->id= other.id;
17      strcpy(this->str,other.str);//浅复制
18 }
4.如果自定义的类中包含指针,则应该自己实现深复制的复制构造函数,赋值操作符和析构函数。
二、管理指针成员
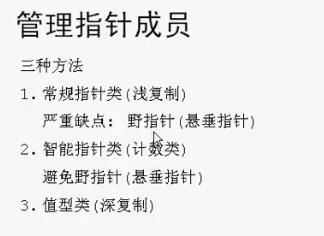
浅复制时因为两个指针指向相同的地址,很有可能出现野指针的情况;
深复制不会出现野指针,但会出现很多相同的对象,浪费内存。
如何有效的使用指针成员呢?管理指针成员的三个方法如图2所示:

图2
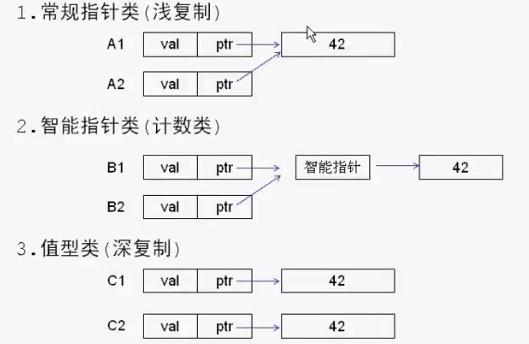
三种方式的具体区别如图3所示:

图3
总结:智能指针其实是浅复制,只是智能指针不会产生野指针,而浅复制会产生野指针。
  1 #include <iostream>
  2
  3 using namespace std;
  4
  5 class ADemo
  6 {
  7 public:
  8     ADemo(int v, const int &p)
  9     {
 10         val = v;
 11         ptr = new int(p);
 12     }
 13     ~ADemo()
 14     {
 15         delete ptr;
 16     }
 17
 18     ADemo(const ADemo &other)
 19     {
 20         val = other.val;
 21         ptr = new int;
 22         *ptr = *other.ptr;//深复制
 23     }
 24
 25     ADemo& operator=(const ADemo &other)
 26     {
 27         val = other.val;
 28         ptr = new int;
 29         *ptr = *other.ptr;//深复制
 30         return *this;
 31     }
 32
 33     int get_ptr_val()
 34     {
 35         return *ptr;
 36     }
 37     void set_ptr(int v)
 38     {
 39         *ptr = v;
 40     }
 41 private:
 42     int val;
 43     int *ptr;
 44 };
 45
 46 class BDemo
 47 {
 48     public:
 49     BDemo(int v, const int &p)
 50     {
 51         val = v;
 52         ptr = new int(p);
 53     }
 54     ~BDemo()
 55     {
 56         delete ptr;
 57     }
 58
 59     BDemo(const BDemo &other)
 60     {
 61         val = other.val;
 62         ptr = other.ptr;//浅复制
 63     }
 64
 65     BDemo& operator=(const BDemo &rig)
 66     {
 67         val = rig.val;
 68         ptr = rig.ptr;//浅复制
 69         return *this;
 70     }
 71
 72     int get_ptr_val()
 73     {
 74         return *ptr;
 75     }
 76     void set_ptr(int v)
 77     {
 78         *ptr = v;
 79     }
 80 private:
 81     int val;
 82     int *ptr;
 83
 84 };
 85
 86 //====================智能指针start============
 87 class U_Ptr
 88 {
 89     friend class CDemo;
 90 private:
 91     int *ptr;
 92     size_t use;
 93     U_Ptr(int *p,int u)
 94     {
 95         this->ptr = p;
 96         use = u;
 97     }
 98     ~U_Ptr()
 99     {
100         delete ptr;
101     }
102 } ;
103
104 class CDemo
105 {//智能指针
106 public:
107     CDemo(const int &p,int v)
108     {
109         ptr = new U_Ptr(new int(p),1);
110         val = v;
111     }
112     ~CDemo()
113     {
114         if(--ptr->use == 0)delete ptr;
115     }
116
117     CDemo(const CDemo &other)
118     {
119         ++ptr->use;//多了一个对象使用
120         val = other.val;
121         ptr = other.ptr;//浅复制
122     }
123     CDemo& operator=(const CDemo &rig)
124     {
125         ++rig.ptr->use;
126         if(--ptr->use == 0)delete ptr;
127
128         val = rig.val;
129         ptr = rig.ptr;//浅复制
130         return *this;
131     }
132
133     void set_Ptr_val(int v)
134     {
135         *ptr->ptr = v;
136     }
137
138     int get_ptr_val()
139     {
140         return *ptr->ptr;
141     }
142 private:
143     int val;
144     U_Ptr *ptr;
145 };
146
147 void test_ShenCopy()
148 {
149     int prr = 20;
150     ADemo a(10,prr);
151     ADemo b = a;
152     cout<<"a = "<<a.get_ptr_val()<<endl;
153     cout<<"b = "<<b.get_ptr_val()<<endl;
154     cout<<"修改之后:"<<endl;
155     a.set_ptr(40);
156     cout<<"a = "<<a.get_ptr_val()<<endl;
157     cout<<"b = "<<b.get_ptr_val()<<endl;
158 }
159 void test_QianCopy()
160 {
161
162     int prr = 40;
163     BDemo a(50,prr);
164     BDemo b = a;
165     cout<<"a = "<<a.get_ptr_val()<<endl;
166     cout<<"b = "<<b.get_ptr_val()<<endl;
167     cout<<"修改之后:"<<endl;
168     b.set_ptr(80);
169     cout<<"a = "<<a.get_ptr_val()<<endl;
170     cout<<"b = "<<b.get_ptr_val()<<endl;
171 }
172
173 void test_smart()
174 {
175     int prr = 90;
176     CDemo a(100,prr);
177     CDemo b = a;
178     cout<<"a = "<<a.get_ptr_val()<<endl;
179     cout<<"b = "<<b.get_ptr_val()<<endl;
180     cout<<"修改之后:"<<endl;
181     b.set_Ptr_val(180);
182     cout<<"a = "<<a.get_ptr_val()<<endl;
183     cout<<"b = "<<b.get_ptr_val()<<endl;
184 }
185 int main()
186 {
187     cout<<"深复制:"<<endl;
188     test_ShenCopy();
189     cout<<endl<<"浅复制:"<<endl;
190     test_QianCopy();
191     cout<<endl<<"智能指针:"<<endl;
192     test_smart();
193     return 0;
194 }
以上是关于C++学习基础七——深复制与浅复制的主要内容,如果未能解决你的问题,请参考以下文章