全景视频拼接--OpenCV源码解析
Posted Eason.wxd
tags:
篇首语:本文由小常识网(cha138.com)小编为大家整理,主要介绍了全景视频拼接--OpenCV源码解析相关的知识,希望对你有一定的参考价值。
本文参考:http://blog.csdn.net/skeeee/article/details/19480693,做了一定修改和补充。
一、stitching_detail程序运行流程
1.命令行调用程序,输入源图像以及程序的参数
2.特征点检测,判断是使用surf还是orb,默认是surf。
3.对图像的特征点进行匹配,使用最近邻方法,将最优的匹配的置信度保存下来,同时保存两幅图像匹配特征点的单应性矩阵。
4.删除置信度比较低的图像间的匹配,利用并查集算法,确保匹配图像的拼接集。
5.对所有拼接集图像进行相机参数粗略估计,然后求出旋转矩阵。
6.使用光束平均法进一步精准的估计出旋转矩阵。
7.波形校正,水平或者垂直
8.原始图到指定全景图的投影拼接。
9.融合,多频段融合,光照补偿。
二、stitching_detail程序接口介绍
img1 img2 img3 输入图像
--preview 以预览模式运行程序,比正常模式要快,但输出图像分辨率低,拼接的分辨率compose_megapix 设置为0.6
--try_gpu (yes|no) 是否使用GPU(图形处理器),默认为no
/* 运动估计参数 */
--work_megapix <--work_megapix <float>> 图像匹配的分辨率大小,图像的面积尺寸变为work_megapix*100000,默认为0.6
--features (surf|orb) 选择surf或者orb算法进行特征点计算,默认为surf
--match_conf <float> 特征点检测置信等级,最近邻匹配距离与次近邻匹配距离的比值,surf默认为0.65,orb默认为0.3
--conf_thresh <float> 两幅图来自同一全景图的置信度,默认为1.0
--ba (reproj|ray) 光束平均法的误差函数选择,默认是ray方法
--ba_refine_mask (mask) ---------------
--wave_correct (no|horiz|vert) 波形校验 水平,垂直或者没有 默认是horiz
--save_graph <file_name> 将匹配的图形以点的形式保存到文件中, Nm代表匹配的数量,NI代表正确匹配的数量,C表示置信度
/*图像融合参数:*/
--warp (plane|cylindrical|spherical|fisheye|stereographic|compressedPlaneA2B1|compressedPlaneA1.5B1|compressedPlanePortraitA2B1
|compressedPlanePortraitA1.5B1|paniniA2B1|paniniA1.5B1|paniniPortraitA2B1|paniniPortraitA1.5B1|mercator|transverseMercator)
选择融合的平面,默认是球形
--seam_megapix <float> 拼接缝分辨率压缩因子(非压缩系数) 默认是0.1 ------------
--seam (no|voronoi|gc_color|gc_colorgrad) 拼接缝隙估计方法 默认是gc_color
--compose_megapix <float> 拼接分辨率,默认为-1
--expos_comp (no|gain|gain_blocks) 光照补偿方法,默认是gain_blocks
--blend (no|feather|multiband) 融合方法,默认是多频段融合
--blend_strength <float> 融合强度,0-100.默认是5.
--output <result_img> 输出图像的文件名,默认是result,jpg
命令使用实例,以及程序运行时的提示:
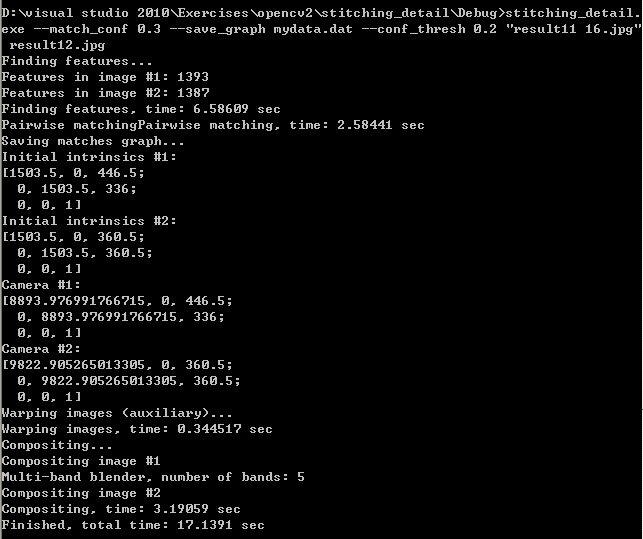
三、程序代码分析
1.参数读入
程序参数读入分析,将程序运行是输入的参数以及需要拼接的图像读入内存,检查图像是否多于2张。
    int retval = parseCmdArgs(argc, argv);
    if (retval)
        return retval;

    // Check if have enough images
    int num_images = static_cast<int>(img_names.size());
    if (num_images < 2)
    {
        LOGLN("Need more images");
        return -1;
    }
2.特征点检测
判断选择是surf还是orb特征点检测(默认是surf)以及对图像进行预处理(尺寸缩放),然后计算每幅图形的特征点,以及特征点描述子
2.1 计算work_scale,将图像resize到面积在work_megapix*10^6以下,(work_megapix 默认是0.6)
work_scale = min(1.0, sqrt(work_megapix * 1e6 / full_img.size().area()));resize(full_img, img, Size(), work_scale, work_scale);图像大小是740*830,面积大于6*10^5,所以计算出work_scale = 0.98,然后对图像resize。
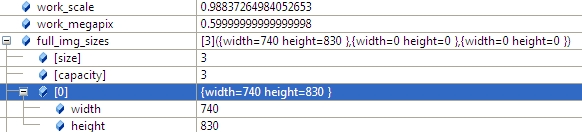
2.2 计算seam_scale,也是根据图像的面积小于seam_megapix*10^6,(seam_megapix 默认是0.1),seam_work_aspect目前还没用到
   seam_scale = min(1.0, sqrt(seam_megapix * 1e6 / full_img.size().area()));
seam_work_aspect = seam_scale / work_scale; //seam_megapix = 0.1 seam_work_aspect = 0.69 
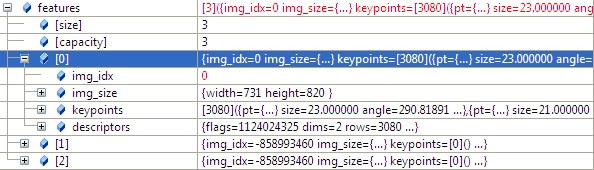
2.3 计算图像特征点,以及计算特征点描述子,并将img_idx设置为i。
  (*finder)(img, features[i]);//matcher.cpp 348
  features[i].img_idx = i;
特征点描述的结构体定义如下:
	struct detail::ImageFeatures
	Structure containing image keypoints and descriptors.
	struct CV_EXPORTS ImageFeatures
	{
		int img_idx;//
		Size img_size;
		std::vector<KeyPoint> keypoints;
		Mat descriptors;
}; 
2.4 将源图像resize到seam_megapix*10^6,并存入image[]中
        resize(full_img, img, Size(), seam_scale, seam_scale);
        images[i] = img.clone();
3.图像匹配
对任意两副图形进行特征点匹配,然后使用查并集法,将图片的匹配关系找出,并删除那些不属于同一全景图的图片。
3.1 使用最近邻和次近邻匹配,对任意两幅图进行特征点匹配。
    vector<MatchesInfo> pairwise_matches;//Structure containing information about matches between two images.
    BestOf2NearestMatcher matcher(try_gpu, match_conf);//最近邻和次近邻法
    matcher(features, pairwise_matches);//对每两个图片进行matcher,20-》400 matchers.cpp 502
介绍一下BestOf2NearestMatcher 函数:
      //Features matcher which finds two best matches for each feature and leaves the best one only if the ratio between descriptor distances is greater than the threshold match_conf.
     detail::BestOf2NearestMatcher::BestOf2NearestMatcher(bool try_use_gpu=false,float match_conf=0.3f,
	                                                     intnum_matches_thresh1=6, int num_matches_thresh2=6)
     Parameters:	try_use_gpu – Should try to use GPU or not
			match_conf – Match distances ration threshold
			num_matches_thresh1 – Minimum number of matches required for the 2D projective
			transform estimation used in the inliers classification step
			num_matches_thresh2 – Minimum number of matches required for the 2D projective
			transform re-estimation on inliers
函数的定义(只是设置一下参数,属于构造函数):
BestOf2NearestMatcher::BestOf2NearestMatcher(bool try_use_gpu, float match_conf, int num_matches_thresh1, int num_matches_thresh2)
{
#ifdef HAVE_OPENCV_GPU
    if (try_use_gpu && getCudaEnabledDeviceCount() > 0)
        impl_ = new GpuMatcher(match_conf);
    else
#else
    (void)try_use_gpu;
#endif
        impl_ = new CpuMatcher(match_conf);

    is_thread_safe_ = impl_->isThreadSafe();
    num_matches_thresh1_ = num_matches_thresh1;
    num_matches_thresh2_ = num_matches_thresh2;
}
以及MatchesInfo的结构体定义:
Structure containing information about matches between two images. It’s assumed that there is a homography between those images.
	struct CV_EXPORTS MatchesInfo
	{
		MatchesInfo();
		MatchesInfo(const MatchesInfo &other);
		const MatchesInfo& operator =(const MatchesInfo &other);
		int src_img_idx, dst_img_idx; // Images indices (optional)
		std::vector<DMatch> matches;
		std::vector<uchar> inliers_mask; // Geometrically consistent matches mask
		int num_inliers; // Number of geometrically consistent matches
		Mat H; // Estimated homography
		double confidence; // Confidence two images are from the same panorama
	};
求出图像匹配的结果如下(具体匹配参见sift特征点匹配),任意两幅图都进行匹配(3*3=9),其中1-》2和2-》1只计算了一次,以1-》2为准(2-1直接采用对称方式,且H求逆),:
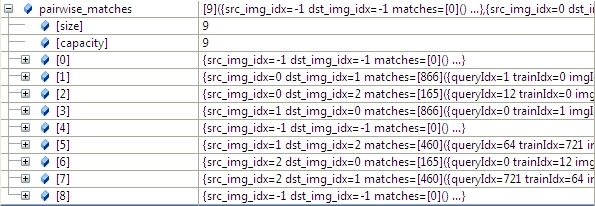
3.2 根据任意两幅图匹配的置信度,将所有置信度高于conf_thresh(默认是1.0)的图像合并到一个全集中。
我们通过函数的参数 save_graph打印匹配结果如下(我稍微修改了一下输出):
"outimage101.jpg" -- "outimage102.jpg"[label="Nm=866, Ni=637, C=2.37864"];
"outimage101.jpg" -- "outimage103.jpg"[label="Nm=165, Ni=59, C=1.02609"];
"outimage102.jpg" -- "outimage103.jpg"[label="Nm=460, Ni=260, C=1.78082"];
Nm代表匹配的数量,NI代表正确匹配的数量,C表示置信度
    vector<int> indices = leaveBiggestComponent(features, pairwise_matches, conf_thresh);//将置信度高于门限的所有匹配合并到一个集合中
    vector<Mat> img_subset;
    vector<string> img_names_subset;
    vector<Size> full_img_sizes_subset;
    for (size_t i = 0; i < indices.size(); ++i)
    {
        img_names_subset.push_back(img_names[indices[i]]);
        img_subset.push_back(images[indices[i]]);
        full_img_sizes_subset.push_back(full_img_sizes[indices[i]]);
    }

    images = img_subset;
    img_names = img_names_subset;
    full_img_sizes = full_img_sizes_subset;
4.根据单应性矩阵粗略估计出相机参数(焦距)
4.1 焦距参数的估计
根据前面求出的任意两幅图的匹配,我们根据两幅图的单应性矩阵H,求出符合条件的f,(4副图,16个匹配,求出8个符合条件的f),然后求出f的均值或者中值当成所有图形的粗略估计的f。
estimateFocal(features, pairwise_matches, focals);函数的主要源码如下:
    for (int i = 0; i < num_images; ++i)
    {
        for (int j = 0; j < num_images; ++j)
        {
            const MatchesInfo &m = pairwise_matches[i*num_images + j];
            if (m.H.empty())
                continue;
            double f0, f1;
            bool f0ok, f1ok;
			focalsFromHomography(m.H, f0, f1, f0ok, f1ok);//Tries to estimate focal lengths from the given homography  79
			//under the assumption that the camera undergoes rotations around its centre only.
            if (f0ok && f1ok)
                all_focals.push_back(sqrt(f0 * f1));
        }
    }
其中函数focalsFromHomography的定义如下:
Tries to estimate focal lengths from the given homography
	under the assumption that the camera undergoes rotations around its centre only.
	Parameters
	H – Homography.
	f0 – Estimated focal length along X axis.
	f1 – Estimated focal length along Y axis.
	f0_ok – True, if f0 was estimated successfully, false otherwise.
f1_ok – True, if f1 was estimated successfully, false otherwise.函数的源码(注意:这里根据H计算F的原理,一直没找到,知道的朋友可以指点下):
void focalsFromHomography(const Mat& H, double &f0, double &f1, bool &f0_ok, bool &f1_ok)
{
    CV_Assert(H.type() == CV_64F && H.size() == Size(3, 3));//Checks a condition at runtime and throws exception if it fails

    const double* h = reinterpret_cast<const double*>(H.data);//强制类型转换

    double d1, d2; // Denominators
    double v1, v2; // Focal squares value candidates

	//具体的计算过程有点看不懂啊
    f1_ok = true;
    d1 = h[6] * h[7];
    d2 = (h[7] - h[6]) * (h[7] + h[6]);
    v1 = -(h[0] * h[1] + h[3] * h[4]) / d1;
    v2 = (h[0] * h[0] + h[3] * h[3] - h[1] * h[1] - h[4] * h[4]) / d2;
    if (v1 < v2) std::swap(v1, v2);
    if (v1 > 0 && v2 > 0) f1 = sqrt(std::abs(d1) > std::abs(d2) ? v1 : v2);
    else if (v1 > 0) f1 = sqrt(v1);
    else f1_ok = false;

    f0_ok = true;
    d1 = h[0] * h[3] + h[1] * h[4];
    d2 = h[0] * h[0] + h[1] * h[1] - h[3] * h[3] - h[4] * h[4];
    v1 = -h[2] * h[5] / d1;
    v2 = (h[5] * h[5] - h[2] * h[2]) / d2;
    if (v1 < v2) std::swap(v1, v2);
    if (v1 > 0 && v2 > 0) f0 = sqrt(std::abs(d1) > std::abs(d2) ? v1 : v2);
    else if (v1 > 0) f0 = sqrt(v1);
    else f0_ok = false;
}
求出的焦距有8个
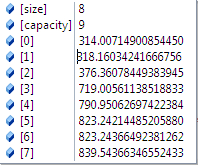
求出的焦距取中值或者平均值,然后就是所有图片的焦距。
并构建camera参数,将矩阵写入camera:
        cameras.assign(num_images, CameraParams());
        for (int i = 0; i < num_images; ++i)
            cameras[i].focal = focals[i];
4.2 根据匹配的内点构建最大生成树,然后广度优先搜索求出根节点,并求出camera的R矩阵,K矩阵以及光轴中心
camera其他参数:
aspect = 1.0,ppx,ppy目前等于0,最后会赋值成图像中心点的。
K矩阵的值:
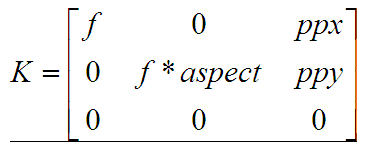
Mat CameraParams::K() const
{
    Mat_<double> k = Mat::eye(3, 3, CV_64F);
    k(0,0) = focal; k(0,2) = ppx;
    k(1,1) = focal * aspect; k(1,2) = ppy;
    return k;
}
R矩阵的值:

    void operator ()(const GraphEdge &edge)
    {
        int pair_idx = edge.from * num_images + edge.to;

        Mat_<double> K_from = Mat::eye(3, 3, CV_64F);
        K_from(0,0) = cameras[edge.from].focal;
        K_from(1,1) = cameras[edge.from].focal * cameras[edge.from].aspect;
        K_from(0,2) = cameras[edge.from].ppx;
        K_from(0,2) = cameras[edge.from].ppy;

        Mat_<double> K_to = Mat::eye(3, 3, CV_64F);
        K_to(0,0) = cameras[edge.to].focal;
        K_to(1,1) = cameras[edge.to].focal * cameras[edge.to].aspect;
        K_to(0,2) = cameras[edge.to].ppx;
        K_to(0,2) = cameras[edge.to].ppy;

        Mat R = K_from.inv() * pairwise_matches[pair_idx].H.inv() * K_to;
        cameras[edge.to].R = cameras[edge.from].R * R;
    }
光轴中心的值
    for (int i = 0; i < num_images; ++i)
    {
        cameras[i].ppx += 0.5 * features[i].img_size.width;
        cameras[i].ppy += 0.5 * features[i].img_size.height;
    }
5.使用Bundle Adjustment方法对所有图片进行相机参数校正
Bundle Adjustment(光束法平差)算法主要是解决所有相机参数的联合。这是全景拼接必须的一步,因为多个成对的单应性矩阵合成全景图时,会忽略全局的限制,造成累积误差。因此每一个图像都要加上光束法平差值,使图像被初始化成相同的旋转和焦距长度。
光束法平差的目标函数是一个具有鲁棒性的映射误差的平方和函数。即每一个特征点都要映射到其他的图像中,计算出使误差的平方和最小的相机参数。具体的推导过程可以参见Automatic Panoramic Image Stitching using Invariant Features.pdf的第五章。
opencv中误差描述函数有两种如下:(opencv默认是BundleAdjusterRay ):
	BundleAdjusterReproj // BundleAdjusterBase(7, 2)//最小投影误差平方和
	Implementation of the camera parameters refinement algorithm which minimizes sum of the reprojection error squares

	BundleAdjusterRay //  BundleAdjusterBase(4, 3)//最小特征点与相机中心点的距离和
	Implementation of the camera parameters refinement algorithm which minimizes sum of the distances between the
	rays passing through the camera center and a feature.
5.1 首先计算cam_params_的值:
setUpInitialCameraParams(cameras);函数主要源码:
    cam_params_.create(num_images_ * 4, 1, CV_64F);
    SVD svd;//奇异值分解
    for (int i = 0; i < num_images_; ++i)
    {
        cam_params_.at<double>(i * 4, 0) = cameras[i].focal;

        svd(cameras[i].R, SVD::FULL_UV);
        Mat R = svd.u * svd.vt;
        if (determinant(R) < 0)
            R *= -1;

        Mat rvec;
        Rodrigues(R, rvec);
        CV_Assert(rvec.type() == CV_32F);
        cam_params_.at<double>(i * 4 + 1, 0) = rvec.at<float>(0, 0);
        cam_params_.at<double>(i * 4 + 2, 0) = rvec.at<float>(1, 0);
        cam_params_.at<double>(i * 4 + 3, 0) = rvec.at<float>(2, 0);
    }
计算cam_params_的值,先初始化cam_params(num_images_*4,1,CV_64F);
cam_params_[i*4+0] = cameras[i].focal;
cam_params_后面3个值,是cameras[i].R先经过奇异值分解,然后对u*vt进行Rodrigues运算,得到的rvec第一行3个值赋给cam_params_。
奇异值分解的定义:
以上是关于全景视频拼接--OpenCV源码解析的主要内容,如果未能解决你的问题,请参考以下文章