[Python][flask][flask-login]关于flask-login中各种API使用实例
Posted Alima
tags:
篇首语:本文由小常识网(cha138.com)小编为大家整理,主要介绍了[Python][flask][flask-login]关于flask-login中各种API使用实例相关的知识,希望对你有一定的参考价值。
本篇博文跟上一篇[Python][flask][flask-wtf]关于flask-wtf中API使用实例教程有莫大的关系。
简介:Flask-Login 为 Flask 提供了用户会话管理。它处理了日常的登入,登出并且长时间记住用户的会话。
直白的讲,flask-login包为用户管理了涉及到用户登录相关的缓存(Session)管理。
Posted by Alima | cnblogs.
一.安装(Install)
PC环境:Windows 7,Python 3.5.2。
PS:此次配置环境阶段和上一篇博文中写的一致,如果看了上一篇博文,安装阶段可以直接跳过。
- 创建wtfdemo虚拟运行环境
用控制台(管理员运行模式)进入(cd)到想要创建工程的路径下,创建wtfdemo文件夹。
mkdir wtfdemo
进入(cd)wtfdemo文件夹,创建Python虚拟运行环境。
virtualenv flaskr
出现如下字样,说明虚拟环境创建成功

PS:本次提供第二种创建Python虚拟运行环境的使用方法
virtualenv -p source_file\\python.exe target_file
为什么提出第二种创建方法,你会发现,当你的Python Web程序开发多了以后,PC上难免安装了很多版本的Python运行环境。
举例:当PC上同时安装了Python2.7和Python3.5,运行virtualenv flaskr后,建立的Python虚拟运行环境是Python2.7版本的,但是我们的开发环境是Python3.5。
在控制台中输入一下指令,你就会发现问题。
virtualenv -h
出现下面图片显示,默认的virtualenv安装路径是Python2.7,也就是默认的安装的虚拟环境是Python2.7版本。

所以,在这种情况下,请指定你需要的Python版本,并建立虚拟运行环境。
- 安装flask-wtf库文件
进入Python虚拟运行环境(在上一篇博文中写过),执行以下指令。
pip install flask
pip install flask-wtf
pip install flask-login
pip install flask-sqlalchemy
出现如下图所示,说明安装成功。
flask安装成功。

flask-wtf安装成功。

flask-login安装成功。(本次使用flask-wtf库时需要辅助以该运行库)

flask-sqlalchemy安装成功。

至此,环境配置阶段结束。
二.flask-Login介绍
它会:
①将活跃用户的ID储存在缓存(Session)中,让登录和注销更加简单。
②让你对登入(或登出)的用户限制浏览不同的视图
③处理略棘手的“记住用户”功能
④帮助保护使用用户的缓存(Session),以免被恶意盗用
⑤可能与Flask-Principal或其他授权扩展,在以后的工作中进行整合
但是,它不会:
①强制让你使用一个特定的数据库或者其他的存储方法。你可以完全负责你的用户时如何加载的。
②限制你使用用户名和密码,OpenID或是其他的认证方法。
③处理“登入或登出”以外的权限
④处理用户注册或者账户恢复
总结,flask-Login包只管理用户登入登出的缓存(Session)管理,而不做过多的超出自己权限的功能。
三.flask-login下的API介绍
由于flask-login中的API比较少,在本文中,尽可能将所有的API功能介绍列在这里。
- LoginManager
class flask_login.LoginManager(app=None, add_context_processor=True)
这个类是用来保存用户的登录状态的,也是flask-login包的主类。
官方:LoginManager的实例是“不”绑定到特定的应用程序的,所以你可以创建LoginManager对象在你的代码主体上,所以你可以创建应用程序在工厂函数中。
解析:我们首先看LoginManager类的构造函数
__init__(self, app=None, add_context_processor=True)
该构造函数提供了一个缺省的局部变量app,默认值为None.和上文说道的,为“不绑定到特定的应用程序”解释说明。也就是说,你可以直接定义LoginManager的实例,而不必去绑定到应用程序上才可以实例化。当你在代码主题中定义了app后,可以随时绑定到LoginManager上。
该构造函数初始化了一些列变量。
\'\'\'
LoginManager构造函数
Blog:   www.cnblogs.com/alima/
Editor: Alima | cnblog
\'\'\'

#: 提供了一个游客用户,该用户是在没有登录状态下时使用
self.anonymous_user = AnonymousUserMixin

#: 提供当用户需要登录时的重定向页面参数
#: (此处也可以是一个绝对路径)
self.login_view = None

#: 提供一个蓝图,当用户需要登录时的重定向页面
#: 如果键值为空,则默认重定向到login_view下的地址
self.blueprint_login_views = {}

#: 这条消息将flash在重定向页面上
self.login_message = LOGIN_MESSAGE

#: login_message的类型,默认LOGIN_MESSAGE_CATEGORY,可自定义
self.login_message_category = LOGIN_MESSAGE_CATEGORY

#: 如果需要一个活跃的登录,使用户重定向到其他界面,重新验证登录
self.refresh_view = None

#: 这条消息将flash到用户重新验证的界面上
self.needs_refresh_message = REFRESH_MESSAGE

#: needs_refresh_message的类型,默认REFRESH_MESSAGE_CATEGORY,可自定义
self.needs_refresh_message_category = REFRESH_MESSAGE_CATEGORY

#: 缓存(Session)的保护等级
#: 有三种等级,分别为: \'basic\'(默认),\'strong\',\'None\'(关闭缓存保护功能)
self.session_protection = \'basic\'

#: 如果存在,则用来转换使用login_message和needs_refresh_message
self.localize_callback = None

#: 检索用户对象回调
self.user_callback = None

#: 未经授权的用户回调(未登录状态)
self.unauthorized_callback = None

#: 未经授权的用户回调(需要活跃登录状态)
self.needs_refresh_callback = None

#: 默认属性以检索用户的Unicode标识(源码注释在flask_login.config文件下)
self.id_attribute = ID_ATTRIBUTE

#: 用于回调检索用户对象。(设置令牌状态)
self.header_callback = None

#: 用于回调检索用户对象。(设置Flask请求对象状态)
self.request_callback = None

#: 如果应用程序(app)为空,则默认创建一个空的LoginManager实例
if app is not None:
    self.init_app(app, add_context_processor)
API:init_app()
init_app(self, app, add_context_processor=True)
配置的应用程序。这将注册一个\'after_request`调用,并附加这个`LoginManager`把它作为\'app.login_manager`。
这里渗透一下,三个flask架构自带的装饰器。
before_request :在请求收到之前绑定一个函数做一些事情。
after_request: 每一个请求之后绑定一个函数,如果请求没有异常。
teardown_request: 每一个请求之后绑定一个函数,即使遇到了异常。
- 重新定制你的用户类
在之前的章节中,分别定义了不同的用户类,flask-login包控制登入登出需要如下属性。
① is_authenticated
当用户通过验证时,返回有效凭证True。
② is_active
一个活动用具有1)通过验证 2)账户也已激活 3)未被停用 4)也不符合任何的应用拒绝登入条件,返回True。不活动的账号无法登入。
③ is_anonyous
如果是一个匿名用户,返回True,如果是登录用户则返回False
④ get_id()
返回一个能唯一识别用户的,并能用于从user_loader回调中加载用户的ID,这个ID必须是Unicode。
如果你对你的新定制的用户类没有其他的要求,你可以继承flask_login.mixins下定义的UserMixin作为你的用户类的父类。
- flask-login下的API详解
① 配置登录
API:@user_loader
解析:这个API设置一个回调,用于从缓存中加载用户登录信息。你构造的函数需要设置一个user ID并且返回一个用户实体。如果用户不存在则返回None。
使用举例(简单实现了一个加载用户的操作,并没有对入口变量做判断):
\'\'\'
Editor: Alima | cnblog
\'\'\'
@login_manager.user_loader
def load_user(id):
    user = User.query.filter_by(id=id).first()
    return user
API:@request_loader(@header_loader)
解析:设置一个从flask请求加载用户的回调。你需要给函数一个Flask请求,函数返回用户实体,用户不存在则返回None。
使用实例:(来自官方文档的一段代码,很有启迪,这段代码欢迎探讨,博主理解不是很好。
\'\'\'
Blog: www.cnblogs.com/alima/
From: Offical Doc
\'\'\'

@login_manager.request_loader
def load_user_from_request(request):

    # first, try to login using the api_key url arg
    api_key = request.args.get(\'api_key\')
    if api_key:
        user = User.query.filter_by(api_key=api_key).first()
        if user:
            return user

    # next, try to login using Basic Auth
    api_key = request.headers.get(\'Authorization\')
    if api_key:
        api_key = api_key.replace(\'Basic \', \'\', 1)
        try:
            api_key = base64.b64decode(api_key)
        except TypeError:
            pass
        user = User.query.filter_by(api_key=api_key).first()
        if user:
            return user

    # finally, return None if both methods did not login the user
    return None
API:anonymous_user
解析:提供了一个游客用户,该用户是在没有登录状态下时使用
使用实例:(你可以判断当前用户的is_anonymous属性,是不是True来看是不是随机用户)
if current_user.is_anonymous == True
② 未经授权的配置
API: flask_login.login_view
解析:当用户需要登录时,将用户重定向到的界面。
使用举例(将非法登录强制重定向到登录界面):
login_manager.login_view = \'login\'
API: flask_login.login_message
解析:当用户重定向时,flash出的消息。
使用举例:
login_manager.login_message = \'Please enter your account\'
API:@unauthorized_handler
解析:如果你不想用默认的重定向定制你的登录,你可以在代码视图实体中显示的写出一个函数体,将@unauthorized_handler装饰器添加到函数体之上。这样做之后,当你用@login_required阻止用户非法登录,将执行我们新定义的函数体中的内容。
使用举例(将非法登录强制重定向到登录界面):
\'\'\'
Editor: Alima | cnblog
\'\'\'
@login_manager.unauthorized_handler
def unauthorized_handler():
    return redirect(\'/login\')
③需要活跃登录的配置
API: flask_login.refresh_view
解析:当用户需要活跃登录时,将用户重定向到的界面。
使用举例(将非法登录强制重定向到登录界面):
login_manager.refresh_view = \'login\'
API: flask_login.needs_refresh_message
解析:当需要活跃登录的用户重定向时,flash出的消息。
使用举例:
login_manager.needs_refresh_message = \'You need a fresh log in.Please enter your account\'
API:@needs_refresh_handler
解析:作用和unauthorized_handler类似,当你需要登录的用户是输入用户名密码登录时,而你又不想使用默认的重定向方法,那么,你可以显示的定义你自己处理函数。
使用举例(将非活跃登录强制重定向到登录界面,并flash出消息):
\'\'\'
Editor: Alima | cnblog
\'\'\'
@login_manager.needs_refresh_handler
def refresh():
    flash(\'You should log in!\')
    return logout()
④登录机制
API:flask_login.current_user
解析:获取当前缓存中保存的用户帐户信息(一个当前用户的代理)
API:flask_login.login_fresh()
如果当前用户是活跃登录,则返回True。
API:flask_login.login_user(user, remember=False, force=False,fresh=True)
解析Ⅰ:登录用户。你需要向函数中传进一个用户对象。如果用户\'is_active\'属性为\'Flase\',只有当\'force\'是\'True\'时才会允许登录。当登录成功后返回\'True\',当失败时返回\'False\'。
这里特别提一下函数参数\'fresh\',当设置为\'False\'时,将登陆用户的缓存(Session)中标志为不是活跃登录。默认值为\'True\'
举例:
@app.route(\'/post\')
@login_required
def post():
    pass
解析Ⅱ:如果只有当前时刻你需要要求你的用户登录,你可以这样做:
if not current_user.is_authenticated:
    return current_app.login_manager.unauthorized()
实际上,将上边的代码添加到你的视图中去就可以达到要求了。
当单体测试的时候它可以很方便的全局关闭认证。将\'LOGIN_DISABLED\'设置为True,装饰器就会被忽略了。
API:flask_login.logout_user()
解析:用户登出(你不需要通过实际用户)。这个函数同时会清除remember me中的cookie(如果存在的话)。
作用就是清除一系列的cookie信息。
API:flask_login.confirm_login()
解析:函数将会将当前Sesslion设置为活跃。当从cookie加载之后,Sesson会变成不活跃状态。
⑤保护视图
API:flask_login.login_required
解析:如果你将这个装饰器放在视图上,它会保证你的当前用户是登录状态,并且在调用实际视图之前进行认证。
如果当前用户不是系统认证的登录状态,它将调用LoginManager.unauthorized回调。
API:flask_login.fresh_login_required
解析:如果用这个装饰器放在视图上,它将确保当前用户是活跃登录的。用户的Session不是从\'remember me\'的cookie中加载的。
敏感的操作,例如修改密码或者邮箱,应该用这个装饰器保护,来阻止cookie被盗取。
如果用户没有认证,通常调用\'LoginManager.unauthorized\'。
如果用户被认证了,但是缓存不是活跃登陆,它将会\'LoginManager.needs_refresh\'代替,而且你需要提供一个\'LoginManager.refresh_view\'。
几乎所有的flask-login下的API都在本文介绍了一下,其中@request_loader装饰器,博主理解不是很好,一旦有进展,会更新在文章中。如果你知道@request_loader装饰器的用法,欢迎私信评论给博主。
以上就是API的介绍,我们下面来看实例。
四.应用实例
本次在前一篇博文的基础上,我们来展开本篇博文。
首先,我们要介绍model.py类,以便匹配本次的flask-login。
\'\'\'
File name: model.py
Editor: Alima | cnblogs
Blog:   www.cnblogs.com/alima/
\'\'\'

from wtf import db
from flask_login import UserMixin

class User(db.Model, UserMixin):
    id = db.Column(db.Integer, primary_key=True)
    username = db.Column(db.String(80), unique=True)
    password = db.Column(db.String(80), unique=True)

    def __init__(self, username, password):
        self.username = username
        self.password = password

    def __repr__(self):
        return \'<User %r>\' % self.username
根据我们讲到的,使用flask-login验证用户登录时需要如下属性。
① is_authenticated
② is_active
③ is_anonyous
④ get_id()
User继承了UserMixin类的属性,方法。下面附加上flask-login包中的UseMixin类的源码。
\'\'\'
From Github: maxcountryman/flask-login
\'\'\'

class UserMixin(object):
    \'\'\'
    This provides default implementations for the methods that Flask-Login
    expects user objects to have.
    \'\'\'

    if not PY2:  # pragma: no cover
        # Python 3 implicitly set __hash__ to None if we override __eq__
        # We set it back to its default implementation
        __hash__ = object.__hash__

    @property
    def is_active(self):
        return True

    @property
    def is_authenticated(self):
        return True

    @property
    def is_anonymous(self):
        return False

    def get_id(self):
        try:
            return text_type(self.id)
        except AttributeError:
            raise NotImplementedError(\'No `id` attribute - override `get_id`\')

    def __eq__(self, other):
        \'\'\'
        Checks the equality of two `UserMixin` objects using `get_id`.
        \'\'\'
        if isinstance(other, UserMixin):
            return self.get_id() == other.get_id()
        return NotImplemented

    def __ne__(self, other):
        \'\'\'
        Checks the inequality of two `UserMixin` objects using `get_id`.
        \'\'\'
        equal = self.__eq__(other)
        if equal is NotImplemented:
            return NotImplemented
        return not equal
附加属性一目了然,如果你想重新定制你的用户类,那么请重新类中的方法重写这个方法,如果仍想调用父类UserMixin中的方法,请使用super()语句。
这下,就解释了之前没有提到的UserMixin的作用。
下面来解释上次有很多有疑点的view.py,并在其中加入本文介绍的一些API的使用。
 1 \'\'\'
 2 File Name: view.py
 3 Editor: Alima | cnblogs
 4 Blog: www.cnblogs.com/alima/
 5 \'\'\'
 6
 7 from flask import render_template, flash, redirect, session, url_for, request, g
 8 from flask_login import login_user, logout_user, current_user, login_required, AnonymousUserMixin, fresh_login_required, login_fresh
 9 from wtf import app, db, lm, User
10 from form import LoginForm, UploadForm
11
12 @app.before_request
13 def before_request():
14     g.user = current_user
15
16 @lm.user_loader
17 def load_user(id):
18     user = User.query.filter_by(id=id).first()
19     return user
20
21 @app.route(\'/login\', methods=[\'GET\', \'POST\'])
22 def login():
23     if g.user is not None and g.user.is_authenticated:
24         #login_fresh()
25         session[\'_fresh\'] = False
26         return redirect(url_for(\'index\'))
27     if g.user.is_active == True:
28         flash(\'active is True\')
29     else:
30         flash(\'active is False\')
31     form = LoginForm()
32     if form.validate_on_submit():
33         user = User.query.filter_by(username=form.username.data, password=form.password.data).first()
34         if(user is not None):
35             login_user(user,remember=form.remember_me.data)
36             return redirect(request.args.get("next") or url_for(\'index\'))
37     return render_template(\'login.html\', form=form)
38
39 @app.route(\'/\', methods = [\'GET\', \'POST\'])
40 @app.route(\'/index\', methods=[\'GET\', \'POST\'])
41 @login_required
42 def index():
43     form = UploadForm()
44
45     if form.validate_on_submit():
46         filename = secure_filename(form.file.data.filename)
47         form.file.data.save(\'uploads/\' + filename)
48         return redirect(url_for(\'upload\'))
49
50     return render_template(\'upload.html\', form=form)
51
52 @app.route(\'/logout\')
53 @login_required
54 def logout():
55     logout_user()
56     return redirect(url_for(\'login\'))
解释:
①第14行,current_user是在当前缓存中取出的用户实体,如果存在用户登录的缓存则返回实体,如果Session不存在则返回None。
②第16行,@lm.user_loader,这个装饰器表示,每次有请求时,都会调用它所装饰的函数。
Q: user_loader的运行机制是什么呢?
A: 答案在stackoverflow上有一个最好的解释,附上连接:flask-login: can\'t understand how it works
解释一下答案中的最后几个点,
1)你需要由你自己写出这段代码。,检查用户名和密码是否匹配(非请求到数据库的情况下)。
也就是说,用户的cookie中可以存在非法的登录信息,你需要自己写出代码校验是否符合你所用数据库的格式。
2)如果认证成功,取得用户ID,然后将用户实体它传递给login_user()。
③第35行,login_user()博主准备放在左后写,这是flask-Login的精髓,也是很多人不了解的。
④第41行,@login_required装饰器将验证所装饰的函数是否是在用户登录状态下访问的。
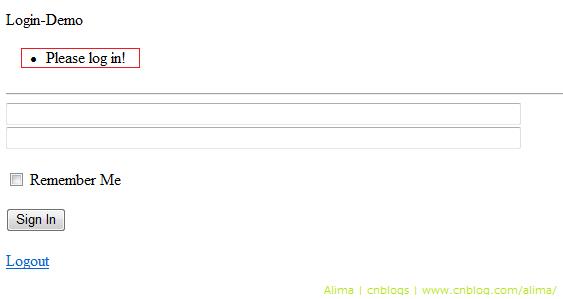
我们在配置文件(wtf.py)中配置如下信息,指定了当用户非法登录时重定向的界面和flash出的消息。
lm.login_view = \'login\'
lm.login_message = \'Please log in!\'
lm.login_message_category = \'info\'
⑤第25行,session[\'_fresh\'] = False没看懂,请Ctrl+F在本文中搜索,下面有解释。
让我们之间访问http://127.0.0.1:5000/index会发生什么。

看到红色框之内的信息了么,就是定义的login_message中的信息。同时页面跳转到了http://127.0.0.1:5000/login,也就是定义的login_view。
同时,上文还讲到使用unauthorized_handler装饰器,可以定制你自己的非法登陆处理过程。这里我们做一个简单的使用过程,非法登录时,页面将显示You have not logged in,你可以自己体验其中的妙处。
@lm.unauthorized_handler
def unauthorized_handler():
    return \'You have not logged in!\'
下面,让我们新加入一个需要活跃登录的界面。
Q:什么是活跃登录(fresh login)?
A:活跃登录是指当用户通过键入账户,并点击登录按钮后的登录状态。
而当用户通过缓存(Session)登录时,被认为是非活跃登录状态。
Q:为什么区分活跃登录和非活跃登录?
A:当用户需要修改用户信息,密码或是其他隐私信息的时候,防止你的PC被别人登录并恶意修改,或是其它人盗用你的缓存达到你不期望的一些恶意操作。
在view.py中添加如下代码段。
@app.route(\'/info\', methods = [\'GET\', \'POST\'])
@fresh_login_required
def info():
    return \'Edit your infomation\'
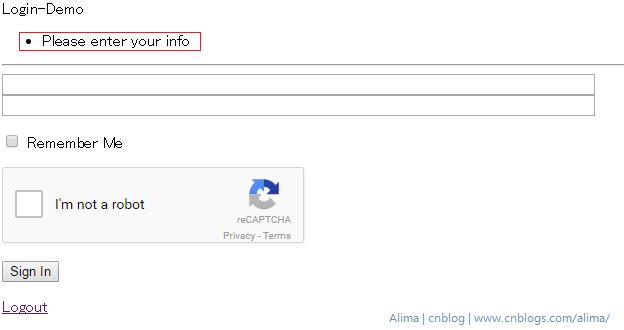
在wtf.py中配置如下信息。
lm.refresh_view = \'login\'
lm.needs_refresh_message = \'Please enter your info\'
lm.needs_refresh_message_category = "refresh_info"
如果想将页面重定向到login界面,需要做点小的改善,就是修改flask-login源码
文件在flaskr\\Lib\\site-packages\\flask_login.py。
修改源码中的needs_refresh()函数。

 1 def needs_refresh(self):
 2     \'\'\'
 3     This is called when the user is logged in, but they need to be
 4     reauthenticated because their session is stale. If you register a
 5     callback with `needs_refresh_handler`, then it will be called.
 6     Otherwise, it will take the following actions:
 7
 8     - Flash :attr:`LoginManager.needs_refresh_message` to the user.
 9
10     - Redirect the user to :attr:`LoginManager.refresh_view`. (The page
11       they were attempting to access will be passed in the ``next``
12       query string variable, so you can redirect there if present
13       instead of the homepage.)
14
15     If :attr:`LoginManager.refresh_view` is not defined, then it will
16     simply raise a HTTP 401 (Unauthorized) error instead.
17
18     This should be returned from a view or before/after_request function,
19     otherwise the redirect will have no effect.
20     \'\'\'
21     user_needs_refresh.send(current_app._get_current_object())
22
23     if self.needs_refresh_callback:
24        return self.needs_refresh_callback()
25
26     if not self.refresh_view:
27         abort(401)
28
29     if self.localize_callback is not None:
30        flash(self.localize_callback(self.needs_refresh_message),
31            category=self.needs_refresh_message_category)
32     else:
33            flash(self.needs_refresh_message,
34                   category=self.needs_refresh_message_category)
35
36     logout_user() #Edit by Alima | cnblogs
37     return redirect(login_url(self.refresh_view, request.url))
Q:为什么要更改needs_refresh()函数?
A:试想当你进入info界面,info界面重定向到login界面,由于浏览器保留了用户的登录缓存,又由login界面跳转到index界面。
最后当你进入info界面的时候,现在不是活跃登录,你预想的结果是让用户登录,其实不然,你发现你的浏览器进入了index界面。
所以你需要重新定制一下needs_refresh()函数,先将当前用户退出登录,这样就会跳转到login界面了,一个小小的思维陷阱。
在源码中没有实现我们想要的效果,那么就修改源码。
Q:当我看到view.py中,login函数时,有一个session[\'_fresh\'] = False语句看不懂。
A:flask-login包,并没有在用户非活跃登录状态,将session[\'_fresh\']设置为Flase的地方,所以我们在那里显示的设置为Flase。
分别用两种方式访问http://127.0.0.1:5000/info
①在键入用户账户并登录成功的情况下,在浏览器中直接输入127.0.0.1:5000/index和127.0.0.1:5000/info
②关闭浏览器界面,打开一个新的浏览器界面再次分别访问127.0.0.1:5000/index和127.0.0.1:5000/info
结果:
①在键入用户账户并登录成功的情况下,两个界面都能够正常显示。
②关闭浏览器界面,打开一个新的浏览器界面。可以访问127.0.0.1:5000/index,但当访问127.0.0.1:5000/info会跳转到登录界面,如下图所示。

看到红色的方框中,正是我们定义的needs_refresh_message信息,并且重定向到login界面。
相信读到这里,你已经能够使用:
①login_fresh()判断当前是否是活跃登录,是则返回True。
②confirm_login()将当前状态强制转换为活跃登录。
最后的最后,我们解释login_user()函数。
login_user()函数是flask-login的最核心的函数,附上源代码。

 1 def login_user(user, remember=False, force=False, fresh=True):
 2     \'\'\'
 3     Logs a user in. You should pass the actual user object to this. If the
 4     user\'s `is_active` property is ``False``, they will not be logged in
 5     unless `force` is ``True``.
 6
 7     This will return ``True`` if the log in attempt succeeds, and ``False`` if
 8     it fails (i.e. because the user is inactive).
 9
10     :param user: The user object to log in.
11     :type user: object
12     :param remember: Whether to remember the user after their session expires.
13         Defaults to ``False``.
14     :type remember: bool
15     :param force: If the user is inactive, setting this to ``True`` will log
16         them in regardless. Defaults to ``False``.
17     :type force: bool
18     :param fresh: setting this to ``False`` will log in the user with a session
19     marked as not "fresh". Defaults to ``True``.
20     :type fresh: bool
21     \'\'\'
22     if not force and not user.is_active:
23         return False
24
25     user_id = getattr(user, current_app.login_manager.id_attribute)()
26     session[\'user_id\'] = user_id
27     session[\'_fresh\'] = fresh
28     session[\'_id\'] = _create_identifier()
29
30     if remember:
31         session[\'remember\'] = \'set\'
32
33     _request_ctx_stack.top.user = user
34     user_logged_in.send(current_app._get_current_object(), user=_get_user())
35     return True
Top One: 不关闭浏览器情况下的Remember me功能
Operation: 读者可以尝试一下,当我们运行本次实例时。
①当你登录用户,但不使用Remember me功能。
②不关闭浏览器,打开一个新的页面,并将刚刚登录过的界面关闭。
③在新的界面输入127.0.0.1:5000/login
Explanation:
你会发现,你并没有进入login界面,而是进入了index界面,你会想我不是没有使用Remember me功能么?
其实,经常做Web程序的人会有直觉,问题出现在Session上,的确,确实发生在Session上。
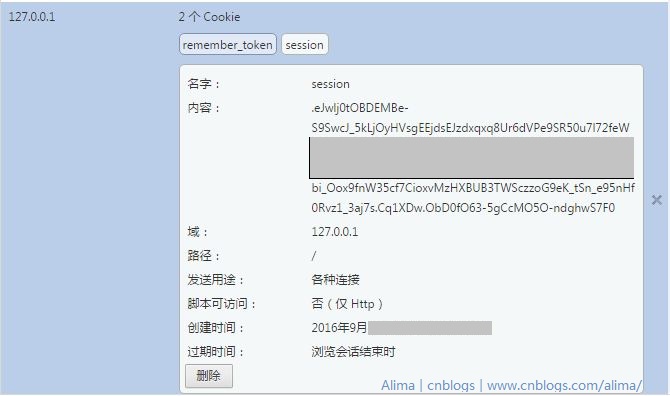
以Chrome浏览器为例,打开Chrome菜单->设置->显示高级设置->内容设置(隐私内容)->所有Cookie和数据库数据(博主将截图部分cookie和日期做了模糊处理,请见谅)

我们看到这个session的过期时间是在关闭浏览器之后,这样就解释了上面的现象。
当然,你可以设置cookie失效时间,下面表格是cookie的一些设置。
| REMEMBER_COOKIE_NAME | 存储"Remember me"信息的Cookie名。默认值:remember_token |
| REMEMBER_ 以上是关于[Python][flask][flask-login]关于flask-login中各种API使用实例的主要内容,如果未能解决你的问题,请参考以下文章 python Python Flask WSGI路由技术#python #flask #wsgi |
