RabbitMQ(从安装到使用)
Posted Wyc
tags:
篇首语:本文由小常识网(cha138.com)小编为大家整理,主要介绍了RabbitMQ(从安装到使用)相关的知识,希望对你有一定的参考价值。
RabbitMQ
一,RabbitMQ简单介绍:
RabbitMQ是一个在AMQP基础上完整的,可复用的企业消息系统。他遵循Mozilla Public License开源协议。
MQ全称为Message Queue, 消息队列(MQ)是一种应用程序对应用程序的通信方法。应用程序通过读写出入队列的消息(针对应用程序的数据)来通信,而无需专用连接来链接它们。消 息传递指的是程序之间通过在消息中发送数据进行通信,而不是通过直接调用彼此来通信,直接调用通常是用于诸如远程过程调用的技术。排队指的是应用程序通过 队列来通信。队列的使用除去了接收和发送应用程序同时执行的要求。
二,安装
pip install pika
三,简单队列
1丶使用API操作RabbitMQ
基于Queue实现生产者消费者模型


1
2
3
4
5
6
7
8
9
10
11
12
13
14
15
16
17
18
19
20
21
22
23
24
25
26
#!/usr/bin/env python
# -*- coding:utf-8 -*-
import Queue
import threading


message = Queue.Queue(10)


def producer(i):
    while True:
        message.put(i)


def consumer(i):
    while True:
        msg = message.get()


for i in range(12):
    t = threading.Thread(target=producer, args=(i,))
    t.start()

for i in range(10):
    t = threading.Thread(target=consumer, args=(i,))
    t.start()
对于RabbitMQ来说,生产和消费不再针对内存里的一个Queue对象,而是某台服务器上的RabbitMQ Server实现的消息队列。
# !/usr/bin/env python
# -*- coding:utf-8 -*-

import pika

connection = pika.BaseConnection(pika.ConnectionParameters(host=\'10.211.55.4\'))  # 封装socket逻辑部分
channel = connection.channel()  # 拿到操作句柄

channel.queue_declare(queue=\'hello\')  # 通过channel创建一个队列,再给给队列取名字

channel.basic_publish(exchange=\'\',  # 通过句柄给
                      routing_key=\'hello\',  # 把body的数据放到名为hello的队列里去
                      body=\'Hello World!\',

                      ))
print("[x] Sent \'Hello World!")
connection.close()
# !/usr/bin/env python
# -*- coding:utf-8 -*-

import pika

connection = pika.BaseConnection(pika.ConnectionParameters(host=\'10.211.55.4\'))
channel = connection.channel()

channel.queue_declare(queue=\'hello\')  # 创建队列

def callback(ch, method, properties, body):  # 就是个回调函数
    print(" [x] Received %r" % body)


channel.basic_consume(callback,  # 函数名;取出数据就执行这个函数
                      queue=\'hello\',  # 队列名
                      no_ack=Ture)  # 无应答是(Ture);有应答(False)

print(\' [*] Waiting for messages.To exit press CTRL+C\')
channel.start_consuming()
2丶acknowledgment消息不丢失
no-ack = False,如果消费者遇到情况(its channel is closed, connection is closed, or TCP connection is lost)挂掉了,那么,RabbitMQ会重新将该任务添加到队列中。
# !/usr/bin/env python
# -*- coding:utf-8 -*-

import pika

connection = pika.BaseConnection(pika.ConnectionParameters(host=\'10.211.55.4\'))
channel = connection.channel()

channel.queue_declare(queue=\'hello\')  # 创建队列

def callback(ch, method, properties, body):  # 就是个回调函数
    print(" [x] Received %r" % body)
    import time
    time.sleep(10)
    print(\'ok\')
    ch.basic_ack(delivery_tag=method.delivery_tag)  # 调为有应答要加上的(下面的要改no_ack=False)

channel.basic_qos(prefetch_count=1)

channel.basic_consume(callback,  # 函数名;取出数据就执行这个函数
                      queue=\'hello\',  # 队列名
                      no_ack=False)  # 无应答是(Ture);有应答(False)
print(\' [*] Waiting for messages.To exit press CTRL+C\')
channel.start_consuming()
3丶durable消息不丢失
import pika

connection = pika.BlockingConnection(pika.ConnectionParameters(host=\'10.211.55.4\'))
channel = connection.channel()

# make message persistent
channel.queue_declare(queue=\'hello\', durable=True)  # durable=True这个参数是把数据保存到硬盘

channel.basic_publish(exchange=\'\',
                      routing_key=\'hello\',
                      body=\'Hello World!\',
                      properties=pika.BasicProperties(
                          delivery_mode=2, # 传递模式从默认的1,改为2
                      ))
print(" [x] Sent \'Hello World!\'")
connection.close()
#!/usr/bin/env python
# -*- coding:utf-8 -*-
import pika

connection = pika.BlockingConnection(pika.ConnectionParameters(host=\'10.211.55.4\'))
channel = connection.channel()

# make message persistent
channel.queue_declare(queue=\'hello\', durable=True)


def callback(ch, method, properties, body):
    print(" [x] Received %r" % body)
    import time
    time.sleep(10)
    print \'ok\'
    ch.basic_ack(delivery_tag = method.delivery_tag)  # 把无应答调整为有应答

channel.basic_consume(callback,
                      queue=\'hello\',
                      no_ack=False)  # 改为False,表示有应答

print(\' [*] Waiting for messages. To exit press CTRL+C\')
channel.start_consuming()
4丶消息获取顺序
默认消息队列里的数据是按照顺序被消费者拿走,例如:消费者1 去队列中获取 奇数 序列的任务,消费者1去队列中获取 偶数 序列的任务。
channel.basic_qos(prefetch_count=1) 表示谁来谁取,不再按照奇偶数排列
#!/usr/bin/env python
# -*- coding:utf-8 -*-
import pika

connection = pika.BlockingConnection(pika.ConnectionParameters(host=\'10.211.55.4\'))
channel = connection.channel()

# make message persistent
channel.queue_declare(queue=\'hello\')


def callback(ch, method, properties, body):
    print(" [x] Received %r" % body)
    import time
    time.sleep(10)
    print \'ok\'
    ch.basic_ack(delivery_tag = method.delivery_tag)

channel.basic_qos(prefetch_count=1)  # prefetch_count=1这个参数就让取的方式改变,不在顺序取数据

channel.basic_consume(callback,
                      queue=\'hello\',
                      no_ack=False)

print(\' [*] Waiting for messages. To exit press CTRL+C\')
channel.start_consuming()
四,exchange
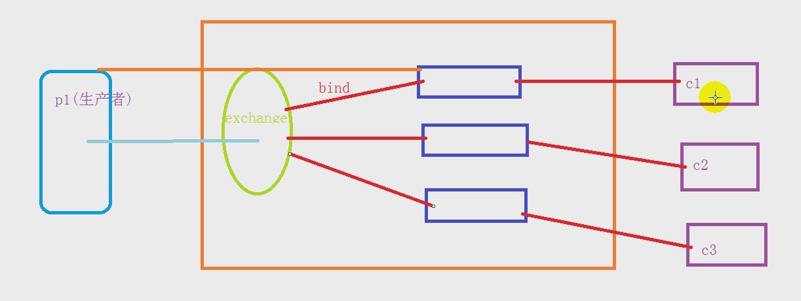
1、fanout模式
发布订阅
发布订阅和简单的消息队列区别在于,发布订阅会将消息发送给所有的订阅者,而消息队列中的数据被消费一次便消失。
所以,RabbitMQ实现发布和订阅时,会为每一个订阅者创建一个队列,而发布者发布消息时,会将消息放置在所有相关队列中。
exchange type = fanout
#!/usr/bin/env python
import pika
import sys

connection = pika.BlockingConnection(pika.ConnectionParameters(
        host=\'localhost\'))
channel = connection.channel()

# 创建交换机
channel.exchange_declare(exchange=\'logs\',  # 名字
                         type=\'fanout\')  # 类型

message = \' \'.join(sys.argv[1:]) or "info: Hello World!"
channel.basic_publish(exchange=\'logs\',  # 往名字为logs的交换机里
                      routing_key=\'\',  # 把数据直接放到交换机里,不用放到队列中,所以默认为空
                      body=message)
print(" [x] Sent %r" % message)
connection.close()  # 关闭
#!/usr/bin/env python
import pika

connection = pika.BlockingConnection(pika.ConnectionParameters(
        host=\'localhost\'))
channel = connection.channel()

#创建交换机
channel.exchange_declare(exchange=\'logs\',
                         type=\'fanout\')

# 随机创建一个队列
result = channel.queue_declare(exclusive=True)
queue_name = result.method.queue

channel.queue_bind(exchange=\'logs\',  # 随机生成的队列绑定交换机
                   queue=queue_name)

print(\' [*] Waiting for logs. To exit press CTRL+C\')

def callback(ch, method, properties, body):
    print(" [x] %r" % body)

channel.basic_consume(callback,  # 在下面阻塞后,如果得到数据后才执行这个函数
                      queue=queue_name,
                      no_ack=True)

channel.start_consuming()  # 阻塞住,等待生产者把数据放到消费者,并监听
图形解释:
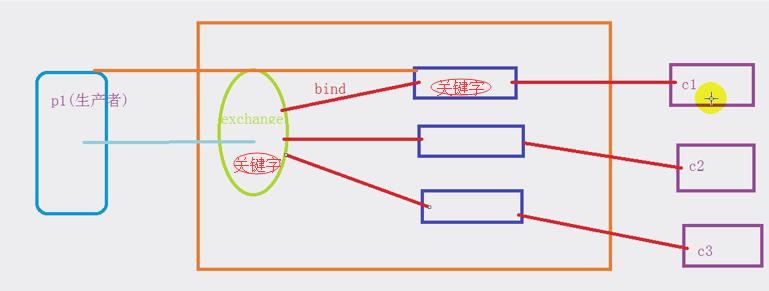
2、dirct模式
关键字发送
RabbitMQ 还支持根据关键字发送,即:队列绑定关键字,发送者将数据根据关键字发送到消息exchange,
exchange 根据 关键字 判定应该将数据发送至指定队列。
exchange type = direct
#!/usr/bin/env python
import pika
import sys

connection = pika.BlockingConnection(pika.ConnectionParameters(
        host=\'localhost\'))
channel = connection.channel()

channel.exchange_declare(exchange=\'direct_logs\',
                         type=\'direct\')

severity = sys.argv[1] if len(sys.argv) > 1 else \'info\'
message = \' \'.join(sys.argv[2:]) or \'Hello World!\'
channel.basic_publish(exchange=\'direct_logs\',
                      routing_key=severity,
                      body=message)
print(" [x] Sent %r:%r" % (severity, message))
connection.close()
#!/usr/bin/env python
import pika
import sys

connection = pika.BlockingConnection(pika.ConnectionParameters(
        host=\'localhost\'))
channel = connection.channel()

channel.exchange_declare(exchange=\'direct_logs\',
                         type=\'direct\')

result = channel.queue_declare(exclusive=True)
queue_name = result.method.queue

severities = sys.argv[1:]
if not severities:
    sys.stderr.write("Usage: %s [info] [warning] [error]\\n" % sys.argv[0])
    sys.exit(1)

for severity in severities:  # 用循环是可以绑定多个队列
    channel.queue_bind(exchange=\'direct_logs\',
                       queue=queue_name,
                       routing_key=\'severity\')  # 定义的参数(关键字)

       channel.queue_bind(exchange=\'direct_logs\',
                       queue=queue_name,
                       routing_key=\'alex\')

print(\' [*] Waiting for logs. To exit press CTRL+C\')

def callback(ch, method, properties, body):
    print(" [x] %r:%r" % (method.routing_key, body))

channel.basic_consume(callback,
                      queue=queue_name,
                      no_ack=True)

channel.start_consuming()
图形解释:
在交换机中用一关键字,只有队列里有关键字交换机才会发送数据给绑定的队列。
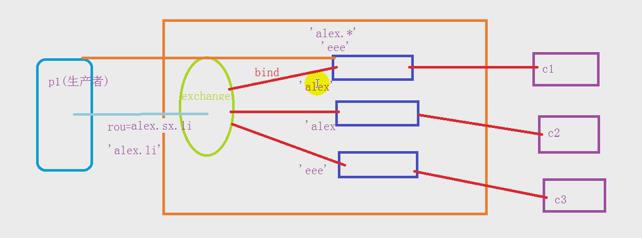
3、topic
模糊匹配
在topic类型下,可以让队列绑定几个模糊的关键字,之后发送者将数据发送到exchange,exchange将传入”路由值“和 ”关键字“进行匹配,
匹配成功,则将数据发送到指定队列。exchange type = topic
# 表示可以匹配 0 个 或 多个 单词
*  表示只能匹配 一个 单词

发送者路由值              队列中
old.boy.python          old.*  -- 不匹配
old.boy.python          old.#  -- 匹配
#!/usr/bin/env python
import pika
import sys

connection = pika.BlockingConnection(pika.ConnectionParameters(
        host=\'localhost\'))
channel = connection.channel()

channel.exchange_declare(exchange=\'topic_logs\',
                         type=\'topic\')

routing_key = sys.argv[1] if len(sys.argv) > 1 else \'anonymous.info\'
message = \' \'.join(sys.argv[2:]) or \'Hello World!\'
channel.basic_publish(exchange=\'topic_logs\',
                      routing_key=routing_key,
                      body=message)
print(" [x] Sent %r:%r" % (routing_key, message))
connection.close()
#!/usr/bin/env python
import pika
import sys

connection = pika.BlockingConnection(pika.ConnectionParameters(
        host=\'localhost\'))
channel = connection.channel()

channel.exchange_declare(exchange=\'topic_logs\',
                         type=\'topic\')

result = channel.queue_declare(exclusive=True)
queue_name = result.method.queue

binding_keys = sys.argv[1:]
if not binding_keys:
    sys.stderr.write("Usage: %s [binding_key]...\\n" % sys.argv[0])
    sys.exit(1)

for binding_key in binding_keys:
    channel.queue_bind(exchange=\'topic_logs\',
                       queue=queue_name,
                       routing_key=binding_key)

print(\' [*] Waiting for logs. To exit press CTRL+C\')

def callback(ch, method, properties, body):
    print(" [x] %r:%r" % (method.routing_key, body))

channel.basic_consume(callback,
                      queue=queue_name,
                      no_ack=True)

channel.start_consuming()
图形解释:
以上是关于RabbitMQ(从安装到使用)的主要内容,如果未能解决你的问题,请参考以下文章