开源jumpserver 跳板机搭建
Posted
tags:
篇首语:本文由小常识网(cha138.com)小编为大家整理,主要介绍了开源jumpserver 跳板机搭建相关的知识,希望对你有一定的参考价值。
准备环境
关闭服务器的防火墙
[[email protected] ~]# /etc/init.d/iptables stop
[[email protected] ~]# /etc/init.d/iptables status
iptables: Firewall is not running.
2.关闭selinux强制访问控制系统
[[email protected] ~]# cp /etc/selinux/config /etc/selinux/config.sourec.bak
[[email protected] ~]# sed -i "s/SELINUX=enforcing/SELINUX=disabled/g" /etc/selinux/config
3.配置指定的YUM源分别为(阿里云YUM源,与epel YUM源)
wget -O /etc/yum.repos.d/epel.repo http://mirrors.aliyun.com/repo/epel-6.repo
wget -O /etc/yum.repos.d/CentOS-Base.repo http://mirrors.aliyun.com/repo/Centos-6.repo
yum repolist
4.检查您的服务器是否可以访问外网
[[email protected] ~]# ping www.baidu.com
PING www.a.shifen.com (61.135.169.121) 56(84) bytes of data.
64 bytes from 61.135.169.121: icmp_seq=1 ttl=128 time=23.0 ms
5.现在需要安装jump-server所依赖的软件包
[[email protected] ~]# yum -y install epel-release
Installed:
  epel-release.noarch 0:6-8
[[email protected] ~]# rpm -q epel-release
epel-release-6-8.noarch

[[email protected] ~]# yum -y install git python-pip mysql-devel gcc automake autoconf python-devel vim sshpass lrzsz readline-devel
[[email protected] ~]# rpm -q git python-pip mysql-devel gcc automake autoconf python-devel vim sshpass lrzsz readline-devel
gcc gcc-c++
安装jump-server跳板机
1. 首先我们需要先下载jump-server源码及安装包
[[email protected] ~]# cd /opt && git clone https://github.com/jumpserver/jumpserver.git
Initialized empty Git repository in /opt/jumpserver/.git/
remote: Counting objects: 12936, done.
Receiving objects:  14% (1856/12936), 356.01 KiB | 229 KiB/s

[[email protected] opt]# ll /opt/
drwxr-xr-x  14 root root 4096 Jun 22 11:44 jumpserver
2.通过执行安装包自带的脚本快速安装jump-server软件
[[email protected] opt]# cd jumpserver/install && pip install -r requirements.txt
InsecurePlatformWarning
  Downloading Django-1.6-py2.py3-none-any.whl (6.7MB)
    11% |███▊                            | 765kB 1.7MB/s eta 0:00:04

#######################最后提示安装成功的信息
Uninstalling pycrypto-2.0.1:
      Successfully uninstalled pycrypto-2.0.1
  Running setup.py install for pycrypto
  Found existing installation: paramiko 1.7.5
    Uninstalling paramiko-1.7.5:
      Successfully uninstalled paramiko-1.7.5
  Running setup.py install for MySQL-python
  Running setup.py install for psutil
  Running setup.py install for xlrd
  Running setup.py install for django-bootstrap-form
  Running setup.py install for backports.ssl-match-hostname
  Running setup.py install for tornado
  Running setup.py install for MarkupSafe
  Running setup.py install for PyYAML
  Running setup.py install for ansible
  Running setup.py install for pyinotify
  Running setup.py install for django-smtp-ssl
Successfully installed MarkupSafe-0.23 MySQL-python-1.2.5 PyYAML-3.11 ansible-1.9.4 argparse-1.4.0 backports-abc-0.4 backports.ssl-match-hostname-3.5.0.1 certifi-2016.2.28 django-1.6 django-bootstrap-form-3.2 django-crontab-0.6.0 django-smtp-ssl-1.0 ecdsa-0.13 jinja2-2.8 paramiko-1.16.0 passlib-1.6.5 psutil-3.3.0 pycrypto-2.4.1 pyinotify-0.9.6 pyte-0.5.2 singledispatch-3.4.0.3 six-1.10.0 tornado-4.3 wcwidth-0.1.6 xlrd-0.9.4 xlsxwriter-0.7.7
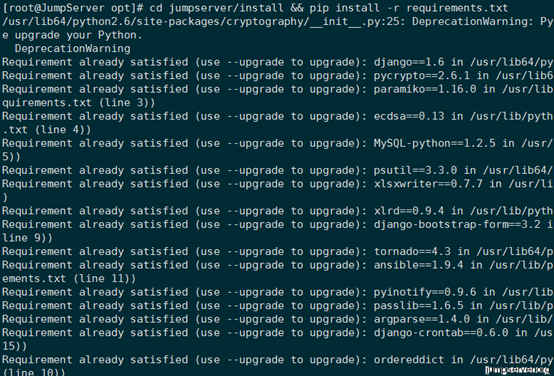
如果是已经安装好的,就是提示如下图内容
当然我们也可以查看安装包
[[email protected] install]# pip freeze
ansible==1.9.4
xlrd==0.9.4
-----------
XlsxWriter==0.7.7
yum-metadata-parser==1.1.2
配置jump-server跳板机
3.当我们安装完成jumpserver以后需要对其进行初始化的设置
[[email protected] install]# python install.py
开始关闭防火墙和selinux
setenforce: SELinux is disabled
请输入您服务器的IP地址,用户浏览器可以访问 [10.0.0.61]:
是否安装新的MySQL服务器? (y/n) [y]: y
以下就需要下载安装MySQL数据库,此过程省略……………………………………………….
Starting mysqld:            [  OK  ]
连接数据库成功
请输入SMTP地址: stmp.163.com
请输入SMTP端口 [25]:
请输入账户: [email protected]
请输入密码:*************
[Errno -2] Name or service not known
是否跳过(y/n) [n]? : y
请登陆邮箱查收邮件, 然后确认是否继续安装
是否继续? (y/n) [y]: y
开始写入配置文件
开始安装Jumpserver ...
开始更新jumpserver
请输入管理员用户名 [admin]: admin
请输入管理员密码: [[email protected]]: admin
请再次输入管理员密码: [[email protected]]: admin
安装成功,请访问web, 祝你使用愉快。
请访问 https://github.com/jumpserver/jumpserver/wiki 查看文档
到了这里我们的jump-server服务器就安装完成啦!
提示注意:
1)根据提示输入相关信息,完成安装,完成安装后,请访问web,继续查看后续文档
2)如果启动失败,请返回上层目录,手动运行 ./service.sh start启动
3)如果./service.sh start启动失败
请进入jumpserver目录,手动运行
python manage.py runserver 0.0.0.0:80
python run_websocket.py
4)如果启动失败,可能是由于 80端口和3000端口已经被占用,或者数据库账号密码不对,请检查
登录jump-server后台
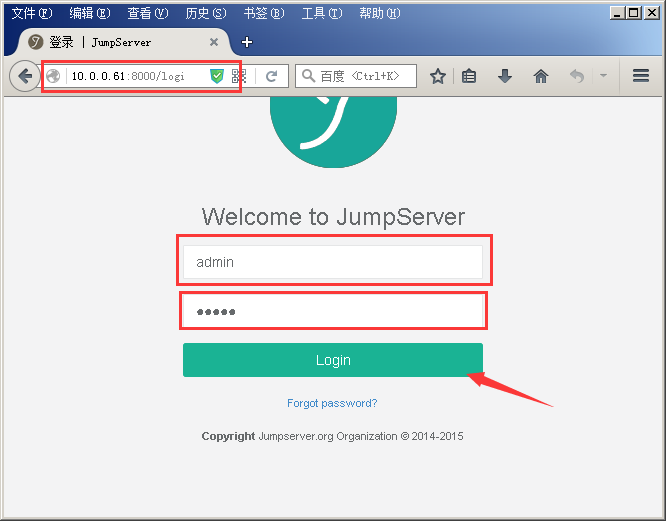
4.通过在浏览器输入http://10.0.0.61:8000/login/地址访问jump-server后台(建议最好使用谷歌浏览器)
当我们登录进去就会看到如下界面
提示:
在使用Jumpserver过程中,有一步是系统用户推送,
要推送成功,Client端(后端服务器)环境要满足以下条件:
后端服务器需要有python,sudo 环境才能使用推送用户,批量命令等功能
后端服务器如果开启了selinux,请安装 libselinux-python
更新代码的方法
假如我们的jump-server代码如果有更新的内容的话,那么就可以使用安装包自带的脚本进行代码更新操作
[[email protected] ~]# cd /opt/jumpserver
[[email protected] jumpserver]# git pull #<== 更新代码
Already up-to-date. #<== 这里表示jump-server的代码已经是最新的啦
更多的功能可以参考官方文档:https://github.com/jumpserver/jumpserver/wiki
本文出自 “土豆” 博客,请务必保留此出处http://zhaoyulin.blog.51cto.com/11665101/1844996
以上是关于开源jumpserver 跳板机搭建的主要内容,如果未能解决你的问题,请参考以下文章


![DY4O1B$CZJJUEJF}(H2X]@4.png 技术分享](http://s5.51cto.com/wyfs02/M00/86/AB/wKioL1fG-nqRDtx0AAF-hb3eOsw842.png)