前言
上一篇内容写了Java中线程池的实现原理及源码分析,说好的是实实在在的大满足,想通过一篇文章让大家对线程池有个透彻的了解,但是文章写完总觉得还缺点什么?
上篇文章只提到线程提交的execute()方法,并没有讲解线程提交的submit()方法,submit()有一个返回值,可以获取线程执行的结果Future<T>,这一讲就那深入学习下submit()和FutureTask实现原理。
使用场景&示例
使用场景
我能想到的使用场景就是在并行计算的时候,例如一个方法中调用methodA()、methodB(),我们可以通过线程池异步去提交方法A、B,然后在主线程中获取组装方法A、B计算后的结果,能够大大提升方法的吞吐量。
使用示例
/**
 * @author wangmeng
 * @date 2020/5/28 15:30
 */
public class FutureTaskTest {
    public static void main(String[] args) throws InterruptedException, ExecutionException {
        ExecutorService threadPool = Executors.newCachedThreadPool();

        System.out.println("====执行FutureTask线程任务====");
        Future<String> futureTask = threadPool.submit(new Callable<String>() {
            @Override
            public String call() throws Exception {
                System.out.println("FutureTask执行业务逻辑");
                Thread.sleep(2000);
                System.out.println("FutureTask业务逻辑执行完毕!");
                return "欢迎关注: 一枝花算不算浪漫!";
            }
        });

        System.out.println("====执行主线程任务====");
        Thread.sleep(1000);
        boolean flag = true;
        while(flag){
            if(futureTask.isDone() && !futureTask.isCancelled()){
                System.out.println("FutureTask异步任务执行结果:" + futureTask.get());
                flag = false;
            }
        }

        threadPool.shutdown();
    }
}
上面的使用很简单,submit()内部传递的实际上是个Callable接口,我们自己实现其中的call()方法,我们通过futureTask既可以获取到具体的返回值。
submit()实现原理
submit() 是也是提交任务到线程池,只是它可以获取任务返回结果,返回结果是通过FutureTask来实现的,先看下ThreadPoolExecutor中代码实现:
public class ThreadPoolExecutor extends AbstractExecutorService {
    public <T> Future<T> submit(Callable<T> task) {
        if (task == null) throw new NullPointerException();
        RunnableFuture<T> ftask = newTaskFor(task);
        execute(ftask);
        return ftask;
    }
}

public abstract class AbstractExecutorService implements ExecutorService {
    protected <T> RunnableFuture<T> newTaskFor(Callable<T> callable) {
        return new FutureTask<T>(callable);
    }
}
提交任务还是执行execute()方法,只是task被包装成了FutureTask ,也就是在excute()中启动线程后会执行FutureTask.run()方法。
再来具体看下它执行的完整链路图:
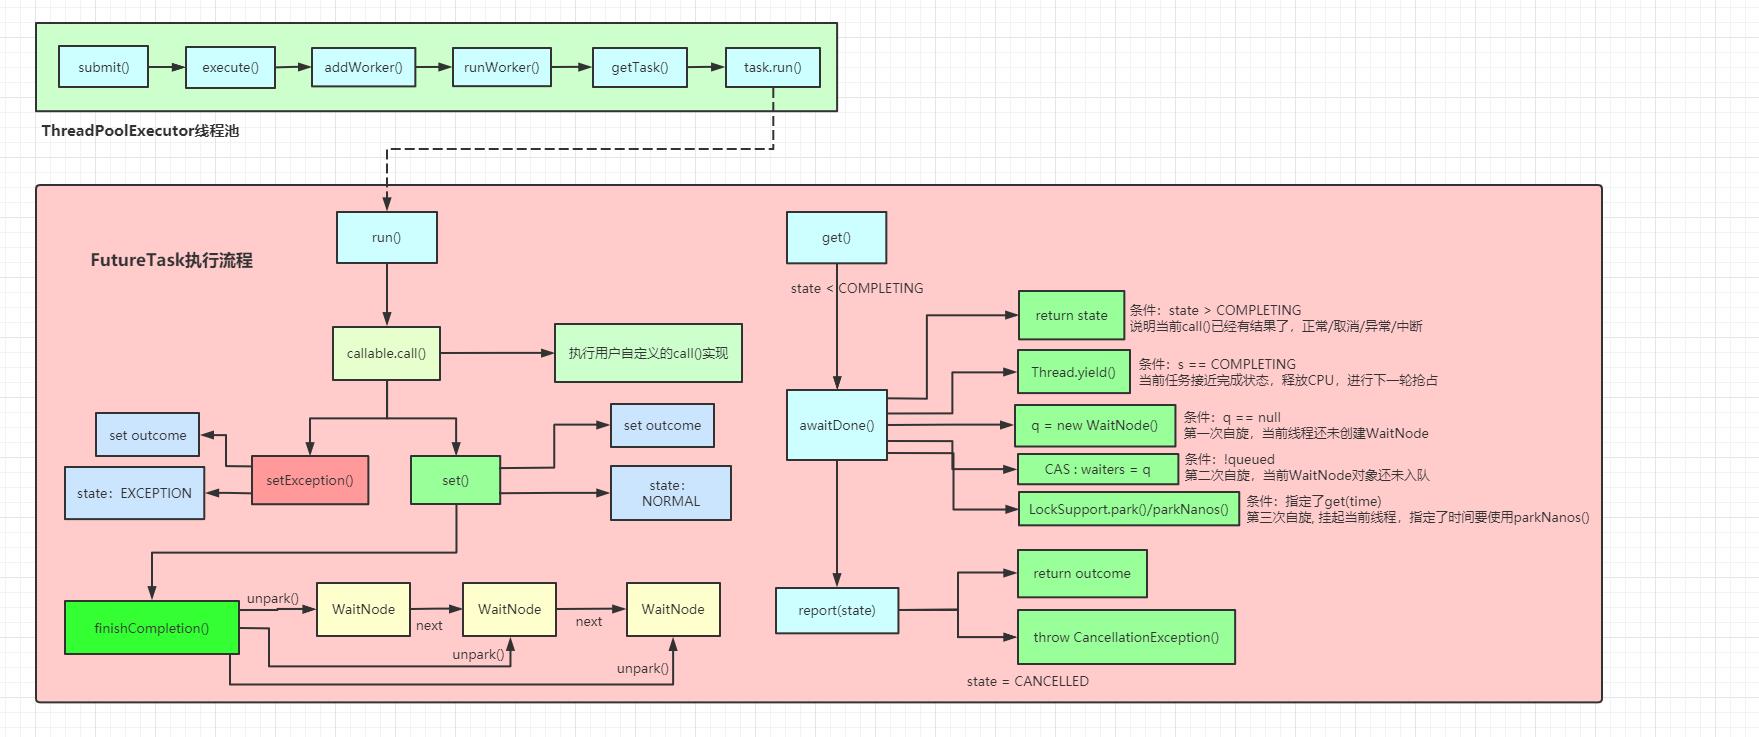
上图可以看到,执行任务并返回执行结果的核心逻辑实在FutureTask中,我们以FutureTask.run/get 两个方法为突破口,一点点剖析FutureTask的实现原理。
FutureTask源码初探
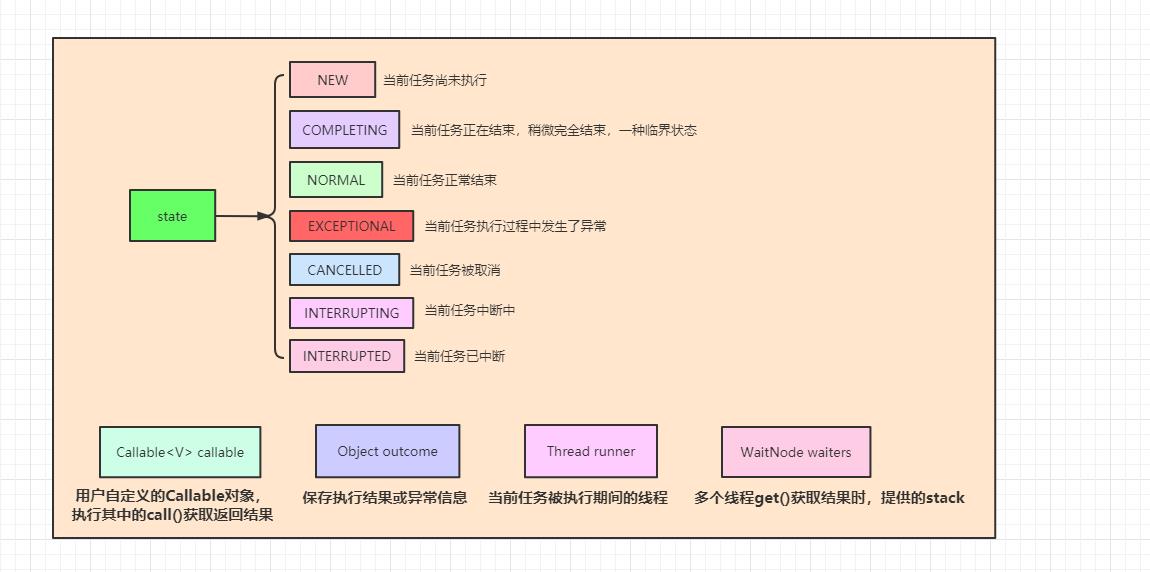
先看下FutureTask中部分属性:
public class FutureTask<V> implements RunnableFuture<V> {
    private volatile int state;
    private static final int NEW          = 0;
    private static final int COMPLETING   = 1;
    private static final int NORMAL       = 2;
    private static final int EXCEPTIONAL  = 3;
    private static final int CANCELLED    = 4;
    private static final int INTERRUPTING = 5;
    private static final int INTERRUPTED  = 6;

    private Callable<V> callable;
    private Object outcome;
    private volatile Thread runner;
    private volatile WaitNode waiters;
}
- state
当前task状态,共有7中类型。
NEW: 当前任务尚未执行
COMPLETING: 当前任务正在结束,尚未完全结束,一种临界状态
NORMAL:当前任务正常结束
EXCEPTIONAL: 当前任务执行过程中发生了异常。
CANCELLED: 当前任务被取消
INTERRUPTING: 当前任务中断中..
INTERRUPTED: 当前任务已中断
- callble
用户提交任务传递的Callable,自定义call方法,实现业务逻辑
- outcome
任务结束时,outcome保存执行结果或者异常信息。
- runner
当前任务被线程执行期间,保存当前任务的线程对象引用
- waiters
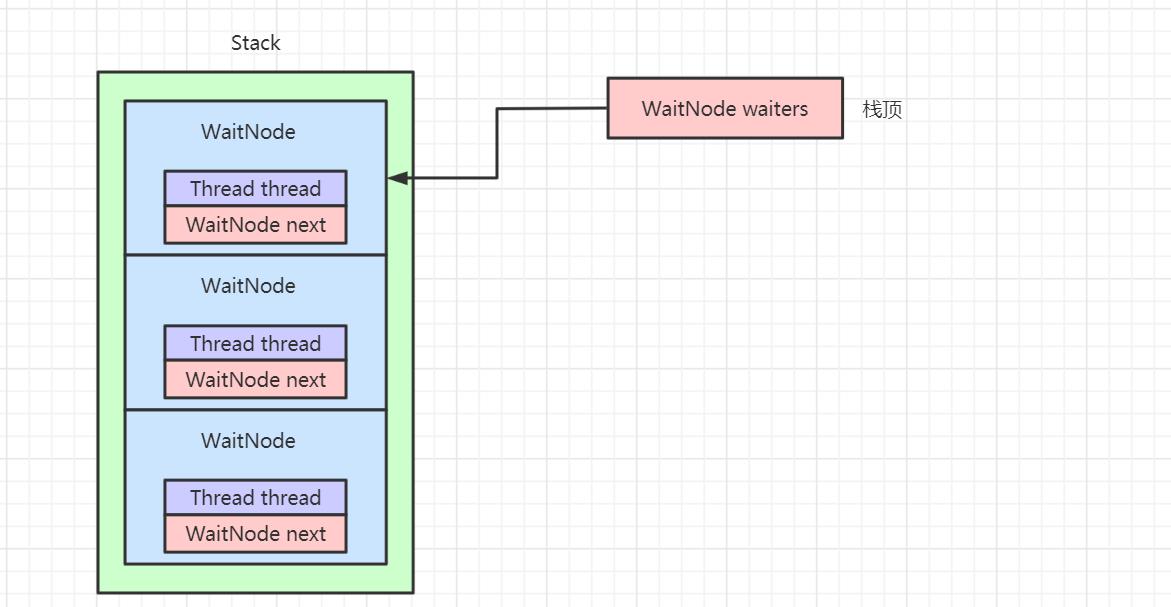
因为会有很多线程去get当前任务的结果,所以这里使用了一种stack数据结构来保存
FutureTask.run()实现原理
我们已经知道在线程池runWorker()中最终会调用到FutureTask.run()方法中,我们就来看下它的执行原理吧:
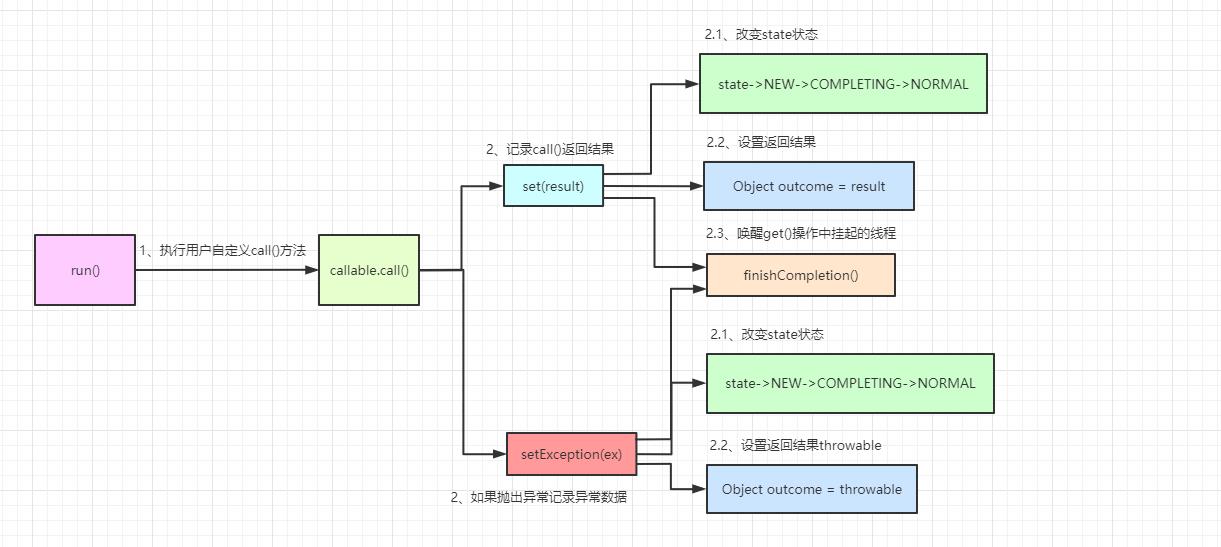
具体代码如下:
public class FutureTask<V> implements RunnableFuture<V> {
    public void run() {
        if (state != NEW ||
            !UNSAFE.compareAndSwapObject(this, runnerOffset, null, Thread.currentThread()))
            return;
        try {
            Callable<V> c = callable;
            if (c != null && state == NEW) {
                V result;
                boolean ran;
                try {
                    result = c.call();
                    ran = true;
                } catch (Throwable ex) {
                    result = null;
                    ran = false;
                    setException(ex);
                }
                if (ran)
                    set(result);
            }
        } finally {
            runner = null;
            int s = state;
            if (s >= INTERRUPTING)
                handlePossibleCancellationInterrupt(s);
        }
    }
}
首先是判断FutureTask中state状态,必须是NEW才可以继续执行。
然后通过CAS修改runner引用为当前线程。
接着执行用户自定义的call()方法,将返回结果设置到result中,result可能为正常返回也可能为异常信息。这里主要是调用set()/setException()
FutureTask.set()实现原理
set()方法的实现很简单,直接看下代码:
public class FutureTask<V> implements RunnableFuture<V> {
    protected void set(V v) {
        if (UNSAFE.compareAndSwapInt(this, stateOffset, NEW, COMPLETING)) {
            outcome = v;
            UNSAFE.putOrderedInt(this, stateOffset, NORMAL);
            finishCompletion();
        }
    }
}
将call()返回的数据赋值给全局变量outcome上,然后修改state状态为NORMAL,最后调用finishCompletion()来做挂起线程的唤醒操作,这个方法等到get()后面再来讲解。
FutureTask.get()实现原理

接着看下代码:
public class FutureTask<V> implements RunnableFuture<V> {
    public V get() throws InterruptedException, ExecutionException {
        int s = state;
        if (s <= COMPLETING)
            s = awaitDone(false, 0L);
        return report(s);
    }
}
如果FutureTask中state为NORMAL或者COMPLETING,说明当前任务并没有执行完成,调用get()方法会被阻塞,具体的阻塞逻辑在awaitDone()方法:
private int awaitDone(boolean timed, long nanos) throws InterruptedException {

        final long deadline = timed ? System.nanoTime() + nanos : 0L;
        WaitNode q = null;
        boolean queued = false;
        for (;;) {
            if (Thread.interrupted()) {
                removeWaiter(q);
                throw new InterruptedException();
            }

            int s = state;
            if (s > COMPLETING) {
                if (q != null)
                    q.thread = null;
                return s;
            }
            else if (s == COMPLETING)
                Thread.yield();
            else if (q == null)
                q = new WaitNode();
            else if (!queued)
                queued = UNSAFE.compareAndSwapObject(this, waitersOffset, q.next = waiters, q);
            else if (timed) {
                nanos = deadline - System.nanoTime();
                if (nanos <= 0L) {
                    removeWaiter(q);
                    return state;
                }
                LockSupport.parkNanos(this, nanos);
            }
            else
                LockSupport.park(this);
        }
    }
这个方法可以说是FutureTask中最核心的方法了,一步步来分析:
如果timed不为空,这说明指定nanos时间还未返回结果,线程就会退出。
q是一个WaitNode对象,是将当前引用线程封装在一个stack数据结构中,WaitNode对象属性如下:
 static final class WaitNode {
    volatile Thread thread;
    volatile WaitNode next;
    WaitNode() { thread = Thread.currentThread(); }
}
接着判断当前线程是否中断,如果中断则抛出中断异常。
下面就进入一轮轮的if... else if...判断逻辑,我们还是采用分支的方式去分析。
分支一:if (s > COMPLETING) {
此时get()方法已经有结果了,无论是正常返回的结果,还是异常、中断、取消等,此时直接返回state状态,然后执行report()方法。
分支二:else if (s == COMPLETING)
条件成立,说明当前任务接近完成状态,这里让当前线程再释放cpu,进行下一轮抢占cpu。
分支三:else if (q == null)
第一次自旋执行,WaitNode还没有初始化,初始化q=new WaitNode();
分支四:else if (!queued){
queued代表当前线程是否入栈,如果没有入栈则进行入栈操作,顺便将全局变量waiters指向栈顶元素。
分支五/六:LockSupport.park
如果设置了超时时间,则使用parkNanos来挂起当前线程,否则使用park()
经过这么一轮自旋循环后,如果执行call()还没有返回结果,那么调用get()方法的线程都会被挂起。
被挂起的线程会等待run()返回结果后依次唤醒,具体的执行逻辑在finishCompletion()中。
最终stack结构中数据如下:
FutureTask.finishCompletion()实现原理
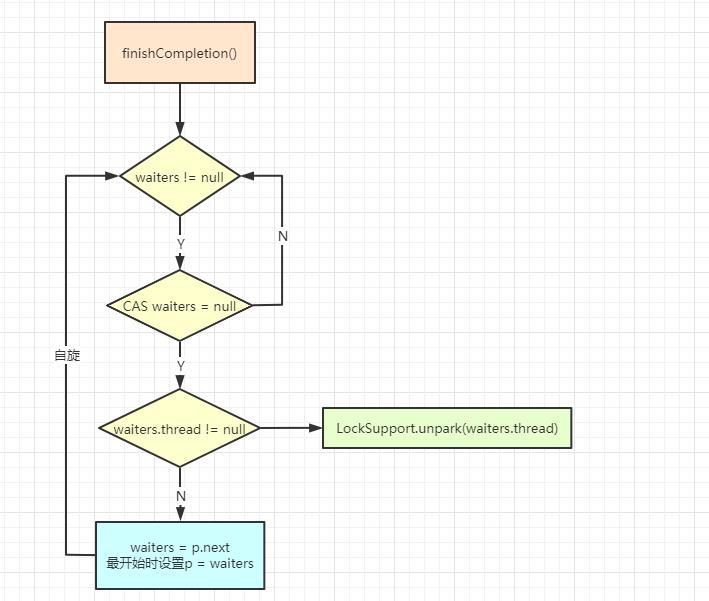
具体实现代码如下:
private void finishCompletion() {
    for (WaitNode q; (q = waiters) != null;) {
        if (UNSAFE.compareAndSwapObject(this, waitersOffset, q, null)) {
            for (;;) {
                Thread t = q.thread;
                if (t != null) {
                    q.thread = null;
                    LockSupport.unpark(t);
                }
                WaitNode next = q.next;
                if (next == null)
                    break;
                q.next = null;
                q = next;
            }
            break;
        }
    }

    done();

    callable = null;
}
代码实现很简单,看过get()方法后,我们知道所有调用get()方法的线程,在run()还没有返回结果前,都会保存到一个有WaitNode构成的statck数据结构中,而且每个线程都会被挂起。
这里是遍历waiters栈顶元素,然后依次查询起next节点进行唤醒,唤醒后的节点接着会往后调用report()方法。
FutureTask.report()实现原理
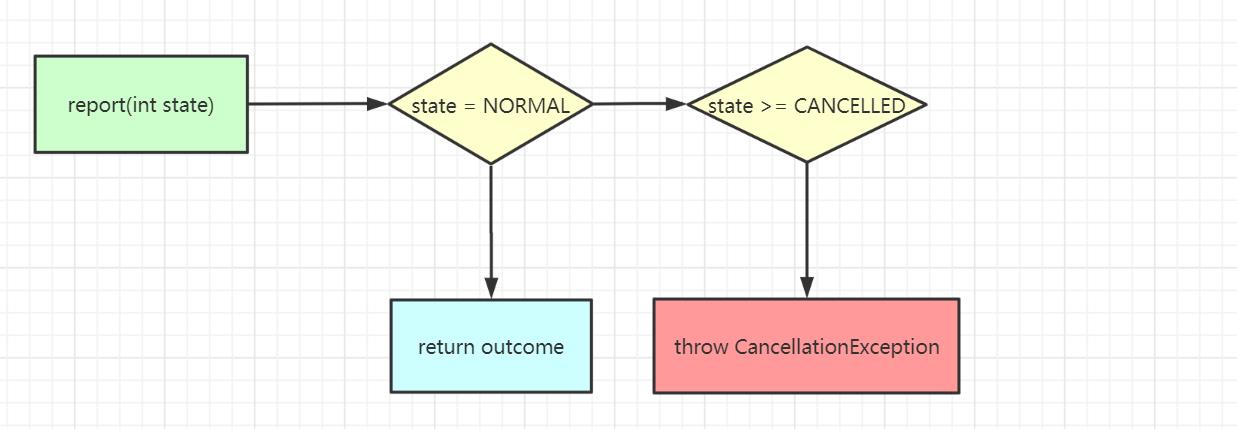
具体代码如下:
private V report(int s) throws ExecutionException {
    Object x = outcome;
    if (s == NORMAL)
        return (V)x;
    if (s >= CANCELLED)
        throw new CancellationException();
    throw new ExecutionException((Throwable)x);
}
这个方法很简单,因为执行到了这里,说明当前state状态肯定大于COMPLETING,判断如果是正常返回,那么返回outcome数据。
如果state是取消状态,抛出CancellationException异常。
如果状态都不满足,则说明执行中出现了差错,直接抛出ExecutionException
FutureTask.cancel()实现原理

public boolean cancel(boolean mayInterruptIfRunning) {
    if (!(state == NEW && UNSAFE.compareAndSwapInt(this, stateOffset, NEW, mayInterruptIfRunning ? INTERRUPTING : CANCELLED)))
        return false;
    try {
        if (mayInterruptIfRunning) {
            try {
                Thread t = runner;
                if (t != null)
                    t.interrupt();
            } finally {
                UNSAFE.putOrderedInt(this, stateOffset, INTERRUPTED);
            }
        }
    } finally {
        finishCompletion();
    }
    return true;
}
cancel()方法的逻辑很简单,就是修改state状态为CANCELLED,然后调用finishCompletion()来唤醒等待的线程。
这里如果mayInterruptIfRunning,就会先中断当前线程,然后再去唤醒等待的线程。
总结
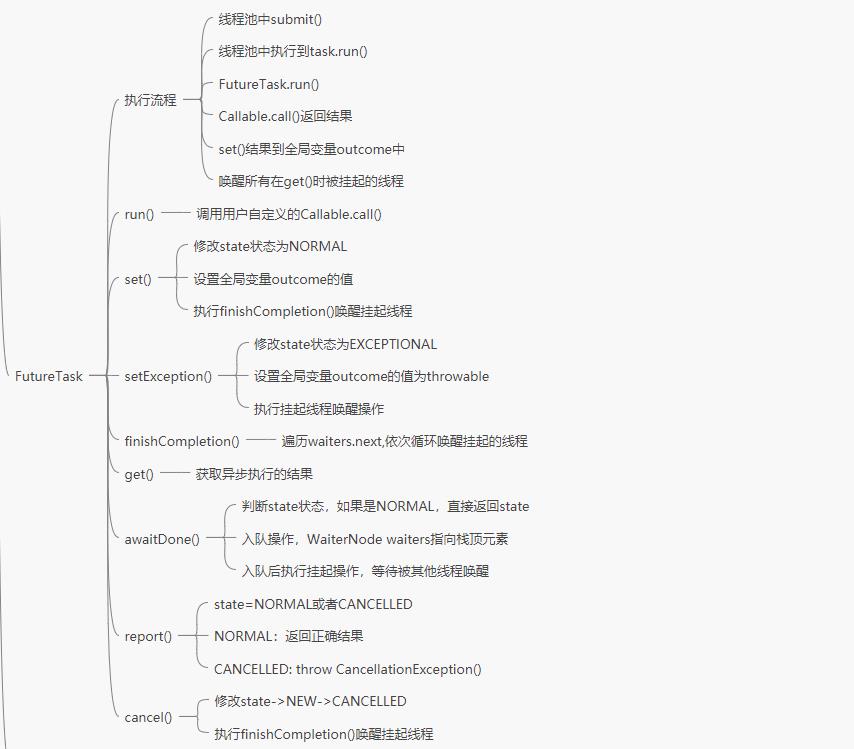
FutureTask的实现原理其实很简单,每个方法基本上都画了一个简单的流程图来方便立即。
后面还打算分享一个BlockingQueue相关的源码解读,这样线程池也可以算是完结了。
在这之前可能会先分享一个SpringCloud常见配置代码分析、最佳实践等手册,方便工作中使用,也是对之前看过的源码一种总结。敬请期待!
欢迎关注:

