手写一个模块化的 TCP 服务端客户端
Posted 牛有肉
tags:
篇首语:本文由小常识网(cha138.com)小编为大家整理,主要介绍了手写一个模块化的 TCP 服务端客户端相关的知识,希望对你有一定的参考价值。

前面的博客 基于 socket 手写一个 TCP 服务端及客户端 写过一个简单的 TCP 服务端客户端,没有对代码结构进行任何设计,仅仅是实现了相关功能,用于加深对 socket 编程的认识。
这次我们对整个代码结构进行一下优化,使其模块化,易扩展,成为一个简单意义上的“框架”。
对于 Socket 编程这类所需知识偏底层的情况(OS 协议栈的运作机制,TCP 协议的理解,多线程的理解,BIO/NIO 的理解,阻塞函数的运作原理甚至是更底层处理器的中断、网卡等外设与内核的交互、核心态与内核态的切换等),虽然说底层提供的系统函数或 JDK 封装好的原生函数帮助我们屏蔽了一大部分底层的实现细节,但如果对底层的机制没有清楚的认识,这些函数往往很难上手,始终觉着“隔着一层”。
在遇到这种情况时,应当先将函数依赖的底层运作机制搞清楚,上手实现功能,用熟 API 后再考虑代码结构的优化。毕竟代码结构的优化需要我们能清楚的找出代码中可以复用的部分,以及会出现条件分支的地方。可复用的抽取、需要分支的解耦,将代码模块化,可拔插,同时为代码留下扩展的余地。抽象化和结构化是对功能有整体的把控后才可以去做的工作。
说的有点多我们先来看些优化后的代码如何使用。
首先是服务端的构建:
    public static void main(String[] args) {
        Server server = ServerFactory.getServer(80, SocketType.BIO, DelimitType.LengthFlag, DelimitType.LengthFlag,
                (socket, bytes) -> {
            //bytes 是接收到的数据,在这里拿到后做业务处理。socket是本次连接的socket对象,如果对连接有特殊需求比如设置长连接短连接等可自行通过socket对象设置。
            //return 的 msg 会回复给请求方
return msg;
                });
        server.start();
    }
构建服务端只需要选择监听端口、IO模式、发送数据的方式、接收数据的方式,并传入处理业务的 lamda 函数对象即可。lamda 函数对象中,我们 return 的值会被返回给请求方,如果不需要返回数据,return null 即可。
对于 IO 模式提供 BIO 与 NIO 两种模式,即传统的阻塞 IO 或 多路复用 IO。两种模式均实现了 Server 接口,可由 ServerFactory.getServer 方法进行构建。
对于 DelimitType ,数据接收和发送类型,提供了三种方式:1、DelimitType.FixedLength,定长的 TCP 报文帧;2:DelimitType.Flag,以固定分隔符进行定界的报文;3:DelimitType.LengthFlag,由报文头标识本次报文内容长度的报文定界方式。由于服务端实例接收和发送报文时存在这三种情况,我们将其封装为行为策略,与服务端实例解耦。这样我们可以根据需要选择不同的策略来构建服务端,同时如果需要新增报文定界的处理方式,只需新增一个策略类型即可。
以 BIO 中的 报文头标识长度的定界策略为例,接口:
/**
 * @Author Nxy
 * @Date 2020/3/21 20:11
 * @Description 读取 接收缓冲区 接收数据行为策略
 */
public interface ReciveRegister {
    public byte[] read(InputStream in) throws IOException;
}
DelimitType.LengthFlag 策略实现类:
/**
 * @Author Nxy
 * @Date 2020/3/21 20:25
 * @Description 按长度标识读取报文的读取策略。每次报文头四个字节标识本次
 * 请求的报文长度,用于划定请求边界
 */
public class LengthFlagReciveRegister implements ReciveRegister {
    @Override
    public byte[] read(InputStream in) throws IOException {
        if (in == null) {
            throw new NullPointerException("inputStream is null!");
        }

        BufferedInputStream bufferIn = new BufferedInputStream(in);
        byte[] result;
        //读取头四个字节,转换为 int 即为报文长度
        byte[] lengthByte = IOUtil.readBytesFromInputStream(bufferIn, 4);
        int length = ByteBuffer.wrap(lengthByte).getInt();
        System.out.println("from recive:" + length);
        //读取指定长度字节
        result = IOUtil.readBytesFromInputStream(bufferIn, length);
        return result;
    }
}
服务端接口:
public interface Server {
    public void start();

    public void stop();
}
BIO 服务端实现类:
/**
 * @Author Nxy
 * @Date 2020/3/21 17:16
 * @Description socket TCP BIO 服务端
 */
public class Biosever implements Server {
    //接受数据的报文定界策略
    private final ReciveRegister reciveRegister;
    //回复数据的报文定界策略
    private final SendRegister sendRegister;
    //接收数据处理业务逻辑
    private final BiFunction<Socket, byte[], Object> dataHandler;
    //任务线程池
    private final ExecutorService threadPool;
    // 主线程线程对象
    private final Thread mainThread;
    //监听端口
    private int port;

    public BIOSever(int port, ReciveRegister reciveRegister, SendRegister sendRegister, BiFunction<Socket, byte[], Object> dataHandler) {
        this.reciveRegister = reciveRegister;
        this.sendRegister = sendRegister;
        this.dataHandler = dataHandler;
        this.threadPool = Executors.newCachedThreadPool();
        mainThread = Thread.currentThread();
        this.port = port;
    }

    @Override
    public void start() {
        ServerSocket server = null;
        try {
            server = new ServerSocket(port);
            System.out.println("recive start!");
        } catch (IOException e) {
            e.printStackTrace();
            return;
        }
        while (!Thread.currentThread().isInterrupted()) {
            Socket socket;
            BufferedInputStream in;
            BufferedOutputStream out;
            try {
                //阻塞等待连接请求
                socket = server.accept();
                System.out.println("建立连接:" + socket.getInetAddress());
                in = new BufferedInputStream(socket.getInputStream());
                out = new BufferedOutputStream(socket.getOutputStream());
            } catch (IOException e) {
                e.printStackTrace();
                System.out.println("连接建立失败!");
                continue;
            }
            threadPool.execute(() -> {
                while (!Thread.currentThread().isInterrupted()) {
                    byte[] result;
                    try {
                        //通过策略模式解耦报文定界策略与本类
                        result = reciveRegister.read(in);
                        //由调用者传入业务处理逻辑,如需返回数据,可通过 socket 对象获取发送缓冲区并写入返回数据
                        Object returnMsg = dataHandler.apply(socket, result);
                        if (returnMsg != null) {
                            //需回复数据不为 null 则回复数据
                            sendRegister.send(socket, returnMsg);
                        }
                    } catch (IOException e) {
                        System.out.println("an connect is closed witn IOException:" + e.getMessage());
                        return;
                    }
                }
            });
        }
    }

    public Thread getMainThread() {
        return this.mainThread;
    }

    @Override
    public void stop() {
        System.out.println("Stop recive :" + this.port);
        threadPool.shutdown();
        mainThread.interrupt();
    }
}
枚举定界策略类型:
/**
 * @Author Nxy
 * @Date 2020/3/21 20:31
 * @Description 报文定界策略类型
 */
public enum DelimitType {
    //通过长度标识接收数据
    LengthFlag,
    //将数据封装为帧,接收定长数据
    fixedLength,
    //通过结束标识接收数据
    commonFlag
}
构建服务端的简单工厂:
/**
 * @Author Nxy
 * @Date 2020/3/21 21:19
 * @Description 构建 socket 服务端的简单工厂
 */
public class ServerFactory {
    /**
     * @Author Nxy
     * @Date 2020/3/21 21:43
     * @Param port:监听端口,serverType:服务端类型,reciveRegisterType:划分报文边界策略,dataHandler:业务逻辑函数
     * @Return Server:构建的服务端对象,通过 start 方法启动
     * @Exception
     * @Description
     */
    public static Server getServer(int port, SocketType serverType, DelimitType reciveDelimitType,
                                   DelimitType sendDelimitType, BiFunction<Socket, byte[], Object> dataHandler) {
        Server re = null;
        ReciveRegister reciveRegister = null;
        SendRegister sendRegister = null;
        //接收报文定界策略构建
        switch (reciveDelimitType) {
            case commonFlag:
          reciveRegister = new CommonFlagRegister();
                break;
            case fixedLength:
           reciveRegister = new FixedLengthRegister();
                break;
            case LengthFlag:
                reciveRegister = new LengthFlagReciveRegister();
                break;
        }
        //发送报文定界策略构建
        switch (sendDelimitType) {
            case commonFlag:
          sendRegister = new CommonFlagRegister(null);
                break;
            case fixedLength:
          sendRegister = new FixedLengthRegister(null);
                break;
            case LengthFlag:
                sendRegister = new LengthFlagSendRegister(null);
                break;
        }
        //服务端构建
        switch (serverType) {
            case BIO:
                re = new BIOSever(port, reciveRegister, sendRegister, dataHandler);
                break;
            case NIO:
                re = new NIOServer(port,reciveRegister,sendRegister,dataHandler);
                break;
        }
        return re;
    }
}
这样一来,业务逻辑处理、发送与接收报文的数据定界方式、IO类型 都是可拔插、可扩展的,在构建时按需选择拼装即可。
再来看客户端的使用:
    public static void main(String[] args) throws Exception {
        //简单工厂获取客户端实例
        Client client =
                ClientFactory.getClient("127.0.0.1", 80, SocketType.BIO,
                        DelimitType.LengthFlag, DelimitType.LengthFlag);
//发送数据,re 为服务端返回值,拿到后可以做后续处理
        byte[] re = client.send(invocation);
    }
与服务端一样,我们传入 目的IP、目的端口、IO 类型、发送和接收报文的数据定界方式 即可从工厂中得到一个 TCP 客户端。
然后只需要调用 send 方法就可以向服务端传输数据,方法返回值即是服务端的返回数据。远程调用变的像方法调用一样简单,非常方便。
需要注意的是 send 方法是阻塞的,会阻塞在读取 socket 接受缓冲区的 read 方法上,以 BIO 的报文头传输报文长度的定界方式为例:
Client 接口:
public interface Client {
    public Socket getSocket();

    /**
     * @Author Nxy
     * @Date 2020/3/21 22:12
     * @Param data:要发送的数据
     * @Return
     * @Exception
     * @Description 发送数据
     */
    public byte[] send(Object data);

    public void close();
}
BIO Client 的实现类:
public class BIOClient implements Client {
    private final Socket socket;
    private final BufferedOutputStream out;
    private final BufferedInputStream in;
    private final ReciveRegister reciveRegister;
    private final SendRegister sendRegister;

    public BIOClient(String host, int port, ReciveRegister reciveRegister, SendRegister sendRegister) throws IOException {
        socket = new Socket("127.0.0.1", 80);
        out = new BufferedOutputStream(socket.getOutputStream());
        in = new BufferedInputStream(socket.getInputStream());
        this.reciveRegister = reciveRegister;
        this.sendRegister = sendRegister;
    }

    @Override
    public Socket getSocket() {
        return this.socket;
    }

    @Override
    public byte[] send(Object data) {
        byte[] re = null;
        try {
            re = sendRegister.send(socket, data);
        } catch (IOException e) {
            e.printStackTrace();
        }
        return re;
    }

    @Override
    public void close() {
        try {
            if (out != null) {
                out.flush();
                out.close();
            }
            if (in != null) {
                in.close();
            }
        } catch (IOException e) {
            e.printStackTrace();
        }
    }
}
定界策略接口:
public interface SendRegister {
    public byte[] send(Socket socket, Object object) throws IOException;
}
DelimitType.LengthFlag 定界策略实现类:
/**
 * @Author Nxy
 * @Date 2020/3/22 15:16
 * @Description 按长度标识定界的发送策略
 */
public class LengthFlagSendRegister implements SendRegister {
    private final ReciveRegister reciveRegister;

    public LengthFlagSendRegister(ReciveRegister reciveRegister) {
        this.reciveRegister = reciveRegister;
    }

    @Override
    public byte[] send(Socket socket, Object object) throws IOException {
        BufferedOutputStream out = new BufferedOutputStream(socket.getOutputStream());
        byte[] objectBytes = IOUtil.toByteArray(object);
        int length = objectBytes.length;
        System.out.println("from client:" + length);
        //写入长度
        out.write(ByteBuffer.allocate(4).putInt(length).array());
        //写入数据
        out.write(objectBytes);
        out.flush();
        //如果未传入接收报文定界策略,则不需要接收回复数据
        if (reciveRegister == null) {
            return null;
        }
        while (socket.getInputStream().available() <= 0) {
        }
        byte[] re = reciveRegister.read(socket.getInputStream());
        return re;
    }
}
客户端简单工厂:
public class ClientFactory {
    public static Client getClient(String host, int port, SocketType socketType, DelimitType reciveType, DelimitType sendType) {
        ReciveRegister reciveRegister = null;
        SendRegister sendRegister = null;
        Client client = null;
        switch (reciveType) {
            case LengthFlag:
                reciveRegister = new LengthFlagReciveRegister();
                break;
            case commonFlag:
                break;
            case fixedLength:
                break;
        }
        switch (sendType) {
            case LengthFlag:
                sendRegister = new LengthFlagSendRegister(reciveRegister);
                break;
            case fixedLength:
                break;
            case commonFlag:
                break;
        }
        switch (socketType) {
            case BIO:
                try {
                    client = new BIOClient(host, port, reciveRegister, sendRegister);
                } catch (IOException e) {
                    e.printStackTrace();
                }
                break;
            case NIO:
                break;
        }
        return client;
    }
这样实现了数据发送、接受方式的可拔插设计,同时通过简单工厂对 IO 类型进行选择构建。
我们以发送和接收序列化、发序列化对象为例进行测试,服务端代码:
/**
 * @Author Nxy
 * @Date 2020/3/22 15:37
 * @Description 工厂模式构建服务端样例
 * 传入 监听端口,socket 类型,接收数据报文定界策略,发送数据报文定界策略,以及报文处理函数。
 * 报文处理函数为一个 lamda 对象,return 的数据会直接回复给请求方
 */
public class ServerDemo {
    public static void main(String[] args) {
        Server server = ServerFactory.getServer(80, SocketType.BIO, DelimitType.LengthFlag, DelimitType.LengthFlag,
                (socket, bytes) -> {
                    Invocation obj = null;
                    String exception = null;
                    try {
                        ByteArrayInputStream bis = new ByteArrayInputStream(bytes);
                        ObjectInputStream ois = new ObjectInputStream(bis);
                        obj = (Invocation) ois.readObject();
                        ois.close();
                        bis.close();
                        exception = "200";
                    } catch (IOException ex) {
                        ex.printStackTrace();
                        exception = ex.getMessage();
                    } catch (ClassNotFoundException ex) {
                        ex.printStackTrace();
                    }
                    System.out.println(obj.getInterfaceName() + ":" + obj.getMethodName());
                    return exception;
                });
        server.start();
    }
}
客户端代码:
/**
 * @Author Nxy
 * @Date 2020/3/21 17:54
 * @Description socket 客户端
 */
public class ClientDemo {
    public static void main(String[] args) throws Exception {
        //简单工厂获取客户端实例
        Client client =
                ClientFactory.getClient("127.0.0.1", 80, SocketType.BIO,
                        DelimitType.LengthFlag, DelimitType.LengthFlag);
        client.getSocket().setKeepAlive(true);
        //要发送的数据准备
        Object[] params = new Object[2];
        Class[] paramTypes = new Class[2];
        Invocation invocation = new Invocation(ClientDemo.class.getName(), "main", paramTypes, params);
        for (int i = 0; i < 10; i++) {
            //发送数据
            byte[] re = client.send(invocation);
            ObjectInputStream in = new ObjectInputStream(new ByteArrayInputStream(re));
            String o = (String) in.readObject();
            System.out.println("服务端回复数据 :" + o);
        }
    }

}
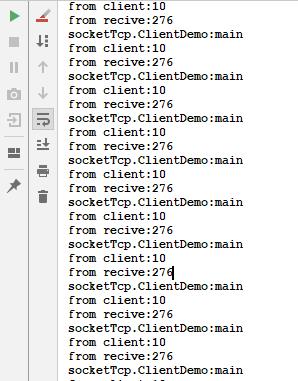
客户端在本次长连接发送了十次序列化对象,服务端均成功进行了反序列化:

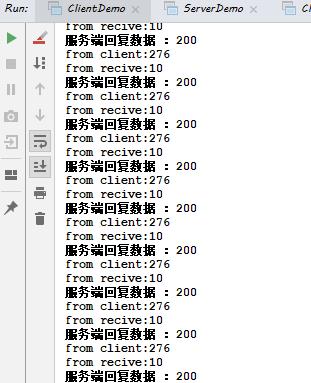
客户端每次也都可以成功收到响应:

其实 TCP 层面的东西搞透了,可以更加清晰的理解 HTTP 的上层协议,也会明白为什么很多 RPC 框架都会实现自己的 RPC 协议进行通信。比如 Dubbo 便是基于 netty 框架在 TCP 的上层封装了 Dubbo 协议。
再加上如何用动态代理为远程过程调用封装一个语法糖,其实就可以手写一个简单的 Dubbo 了,远程过程调用的核心之一:序列化对象的传输 在这里已经实现了,下次我们手写一个简单的 Dubbo。
以上是关于手写一个模块化的 TCP 服务端客户端的主要内容,如果未能解决你的问题,请参考以下文章