配置rsync+inotify进行资源或代码同步
Posted
tags:
篇首语:本文由小常识网(cha138.com)小编为大家整理,主要介绍了配置rsync+inotify进行资源或代码同步相关的知识,希望对你有一定的参考价值。
配置rsync+inotify进行资源推送
------------------------
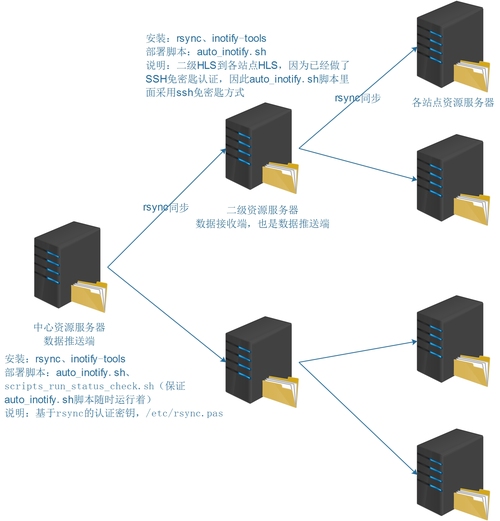
主要步骤解析:
1、部署二级资源中转服务器,数据接收端--qqhrnhls,同时也是数据推送端,推送资源到下级站点
2、部署一级资源服务器(中心资源服务器),数据推送端--229服务器/阿里云服务器
3、在二级资源服务上部署rysnc同步,把资源更新到各个站点
1、部署二级资源中转服务器,数据接收端--qqhrnhls,同时也是数据推送端,推送资源到下级站点
二级中心资源服务器有:qqhrnhls、jyzxhls、qdnhls1、jnhls1
①安装rsync之后,修改/etc/default/rsync
修改/etc/default/rsync文件,允许 --daemon 启动:
---------------------
RSYNC_ENABLE=false
改为
RSYNC_ENABLE=true
---------------------
②创建/etc/rsyncd.conf配置文件,内容如下:
---------------------
[email protected]:~$ sudo cat /etc/rsyncd.conf
uid = www-data
gid = www-data
use chroot = no
max connections = 50
pid file = /var/run/rsyncd.pid
lock file = /var/run/rsyncd.lock
log file = /var/log/rsyncd.log
transfer logging = yes
log format = %t %a %m %f %b
syslog facility = local3
timeout = 300
[hls]
path = /data/www/traindata/imgs/
comment = hls
read only = no
write only = no
list = yes
auth users = 用户名
hosts allow = 允许的IP地址
secrets file=/etc/rsync.pas
---------------------
[email protected]:~$ sudo /etc/init.d/rsync status
[email protected]:~$ sudo /etc/init.d/rsync restart
③创建/etc/rsync.pas,格式如下
---------------------
用户名和密码,用户名同/etc/rsyncd.conf的auth users = upload;密码需要同数据推送端的密码
[email protected]:~$ sudo cat /etc/rsync.pas
用户名:密码
[email protected]:~$ sudo chmod 600 /etc/rsync.pas
---------------------
④若开启了防火墙,防火墙需要放行873端口
873端口,是rsync服务用于监听数据推送端通信???
防火墙开放873端口,网关设备映射内网873端口到外网
2、部署一级资源服务器(中心资源服务器),数据推送端--229服务器/阿里云服务器
①创建/etc/rsync.pas,注意其权限与内容
[email protected]:~$ sudo chmod 600 /etc/rsync.pas
[email protected]:~$ sudo cat /etc/rsync.pas
密码
----------------------
#----------------
# 测试推送数据到接收端
#----------------
[email protected]:~$ sudo rsync -avz --delete  ping_done.txt  [email protected]地址::hls  --password-file=/etc/rsync.pas
sending incremental file list
ping_done.txt
sent 1434 bytes  received 27 bytes  417.43 bytes/sec
total size is 7581  speedup is 5.19
----------------------
推送数据的命令如下:
[email protected]:~$ sudo rsync -avz --delete /data/www/traindata_appui/imgs/ 用户名@IP地址::hls --password-file=/etc/rsync.pas
----------------------
②在数据推送端,229服务器上安装inotify-tools
[email protected]:~$ sudo apt-get install inotify-tools -y
③部署auto_inotify.sh脚本
脚本说明:通过命令inotifywait,监视指定目录的文件改动情况,然后启动rsync命令进行同步
----------------------
#!/bin/sh
PATH=/usr/local/sbin:/usr/local/bin:/sbin:/bin:/usr/sbin:/usr/bin
SRC=‘/data/www/traindata/imgs/‘
TARGET_MODULE=‘hls‘
RSYNC_PAS=‘/etc/rsync.pas‘
IPARRAY=(
    IP地址1
    IP地址2
    IP地址3
    IP地址4
)
inotifywait -mrq --timefmt ‘%d/%m/%y-%H:%M‘ --format ‘%T %w%f‘ -e modify,delete,create,attrib ${SRC} | while read file
do
    for IP in ${IPARRAY[@]}
    do
        rsync -avzP --delete ${SRC}  [email protected]${IP}::${TARGET_MODULE}  --password-file=${RSYNC_PAS} >> /dev/null 2>&1
    done
done
----------------------
[email protected]:~$ sudo nohup sh auto_inotify.sh &
[email protected]:~$ sudo ps -ef |grep auto
root     15142 14013  0 17:18 pts/3    00:00:00 sudo nohup sh auto_inotify.sh
root     15143 15142  0 17:18 pts/3    00:00:00 sh auto_inotify.sh
root     15145 15143  0 17:18 pts/3    00:00:01 sh auto_inotify.sh
----------------------
④部署scripts_run_status_check.sh脚本
脚本功能:用于检测auto_inotify.sh脚本是否运行,未运行就启动这个脚本
----------------------
#!/bin/bash
#
# 检查auto_inotify.sh是否运行,未运行就启动
#
PATH=/usr/local/sbin:/usr/local/bin:/sbin:/bin:/usr/sbin:/usr/bin
SCRIPTS_NAME=‘/root/train_service/auto_inotify.sh‘
PS_NUM=$(ps -ef | grep -v "grep" | grep "$(basename ${SCRIPTS_NAME})" | wc -l )
if [ "${PS_NUM}" -ge 1 ];then
    exit
else
    nohup ${SCRIPTS_NAME} &
fi
----------------------
计划任务如下:
#scripts_run_status_check
*/5 * * * * /root/train_service/scripts_run_status_check.sh
3、在二级资源服务上部署rysnc同步,把资源更新到各个站点
比如:某地区域的中心资源服务器QQHRN-HLS
环境要求:QQHRN-HLS与各下级HLS服务器做了SSH免密匙认证
①安装inotify-tools包
apt-get install inotify-tools -y
----------------------
②部署脚本auto_inotify.sh
必须确保IPARRAY数组里面的IP地址与端口正确,并做了SSH免密匙认证,从qqhrn-hls到下级服务器的免密匙认证
----------------------
#!/bin/sh
PATH=/usr/local/sbin:/usr/local/bin:/sbin:/bin:/usr/sbin:/usr/bin
SRC=‘/data/www/traindata/imgs/‘
DES=‘/data/www/traindata/imgs/‘
IPARRAY=(
    IP地址1:端口
    IP地址2:端口
)
inotifywait -mrq --timefmt ‘%d/%m/%y-%H:%M‘ --format ‘%T %w%f‘ -e modify,delete,create,attrib ${SRC} | while read file
do
    for IPPORT in ${IPARRAY[@]}
    do
        IP=$(echo "${IPPORT}" | awk -F: ‘{print $1}‘)
        PORT=$(echo "${IPPORT}" | awk -F: ‘{print $2}‘)
        rsync -avzP "-e ssh -p ${PORT}" --delete ${SRC}  [email protected]${IP}:${DES} >> /dev/null 2>&1
    done
done
----------------------
③可选择部署脚本scripts_run_status_check.sh,用于保证二级HLS服务器的auto_inotify.sh随时在运行
这个脚本内容与第二步中的脚本相同,部署方法也相同
----------------------
本文出自 “上山路十八弯” 博客,请务必保留此出处http://kongzi68.blog.51cto.com/1432619/1796090
以上是关于配置rsync+inotify进行资源或代码同步的主要内容,如果未能解决你的问题,请参考以下文章
