Node.js 切近实战 之Excel在线(文件&文件组)
Posted
tags:
篇首语:本文由小常识网(cha138.com)小编为大家整理,主要介绍了Node.js 切近实战 之Excel在线(文件&文件组)相关的知识,希望对你有一定的参考价值。
最近西安的天气真他妈的热,感觉还是青海的天气美,最高温28度。上周逛了青海湖,感觉还是意犹未尽,其实我还是很喜欢去一趟西藏的,但是考虑到花费也没人陪我,我暂时放弃这个念头。计划去一下重庆或者甘南,也许是现实的。
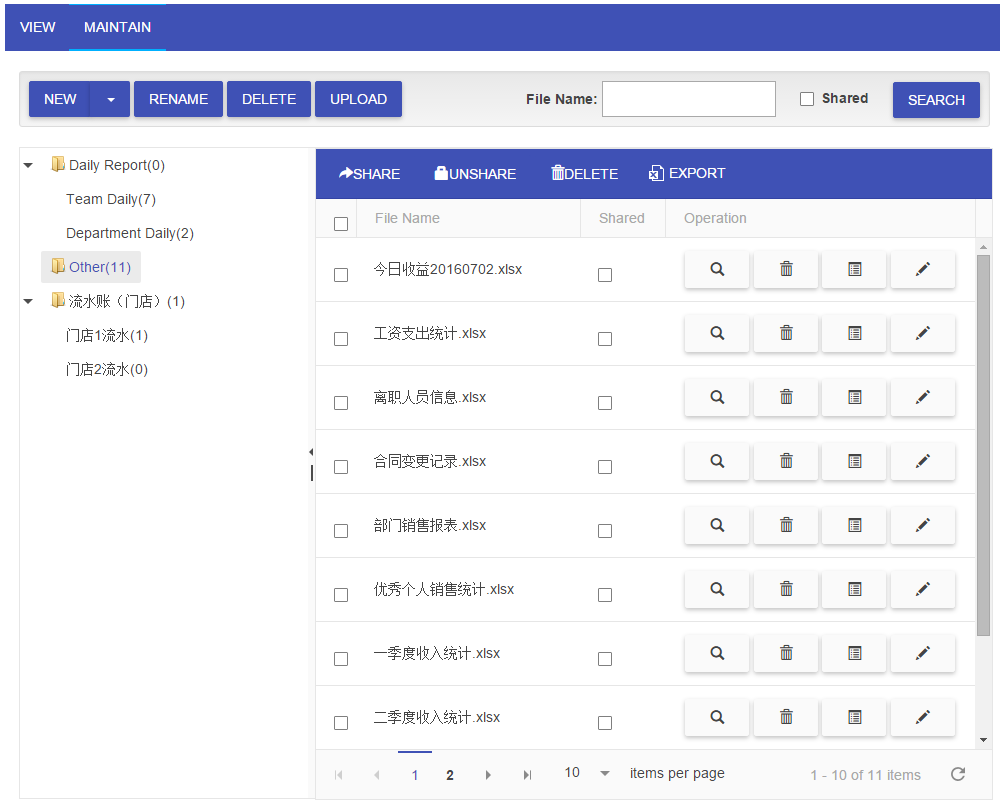
OK,废话不多说,今天我们来看一下Excel在线部分的文件和文件组。首先我们来看一下页面,调一下胃口。俗话说无图无真相,先看图。
没错,还是Telerik Kendo UI,其实我面试的时候当听到别人说自己用的是EasyUI和ExtJs的时候,我就不那么上心,但是如果有人用的是Kendo UI for html5&JS的话,我就会多关注一点。
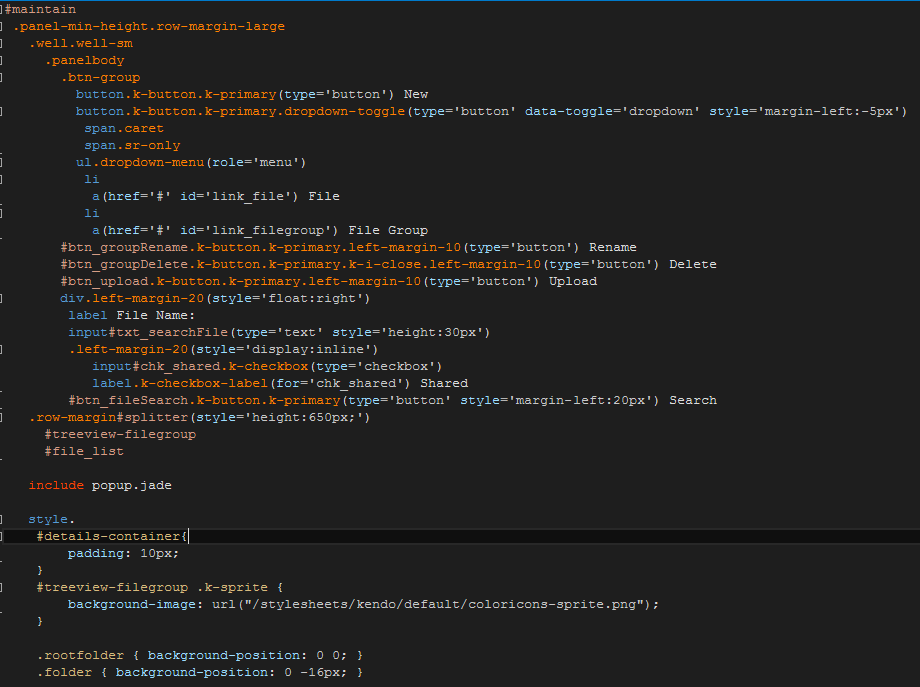
先看一下页面整体代码。
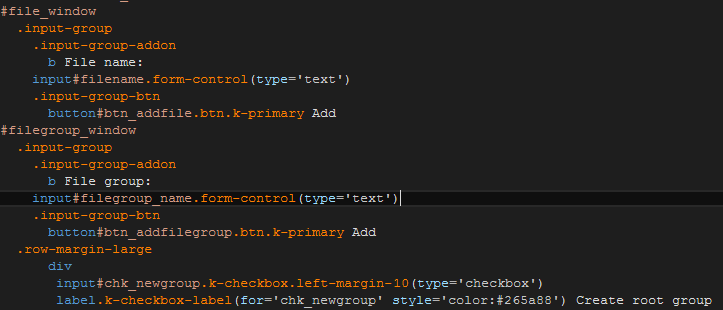
很简单,还是BootStrap布局,jade模板。注意下最底下的css样式,在jade模板中,如果想要在页面定义css,就要像上面这样写。注意这里我们引用了一个部分页,popup.jade,里面其实就是第一幅图里面New,Rename等按钮弹出的modal页。
OK,首先我们看到的是左边的树,这个树叫kendoTreeView,我们来看一下这个树是怎么生成的。
var url = "/filegroup/list/" + userObj.UserID;
var dataSource = new kendo.data.HierarchicalDataSource({
        transport: {
            read: {
                url: url,
                dataType: "json"
            }
        },
        schema: {
            model: {
                id: "_id",
                children: "subgroup",
                expanded: true,
                hasChildren: function (node) {
                    return (node.subgroup && node.subgroup.length > 0);
                },
                spriteCssClass: "folder"
            }
        }
});

$("#treeview-filegroup").kendoTreeView({
        dataSource: dataSource,
        dataTextField: ["filecount"],
        dataValueField: ["_id"],
        change: function (e) {
            var tree = e.sender;
            selNode = tree.select();
            var data = tree.dataItem(selNode);

            if (data._id) {
                selGroupId = data._id;
                $("#chk_all").prop(‘checked‘, false);
                getFilelist(data._id);
            }
        }
    });
OK,这段代码就是生成树的代码,注意这里的dataSource,当页面加载以后,会请求url,filegroup/list/{0},我们来看一下后台这个api。
router.get(‘/filegroup/list/:userId‘, fileRoutes.fileGroupList);
再看一下fileGroupList方法。
exports.fileGroupList = function (req, res) {
    fileGroupModel.find({ ‘userid‘: req.params.userId }, null, { sort: { name: 1 } } , function (error, fileGroup) {
        res.json(fileGroup);
    });
}
其实就是根据传入的userid查询了一下fileGroup Collection,查出来后,注意这里的schema,它的model定义树节点id是我们mongodb的主键,children是subgroup(上节讲过group和subgroup的model定义,不明白的去上节看),hasChildrenC返回是否有子节点。spriteCssClass设置父节点样式,注意我们第一幅图定义的页面样式就用在这里。OK,接下里我们看树的change事件,当有选中的节点时,将右边列表表头的全选复选框uncheck,并根据选中的_id去mongodb查询group下面的数据,我们来看一下getFilelist方法。
function getFilelist(groupId) {
    if (!groupId) return;

    $.get("/filegroup/" + groupId, function (result) {
        var grid = $("#file_list").data("kendoGrid");
        if (result) {
            var dataSource = new kendo.data.DataSource({
                pageSize: 10,
                data: result,
                schema: {
                    parse: function (response) {
                        $.each(response, function (idx, elem) {
                            if (elem.createdate && typeof elem.createdate === "string") {
                                elem.createdate = kendo.parseDate(elem.createdate, "yyyy-MM-ddTHH:mm:ss.fffZ");
                            }

                            if (elem.lasteditdate && typeof elem.lasteditdate === "string") {
                                elem.lasteditdate = kendo.parseDate(elem.lasteditdate, "yyyy-MM-ddTHH:mm:ss.fffZ");
                            }
                        });
                        return response;
                    }
                }
            });

            grid.setDataSource(dataSource);
        }
        else {
            grid.dataSource.data([]);
        }
    });
}
直接调用rest api filegroup/{0}查询数据,得到结果以后,构造kendo Grid的dataSource,对日期进行格式化。
router.get(‘/filegroup/:id‘, fileRoutes.fileGroup);
exports.fileGroup = function (req, res) {
    var groupId = req.params.id;
    fileGroupModel.findById(groupId).populate(‘file‘).exec(function (error, doc) {
        if (!doc || doc.length == 0) {
            fileGroupModel.findOne({ ‘subgroup._id‘: groupId })
            .populate(‘subgroup‘)
            .populate(‘subgroup.file‘)
            .exec(function (error, docs) {
                if (docs) {
                    var subGroupIndex = -1;
                    docs.subgroup.forEach(function (element, index, arra) {
                        if (subGroupIndex > -1) return;

                        if (element._id == groupId) {
                            subGroupIndex = index;
                        }
                    });

                    if (subGroupIndex > -1) {
                        res.json(docs.subgroup[subGroupIndex].file);
                    }
                }
            });
        }
        else {
            res.json(doc.file);
        }
    });
}
这里要注意,首先我们也不知道这里传入的是groupId还是subgroupId,所以我们先拿groupId查询,如果查到了,就返回数据,如果没查到,就拿_id去查subgroup,查询subgroup,注意这里要使用subgroup._id作为查询条件,因为subgroup是嵌入在group中的,是一个整体。查完之后注意这里的两个populate,如果没有populate的话,意味着这些嵌入的subgroup以及引用的file都不会被包含在查询结果中,我们来看一下查询的结果,在后台加一句console.log(docs)即可。有两个subgroup,两个下面都有文件。
我们用robomongo也许看的更清晰一些,两个group,一个下面有7个文件,一个有2个文件。
此时这个结果的话,我们还得找到我们页面传递的_id对应的subgroup下面的file。所以在代码中又有了循环匹配id确定subgroup索引下标的过程,找到后,直接根据索引拿出file。是不是很麻烦,如果你有什么好的办法,可以给我留言。
接下来我们来看一下kendo grid,首先看一下这个全选。
$("#chk_all").click(function () {
    var isChecked = $(this).prop("checked");
    $("#file_list table:eq(1)").find("tr").each(function () {
        $(this).children("td:first").find("input[type=‘checkbox‘]").first().prop(‘checked‘, isChecked);
    });
});
看起来很简单,找到第一个table找到所有tr,再找到第一个td,锁定checkbox让它选中或者不选中。
$("#file_list").kendoGrid({
        scrollable: true,
        selectable: true,
        allowCopy: true,
        resizable: false,
        sortable: true,
        pageable: {
            refresh: true,
            pageSizes: [10, 20, 50, 100],
            buttonCount: 5
        },
        toolbar: [
            { name: ‘share‘, imageClass: ‘glyphicon glyphicon-share-alt‘ },
            { name: ‘unshare‘, imageClass: ‘glyphicon glyphicon-lock‘ },
            { name: ‘batch_delete‘, text: "Delete" , imageClass: ‘glyphicon glyphicon-trash‘ },
            { name: ‘export‘, imageClass: ‘k-icon k-i-excel‘ }],
        columns: [{
                template: "<div class=‘center-align-text‘>" +
                    "<input id=‘chkId_#=_id#‘ type=‘checkbox‘ class=‘k-checkbox‘ value=‘#=_id#‘ onclick=‘chkHeader_click‘/>"
                    + "<label class=‘k-checkbox-label‘ for=‘chkId_#=_id#‘></label></div>",
                field: "",
                title: "<div class=‘center-align-text‘>" +
                    "<input type=‘checkbox‘ class=‘k-checkbox‘ id=‘chk_all‘/>"
                    + "<label class=‘k-checkbox-label‘ for=‘chk_all‘></label></div>",
                width: 40
            },
            {
                field: "fullname",
                title: "File Name"
            }, {
                field: "isshared",
                title: "Shared" ,
                width: 85,
                template: "<div><input type=‘checkbox‘ class=‘k-checkbox‘ value=‘#=isshared#‘ #=isshared ? \"checked=‘checked‘\":\"\" # />"
                + "<label class=‘k-checkbox-label‘></label></div>",
                sortable: false
            },
            {
                command: [
                    {
                        name: "preview",
                        text: "",
                        imageClass: ‘glyphicon glyphicon-search‘,
                        click: showDetails
                    }, {
                        name: "delete",
                        text: "",
                        imageClass: ‘glyphicon glyphicon-trash‘,
                        click: confirmFileDelete
                    }, {
                        name: "rename",
                        text: "",
                        imageClass: ‘glyphicon glyphicon-list-alt‘,
                        click: fileRename
                    }, {
                        name: "edits",
                        text: "",
                        imageClass: ‘glyphicon glyphicon-pencil‘,
                        click: viewfile
                    }
                ],
                width: 310,
                title: "Operation"
            }]
    });
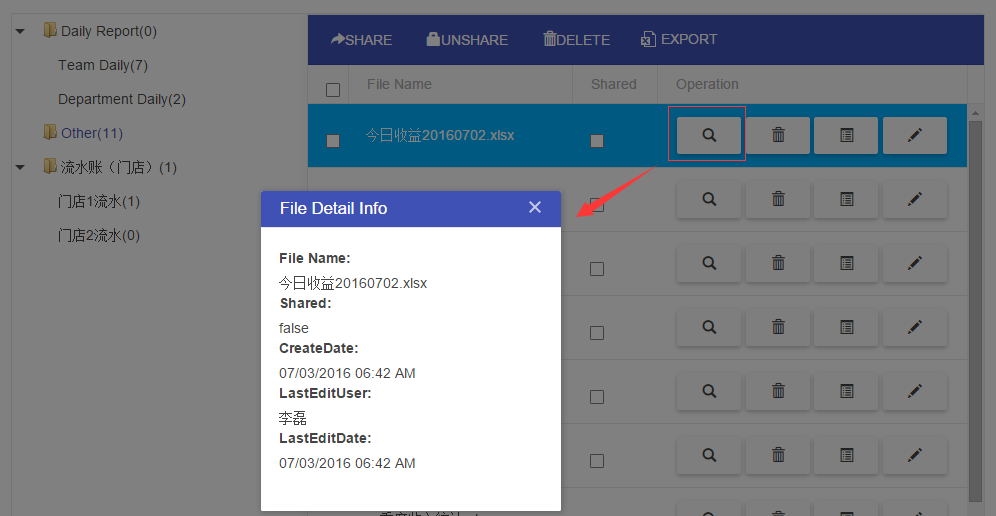
注意grid中的Shared列,使用的是kendo的模板#=#这种写法。最后我们再看一下command列,这个列的话其实就是定义一些按钮,每个按钮都定义好了click事件。就看第一个showDetails,看看js代码
function showDetails(e) {
    var wnd = $("#wd_details").kendoWindow({
        title: "File Detail Info",
        modal: true,
        visible: false,
        resizable: false,
        minWidth: 300
    }).data("kendoWindow");

    var detailsTemplate = kendo.template($("#popup_detail").html());
    e.preventDefault();

    var dataItem = this.dataItem($(e.currentTarget).closest("tr"));
    wnd.content(detailsTemplate(dataItem));
    wnd.center().open();
}
在这里其实就是弹出一个kendo window,这个弹出页中又加载了kendo 模板popup_detail,我们来看一下这个template。
script#popup_detail(type="text/x-kendo-template")
 dl
  dt
   label File Name:
  dd #=fullname#
  dt
   label Shared:
  dd #=isshared#
  dt
   label CreateDate:
  dd #=kendo.toString(createdate,‘MM/dd/yyyy HH:mm tt‘)#
  dt
   label LastEditUser:
  dd #=lastedituser#
  dt
   label LastEditDate:
  dd #=kendo.toString(lasteditdate,‘MM/dd/yyyy HH:mm tt‘)#
只要我们将一个对象给模板,模板就会自己替换对应的内容。在这里我们会先拿到点击行的对象,然后通过.content赋给模板,最后弹出modal页。
就是这么简单,点击重命名按钮,就会弹出重命名页面。
rename功能其实很简单,看看前台和后台。
$("#btn_fileRename").click(function () {
    var fileName = $.trim($("#new_fileName").val());
    if (!fileName) {
        showMsg("info", "Please input new file name!");
        return;
    }

    var postData = {
        id: $("#hfd_fileId").val(),
        filename: fileName
    };

    $.ajax({
        url: ‘/file/rename‘,
        type: ‘PUT‘,
        dataType: ‘json‘,
        data: { postData: JSON.stringify(postData) },
        success: function (res) {
            if (!res.isSuc) {
                showMsg(‘error‘, res.msg);
                return;
            }

            $("#wd_fileRename").data("kendoWindow").close();
            getFilelist(selGroupId);
        }
    });
});
router.put(‘/file/rename‘, fileRoutes.fileRename);
exports.fileRename = function (req, res) {
var data = JSON.parse(req.body.postData);
fileModel.findByIdAndUpdate(data.id, { $set: { name: data.filename, lasteditdate: Date.now() } }
, function (error, result) {
if (error) {
res.json({ isSuc: false, msg: error.message });
}
else {
res.json({ isSuc: true });
}
});
}nodejs,用起来就是这么爽,好了今天就到这里,明天我们继续会讲剩下的group&subgroup创建,文件删除,共享设置等功能,敬请期待。
本文出自 “技术创造价值” 博客,请务必保留此出处http://leelei.blog.51cto.com/856755/1795764
以上是关于Node.js 切近实战 之Excel在线(文件&文件组)的主要内容,如果未能解决你的问题,请参考以下文章


