Ionic JPush极光推送 插件实例
Posted sulin
tags:
篇首语:本文由小常识网(cha138.com)小编为大家整理,主要介绍了Ionic JPush极光推送 插件实例相关的知识,希望对你有一定的参考价值。
1.需要去这里注册https://www.jiguang.cn
注册成功获取AppKey
备注填写应用包名规范点,在项目还要用那
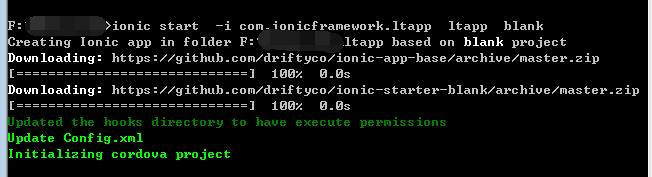
2.创建ionic 项目 指定你注册时候的包名(假如:com.ionicframework.ltapp)
ionic start -i com.ionicframework.ltapp ltapp blank
3.添加JPush 插件
进入 项目目录下 cd ltapp
git clone https://github.com/jpush/jpush-phonegap-plugin.git
cordova 添加jpush
cordova plugin add $dir\\jpush-phonegap-plugin --variable API_KEY=you key
备注:you key =注册成功获取AppKey $dir=当前插件所在位置 添加完成,去项目下面plugins =》plugin.xml 文件查看这个节点是否和你appkey 一样

4.添加平台 android

5.编写代码
index.html
 1 <!DOCTYPE html>
 2 <html>
 3   <head>
 4     <meta charset="utf-8">
 5     <meta name="viewport" content="initial-scale=1, maximum-scale=1, user-scalable=no, width=device-width">
 6     <title></title>
 7
 8     <link href="lib/ionic/css/ionic.css" rel="stylesheet">
 9     <link href="css/style.css" rel="stylesheet">
10
11     <!-- IF using Sass (run gulp sass first), then uncomment below and remove the CSS includes above
12     <link href="css/ionic.app.css" rel="stylesheet">
13     -->
14
15     <!-- ionic/angularjs js -->
16     <script src="lib/ionic/js/ionic.bundle.js"></script>
17
18     <!-- cordova script (this will be a 404 during development) -->
19     <script src="cordova.js"></script>
20
21     <!-- your app\'s js -->
22     <script src="js/app.js"></script>
23     <script src="js/controllers.js"></script>
24     <script src="js/services.js"></script>
25
26
27   </head>
28   <body ng-app="starter">
29   <ion-nav-bar class="bar-positive">
30     <ion-nav-back-button></ion-nav-back-button>
31   </ion-nav-bar>
32   <ion-nav-view name="mainContainer"></ion-nav-view>
33   </body>
mian.html
 1 <ion-view view-title="极光推送Ionic Demo">
 2   <ion-content class="padding">
 3         <form name="jPushForm">
 4           <button class="button button-block button-positive" ng-click="init()">启动推送服务</button>
 5           <button class="button button-block button-energized" ng-click="stopPush()">停止推送服务</button>
 6           <button class="button button-block button-royal" ng-click="resumePush()">重启推送服务</button>
 7           <button class="button button-block button-light" ng-click="getPushState()">查看服务状态</button>
 8           <div class="list">
 9             <div class="item item-input-inset">
10               <label class="item-input-wrapper">
11                 <input type="text" placeholder="设置tag,多个tag用逗号分隔" required ng-trim="true" ng-model="options.tags" />
12               </label>
13
14               <input type="submit" class="button button-small button-positive" value="设置" ng-click="setTags()" />
15               <!-- <button class="button button-small button-positive" ng-click="setTags()">
16                 设置
17               </button>-->
18             </div>
19
20
21             <div class="item item-input-inset">
22               <label class="item-input-wrapper">
23                 <input type="text" placeholder="设置alias" required ng-trim="true" ng-model="options.alias" />
24               </label>
25               <input type="submit" class="button button-small button-positive" value="设置" ng-click="setAlias()" />
26               <!-- <button class="button button-small button-positive" ng-click="setAlias()">
27                 设置
28               </button> -->
29             </div>
30           </div>
31           <button class="button button-block button-balanced" ng-click="setTagsWithAlias()">同时设置</button>
32           <button class="button button-block button-royal" ng-click="cleanTagAndAlias()">清空设置</button>
33           <a href="#/list">消息列表</a>
34           <span class="error" ng-show="jPushForm.input.$error.required">要求输入设置值</span>
35
36           <p>{{result}}</p>
37         </form>
38       </ion-content>
39 </ion-view>
list.html
1 <ion-view title="消息列表">
2     <ion-content>
3         <ion-list>
4             <ion-item ng-repeat="item in items" href="#/detail?id={{item.id}}">
5             对应消息:{{item.id}}
6             </ion-item>
7         </ion-list>
8     </ion-content>
9 </ion-view>
detail.html
<ion-view title="消息内容">
    <ion-content class="padding">
        {{message}}
    </ion-content>
</ion-view>
app.js
 1 var jpushdemo=angular.module(\'starter\', [\'ionic\']);
 2
 3 jpushdemo.run(function($ionicPlatform,$state,jpushService) {
 4   $ionicPlatform.ready(function() {
 5     // Hide the accessory bar by default (remove this to show the accessory bar above the keyboard
 6     // for form inputs)
 7     if(window.cordova && window.cordova.plugins.Keyboard) {
 8       cordova.plugins.Keyboard.hideKeyboardAccessoryBar(true);
 9     }
10     if(window.StatusBar) {
11       StatusBar.styleDefault();
12     }
13
14
15
16     //推送初始化
17     var setTagsWithAliasCallback=function(event){
18       window.alert(\'result code:\'+event.resultCode+\' tags:\'+event.tags+\' alias:\'+event.alias);
19     }
20     var openNotificationInAndroidCallback=function(data){
21       var json=data;
22       window.alert(json);
23       if(typeof data === \'string\'){
24         json=JSON.parse(data);
25       }
26       var id=json.extras[\'cn.jpush.android.EXTRA\'].id;
27       //window.alert(id);
28       var alert = json.extras[\'cn.jpush.android.ALERT\'];
29       $state.go(\'detail\',{id:id+alert});
30     }
31     var config={
32       stac:setTagsWithAliasCallback,
33       oniac:openNotificationInAndroidCallback
34     };
35
36     jpushService.init(config);
37
38     //启动极光推送服务
39     window.plugins.jPushPlugin.init();
40     window.plugins.jPushPlugin.setDebugMode(true);
41   });
42
43   window.onerror = function(msg, url, line) {
44    var idx = url.lastIndexOf("/");
45    if(idx > -1) {
46     url = url.substring(idx+1);
47    }
48    alert("ERROR in " + url + " (line #" + line + "): " + msg);
49    return false;
50   };
51 })
52
53 jpushdemo.config([\'$stateProvider\', \'$urlRouterProvider\', function ($stateProvider,$urlRouterProvider) {
54   $stateProvider.state(\'main\',{
55     url:\'/main?url\',
56     views:{
57       \'mainContainer\':{
58         templateUrl: "templates/main.html",
59         controller:\'mainCtrl\'
60       }
61     }
62   }).state(\'list\',{
63     url:\'/list\',
64     views:{
65       \'mainContainer\':{
66         templateUrl:\'templates/list.html\',
67         controller:\'listCtrl\'
68       }
69     }
70   }).state(\'detail\',{
71     url:\'/detail?id\',
72     views:{
73       \'mainContainer\':{
74         templateUrl:\'templates/detail.html\',
75         controller:\'detailCtrl\'
76       }
77     }
78   });
79   $urlRouterProvider.otherwise(\'/main\')
80 }])
controller.js
 1 jpushdemo.controller(\'mainCtrl\', [\'$scope\',\'$ionicPopup\',\'$stateParams\',\'$state\',\'jpushService\',
 2   function ($scope,$ionicPopup,$stateParams,$state,jpushService) {
 3     $scope.message="";
 4
 5     $scope.options={
 6         tags:"",
 7         alias:""
 8     };
 9
10     $scope.result="";
11
12     // $scope.$on(\'$ionicView.beforeEnter\',function(){
13     //     var url=$stateParams.url;
14     //     if(url){
15     //         $state.go(url);
16     //     }
17     // });
18
19     $scope.init=function(){
20         jpushService.init();
21         window.alert(\'执行启动\');
22     };
23
24     $scope.stopPush=function(){
25         jpushService.stopPush();
26         window.alert(\'执行停止\');
27     };
28
29     $scope.resumePush=function(){
30         jpushService.resumePush();
31         window.alert(\'执行重启\');
32     };
33
34     $scope.getPushState=function(){
35         jpushService.isPushStopped(function(data){
36             if(data==0){
37                 window.alert(\'启动\');
38             }else{
39                 window.alert(\'停止\');
40             }
41         });
42     };
43
44     $scope.setTags=function(){
45         var tagArr=$scope.options.tags.split(\',\');
46         setTagsWithAlias(tagArr,null);
47         //jpushService.setTags(tagArr);
48     }
49
50     $scope.setAlias=function(){
51         var alias=$scope.options.alias;
52         setTagsWithAlias(null,alias);
53         //jpushService.setAlias(alias);
54     }
55
56     var setTagsWithAlias=function(tags,alias){
57         jpushService.setTagsWithAlias(tags,alias);
58     }
59     $scope.setTagsWithAlias=function(){
60         var tagArr=$scope.options.tags.split(\',\')
61         if(tagArr.length==0){
62             tagArr=null;
63         }
64
65         var alias=$scope.options.alias;
66         if(alias===\'\'){
67             alias=null;
68         }
69         setTagsWithAlias(tagArr,alias);
70
71     }
72     $scope.cleanTagAndAlias=function(){
73         var tags=[];
74         var alias="";
75         setTagsWithAlias(tags,alias);
76     }
77 }])
78
79 .controller(\'listCtrl\', [\'$scope\',\'noticeService\' ,function ($scope,noticeService) {
80     $scope.items=noticeService.notices;
81 }])
82
83 .controller(\'detailCtrl\', [\'$scope\',\'$stateParams\', function ($scope,$stateParams) {
84     var id=$stateParams.id;
85     $scope.message=\'消息id:\'+id;
86 }])
services.js
 1 jpushdemo.factory(\'jpushService\',[\'$http\',\'$window\',\'$document\',function($http,$window,$document){
 2     var jpushServiceFactory={};
 3
 4     //var jpushapi=$window.plugins.jPushPlugin;
 5
 6     //启动极光推送
 7     var _init=function(config){
 8         $window.plugins.jPushPlugin.init();
 9         //设置tag和Alias触发事件处理
10         document.addEventListener(\'jpush.setTagsWithAlias\',config.stac,false);
11         //打开推送消息事件处理
12         $window.plugins.jPushPlugin.openNotificationInAndroidCallback=config.oniac;
13
14
15         $window.plugins.jPushPlugin.setDebugMode(true);
16     }
17     //获取状态
18     var _isPushStopped=function(fun){
19         $window.plugins.jPushPlugin.isPushStopped(fun)
20     }
21     //停止极光推送
22     var _stopPush=function(){
23         $window.plugins.jPushPlugin.stopPush();
24     }
25
26     //重启极光推送
27     var _resumePush=function(){
28         $window.plugins.jPushPlugin.resumePush();
29     }
30
31     //设置标签和别名
32     var _setTagsWithAlias=function(tags,alias){
33         $window.plugins.jPushPlugin.setTagsWithAlias(tags,alias);
34     }
35
36     //设置标签
37     var _setTags=function(tags){
38         $window.plugins.jPushPlugin.setTags(tags);
39     }
40
41     //设置别名
42     var _setAlias=function(alias){
43         $window.plugins.jPushPlugin.setAlias(alias);
44     }
45
46
47
48     jpushServiceFactory.init=_init;
49     jpushServiceFactory.isPushStopped=_isPushStopped;
50     jpushServiceFactory.stopPush=_stopPush;
51     jpushServiceFactory.resumePush=_resumePush;
52
53     jpushServiceFactory.setTagsWithAlias=_setTagsWithAlias;
54     jpushServiceFactory.setTags=_setTags;
55     jpushServiceFactory.setAlias=_setAlias;
56
57     return jpushServiceFactory;
58 }])
59
60
61 .factory(\'noticeService\', [function () {
62     var notices=[
63         {id:1,msg:\'消息一\'},
64         {id:2,msg:\'消息二\'},
65         {id:3,msg:\'消息三\'},
66         {id:4,msg:\'消息四\'},
67         {id:5,msg:\'消息五\'},
68         {id:6,msg:\'消息六\'},
69         {id:7,msg:\'消息七\'},
70         {id:8,msg:\'消息八\'}
71     ];
72
73     return {
74         notices:notices
75     };
76 }])
6编译apk 运行文件
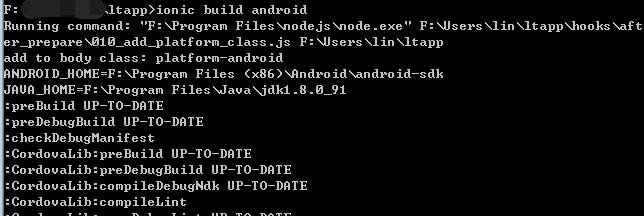
备注:编译过程中可能有错误,具体看情况处理 ,一般能生成apk 就运行了
7.生成apk 目录在项目文件 platforms\\android\\build\\outputs 安装运行

8.查看终端 手机通知信息 以上代码都是从网上当得,修修改测试通过
以上是关于Ionic JPush极光推送 插件实例的主要内容,如果未能解决你的问题,请参考以下文章