Serial Port Programming on Linux(转载)
Posted sunrain_hjb的BLOG
tags:
篇首语:本文由小常识网(cha138.com)小编为大家整理,主要介绍了Serial Port Programming on Linux(转载)相关的知识,希望对你有一定的参考价值。
This is a tutorial on how to program the Serial Ports on your Linux box.Serial Ports are nice little interfaces on the PC which helps you to interface your embedded system projects using a minimum number of wires.In this tutorial we will write a small program that will send and receive ASCII characters to a microcontroller development board.
One problem with the traditional serial ports is that they are now legacy hardware and are being phased out by the PC manufacturers and most laptops have USB ports only,this problem can be easily solved by using a variety of USB to Serial Converters available in the market,eg USB2SERIAL V2.0.
Please note that in this tutorial I am using a USB to Serial Converter based on FT232 from FTDI. You can use any FT232 based board ( other USB converter boards based on different chip sets should work,but i have not tested it ) or you can buy the one I am using here.
If you have traditional D subminiature (DB9) Serial Ports,just identify the relevant pins (RXD, TXD,RTS,DTR and Ground) and continue with the tutorial.
In this tutorial we are going to use the C language to program the serial port on a Linux Operating system(Ubuntu/LinuxMint).The compiler used is gcc which is freely available along with the OS.
Sourcecodes
All the C sourefiles used in this tutorial can be downloaded from our GitHub Page.If you are new to Github Check this article to download code .
If you are not comfortable with C ,you can check our tutorial on Serial Communication using Python (PySerial).
Traditional hardware serial ports under Linux are named as ttyS* where * can be 1,2,3... etc for eg ttyS1,ttyS2,ttyS23 ...... etc.They are similar to COM1,COM2 etc under a windows box.
While USB to Serial Converter based serial ports are usually named as ttyUSB* where * can be 1,2,3... etc for eg ttyUSB0,ttyUSB1 etc .
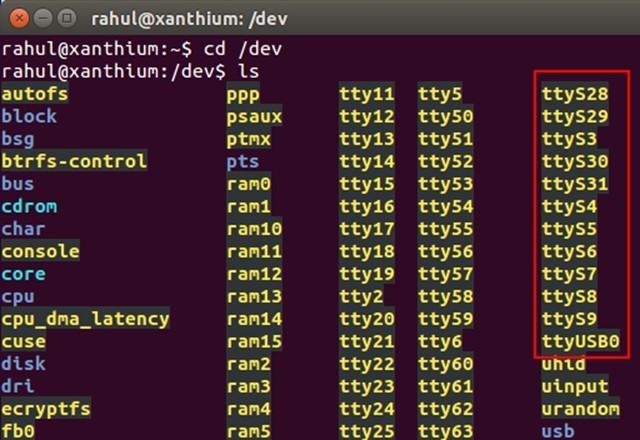
In Linux the hardware components like serial ports are treated like files and are grouped together in the /dev folder in the file system.if you navigate into the /dev folder and list the files using ls command you can see the files corresponding to various hardware devices.

Now you can see a large number of serial ports listed in the /dev directory like ttyS28,ttyS23 etc.Now to identify which of the ttyS* corrosponds to your hardware serial port run the following command on the terminal.
dmesg | grep ttyS
if you are getting an output like this
[ 37.531286] serial8250: ttyS0 at I/O 0x3f8 (irq = 4) is a 16550A
it means that ttyS0 is your hardware serial port connected to your computer.
Now if you dont have any hardware serial ports ( like in my case ) the command will not print anything,like this.

Now to check for any USB to serial converter use dmesg | grep tty command.

You can see that FTDI based USB to Serial Converter is attached to ttyUSB0.Now you can use the ttyUSB0 to communicate with your serial converter .
Another place where you can see the attached serial devices is the /dev/serial/by-id folder.

Programming the Serial Port
In this tutorial i am going to use C language to program the Serial port,compiler used is GCC.
If you are interested to know more about the internals of the serial port you can refer "The Serial Programming Guide for POSIX Operating Systems" written by Michael R.Sweet.
To perform serial I/O under linux we are going to use the termios API.termios API supports two modes of accessing the serial ports.
1. Cannonical Mode
2. NonCannonical Mode
Cannonical mode is the default mode and is used for accessing terminals and stuff.For our tutorial we are going to use the second mode called the non cannonical mode.More details about the difference between the modes are available in the above book.
Opening and Closing the Serial Port
Opening a serial port in Linux is accomplished by using the open() system call and closing the serial port is done using the close() system call.
The open() system call takes two arguments ,name of the file to be opened (here serial port ) and the various parameters associated with it.It returns a -1 on failure and a positive integer on success.
int fd ;
fd = open("/dev/ttyUSB0",O_RDWR | O_NOCTTY);
here /dev/ttyUSB0 is the name of the serial port you are using (here FTDI based USB2SERIAL Converter board),If you are using a hardware serial port it will be some thing like /dev/ttyS1 or/dev/ttyS2.
O_RDWR means that the port is opened for both reading and writing.
O_NOCTTY means that no terminal will control the process opening the serial port.
After a serial port is opened it should be closed by using the close() system call.close() takes a single argument,the file descriptor fd which we have earlier used to open the serial port using open() system call.Like this
close(fd);
Now lets check out what we have learned by trying out on your PC .Fire up your favorite text editor and create a C file named serial.c and type in the following C code.
|
#include <stdio.h> |
Now save the file and compile it using GCC at the terminal.
gcc -o serial serial.c
Please make sure that you are using the correct serial port name in the open() command.In the above code it is ttyUSB0 , it may be different in your system.
Another important fact regarding the Linux system is that Linux will only allow you to access the hardware resources from root account.So you will have to execute the resulting binary as root ,just use the sudo command.
After the code is compiled successfully,execute the binary as root by issuing the following command.Enter the password for root when prompted.
sudo ./serial
Please make sure your hardware is connected before executing the binary, in case you are using a USB to serial converter.

Configuring the termios structure
After opening and closing the serial port successfully ,its time to configure the correct mode,baudrate,data format,number of start/stop bits etc .In Linux it is done by a structure calledtermios.
And this is how the structure looks like
struct termios
{
tcflag_t c_iflag; /* input mode flags */
tcflag_t c_oflag; /* output mode flags */
tcflag_t c_cflag; /* control mode flags */
tcflag_t c_lflag; /* local mode flags */
cc_t c_line; /* line discipline */
cc_t c_cc[NCCS]; /* control characters */
};
Now first thing to do is to declare a structure of type termios
struct termios SerialPortSettings;
Now to configure the termios structure according to our needs we use two functions,tcgetattr() andtcsetattr().
tcgetattr() is used to get the current settings of the serial port to the structure we just declared.It takes two arguments, the file descriptor fd corresponding to the serial port we have opened and the address of the structure we just declared.
tcgetattr(fd, &SerialPortSettings);
After getting the current settings we are going to change it suit our needs.We are going to configure the serial port to transmit at 9600 baudrate , 8 bits, No parity ,1 Stop bit ,the 8N1 configuration.
Setting the Baudrate
In Linux ,there is an option to set different read and write speeds but it is recommended to set the same speed for both read and write.
The Baudrate is set using two functions,
cfsetispeed() for setting the input speed or read speed and
cfsetospeed() for setting the output speed or write speed.
Now let\'s set the speed for both reading and writing at 9600 bps
cfsetispeed(&SerialPortSettings,B9600);
cfsetospeed(&SerialPortSettings,B9600);
you can use other standard baudrates like 4800,19200,38400 etc all Baudrate constants have to beprefixed with a \'B\' like B4800 , B19200 etc .
Please note that the MSP430 microcontroller code provided (microcontroller side) uses 9600bps 8N1 format for communicating with the PC.
Configuring data format,Start/Stop bits ,Parity
The control flags ( c_cflag ) of the termios structure configures the data format (8bit or 7 bits for data),Parity(Even,Odd,None) and the number of start and stop bits to use while communicating.
Configuring these information involves setting and clearing individual bits of the control flags.It is advisable to check out "Bit manipulation in C language" in google/wikipedia,if you are not familiar.
Here is a small eg :-
SerialPortSettings.c_cflag &= ~PARENB; /*CLEAR Parity Bit PARENB*/
SerialPortSettings.c_cflag |= PARENB; /*SET Parity Bit PARENB*/
In our case we want Parity = None so we will clear the Parity Bit PARENB using the below line of code.
SerialPortSettings.c_cflag &= ~PARENB; // No Parity
Number of Stop bits = 1, so we clear the CSTOPB bit.
SerialPortSettings.c_cflag &= ~CSTOPB; //Stop bits = 1
Now to set the number of data bits = 8 ,
SerialPortSettings.c_cflag &= ~CSIZE; /* Clears the Mask */
SerialPortSettings.c_cflag |= CS8; /* Set the data bits = 8 */
Configuring other Options
Turn off hardware based flow control (RTS/CTS).
SerialPortSettings.c_cflag &= ~CRTSCTS;
Turn on the receiver of the serial port (CREAD),other wise reading from the serial port will not work.
SerialPortSettings.c_cflag |= CREAD | CLOCAL;
Turn off software based flow control (XON/XOFF).
SerialPortSettings.c_iflag &= ~(IXON | IXOFF | IXANY);
Setting the mode of operation,the default mode of operation of serial port in Linux is the Cannonical mode.For Serial communications with outside devices like serial modems,mice etc NON Cannonical mode is recommended.
SerialPortSettings.c_iflag &= ~(ICANON | ECHO | ECHOE | ISIG);
More information about the functions and constants discussed above can be found in the termios manual page.You can easly access them by typing
man termios on your terminal.
The man pages are also available online at www.man7.org.
After you have configured all of the required bitfields of the terminos structure.You can use thetcsetattr() function to set them.tcsetattr() takes three arguments,the first and last arguments are same as in the tcgetattr()function.The second one TCSANOW tells to make the changes now without waiting.
tcsetattr(fd,TCSANOW,&SerialPortSettings)
Hardware Connections
Now we will create a small serial link between a microcontroller board and a PC running Linux OS to test out reading and writing from a PC serial port .
Microcontroller used here is MSP430G2553 from Texas instruments on Launchpad development board.Please note that you can use any microcontroller like 8051 or Atmel AVR on the embedded system side.Since this is an article about setting up and configuring the serial port on Linux,the microcontroller side code is explained here.
The PC is connected to the microcontroller board using a null modem cable.The RX of the PC (serial port) is connected to the TX of the Microcontroller and vice versa.The Grounds of PC and microcontroller are connected together.
Here my PC do not have a hardware DB9 serial port(9 pin),So i am using a FTDI based USB to Serial converter called USB2SERIAL which converts the USB signals to TTL compatible serial outputs (RXD and TXD). you can directly connect the outputs of USB2SERIAL to MSP430 microcontroller as shown in the below block diagram.USB2SERIAL also offers selectable 3V/5V TTL outputs for interfacing to3.3V logic microcontrollers like MSP430.


Please noter that if you are using a DB9 RS232 SerialPort of your PC ,you will have to build a RS232 signal level converter at the microcontroller side to decode the RS232 signal.Connecting the RS232 Lines from the PC directly to microcontroller UART directly will damage the chip.
Writing data to serial port is accomplished using the write() system call.The code snippet below explains how a write operation is accomplished.
char write_buffer[] = "A";
int bytes_written = 0 ;
bytes_written = write(fd,write_buffer,sizeof(write_buffer));
write_buffer[] is the array containing the characters to be transmitted by the serial port .In our case we are going to transmit a single character "A" which is received by the MSP430 microcontroller connected to the serial port.
write() system call takes three arguments,
1. fd - file descriptor pointing to the opened serial port.
2. a pointer pointing to the buffer containing the data to be written in this case
write_buffer[].
3. The number of bytes to be written. (here we use sizeof()operator to get the number of bytes in the array).
On writting the data, write() returns the total number of bytes written to the serialport.
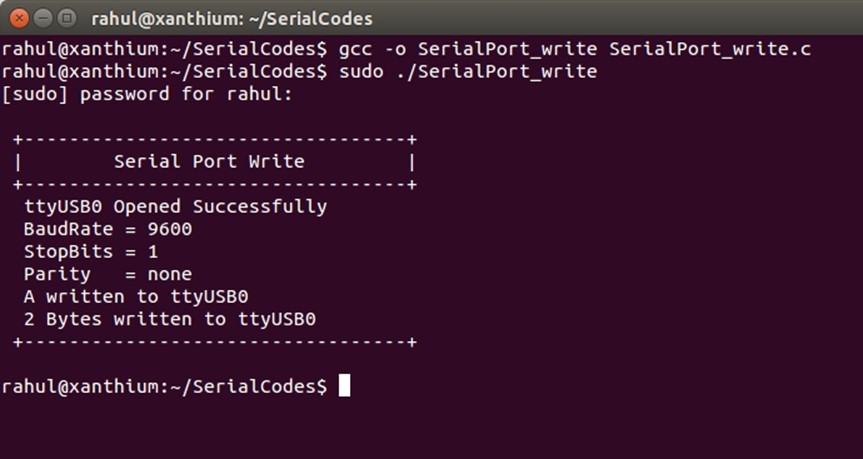
You can find the complete program in the zip file (SerialPort_write.c),here is the screenshot of the executable.

Reading Data from the Serial Port
Reading data from the serial port is accomplished by using the read() system call.
In the case of reading from the serial port ,we have to set time outs in the termios structure.This is achieved by adding two more lines of code during configuring the termios structure.
tcgetattr(fd, &SerialPortSettings);
//Configure Baudrate()
//Configure data bits()
SerialPortSettings.c_cflag |= CREAD | CLOCAL;//enable receiver
/* Setting Time outs */
SerialPortSettings.c_cc[VMIN] = 10; /* Read 10 characters */
SerialPortSettings.c_cc[VTIME] = 0; /* Wait indefinitely */
tcsetattr(fd,TCSANOW,&SerialPortSettings);
SerialPortSettings.c_cc[VMIN] specifies the minimum number of characters that should be read before the read() call returns.Here it should read at least 10 characters before returning.
SerialPortSettings.c_cc[VTIME] specifies the time to wait until the characters is received.Here the program will wait indefinitely since [VTIME] = 0.
Also we have to enable the receiver by setting CREAD.
Now back to read() system call ,
char read_buffer[32];
int bytes_read = 0;
bytes_read = read(fd,&read_buffer,32);
like write(), read() also takes 3 arguments first one is the file descriptor,2nd one is the pointer to the array for storing the received data and the last one is the number of bytes to read.
read() returns the number of bytes it had read from the serial port to bytes_read variable.
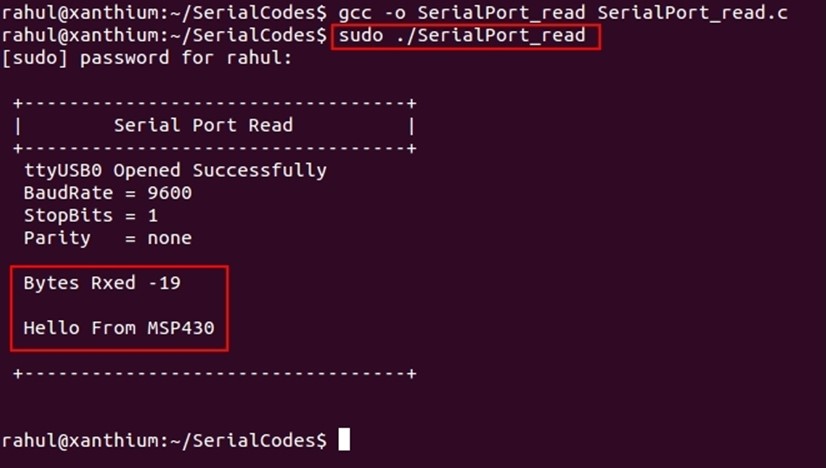
In the zip file you can find "SerialPort_read.c" which contains the complete program.Compile the program using gcc and run it.Remember to use sudo so that your executable runs as root.
After providing the root password,the program will execute and wait for a character to be send by the microcontroller.

You can now reset the MSP430 microcontroller connected to the USB2SERIAL converter to transmit the string .

Program receives the "Hello from MSP430" string send by the microcontroller and displays it on the terminal.
原文地址:http://xanthium.in/Serial-Port-Programming-on-Linux
以上是关于Serial Port Programming on Linux(转载)的主要内容,如果未能解决你的问题,请参考以下文章
