OpenGl学习进程第五课:点边和图形边
Posted MenAngel
tags:
篇首语:本文由小常识网(cha138.com)小编为大家整理,主要介绍了OpenGl学习进程第五课:点边和图形边相关的知识,希望对你有一定的参考价值。
本节是OpenGL学习的第五个课时,下面介绍OpenGL边的相关知识:
(1)边的概念:
数学上的直线没有宽度,但OpenGL的直线则是有宽度的。同时,OpenGL的直线必须是有限长度,而不是像数学概念那样是无限的。可以认为,OpenGL的“直线”概念与数学上的“线段”接*,它可以由两个端点来确定。
(2)如何绘制边:
1)OpenGL支持绘制三种类型的边:
GL_LINES :指定两个顶点,在它们之间绘制一条直线。如果为GL_LINES指定了奇数个顶点,那么最后一个顶点会被忽略。
GL_LINE_STRIP :线带,它允许指定一个顶点列表,并绘制一条经过所有这些顶点的连续的线。
GL_LINE_LOOP:线环,它与线带非常类似,会在顶点列表的最后一个顶点和第一个顶点之间也绘制一条直线。
2)线的另外几种特点:
1.直线可以指定宽度:
void glLineWidth(GLfloat width);和自定义点的大小函数glPointSize()函数类似,在glBegin()函数之前调用。
2.可以画实线也可以画虚线:
1.使用glEnable(GL_LINE_STIPPLE)来启动虚线模式。(使用glDisable(GL_LINE_STIPPLE)可以关闭之)。
2.使用glLineStipple来设置虚线的样式。
函数void glLineStipple(GLint factor, GLushort pattern)用于在OpenGL中设置直线的当前点画模式。
pattern参数是由1或0组成的16位序列,它们根据需要进行重复,对一条特定的直线进行点画处理。从这个模式的低位开始,一个像素一个像素的进行处理。如果模式中对应的位是1,就绘制这个像素,否则就不绘制。模式可以使用factor参数(表示重复因子)进行扩展,它与1和0的连续子序列相乘。
GL_LINE_STIPPLE为参数调用glEnable()才能启用直线点画功能,相应的glDisable()出入此参数来关闭点画功能。下面是讲解示例:
两行代码:
glLineStipple(1, Ox3F07);
glEnable(GL_LINE_STIPPLE);
此时模式为Ox3F07(二进制形式为0011111100000111),它所画出来的直线是这样的:先连续绘制3个像素,然后连续5个像素留空,再连续绘制6个像素,最后两个像素留空(注意,首先是从右侧低位开始的)。如果factor是2,那么这个模式便被扩展为:先连续绘制6个像素,然后连续10个像素留空,再连续绘制12个像素,最后4个像素留空。
如果没有启用点画线功能,OpenGL会自动把pattern当做为OxFFFF,把factor当成1。
3)直线,线环,线带的对比和虚线和实线的对比:
#include <GL/glut.h>
#pragma comment(linker,"/subsystem:\\"windows\\" /entry:\\"mainCRTStartup\\"")

void paint(void)
{
    glViewport(0,0,600,600);
    //先画分割线,分为上下两个区域,其中下区域再分为两个。
    glColor3f(1.0f,0.0f,0.0f);
    glLineWidth(2.0f);
    glBegin(GL_LINES);
    glVertex2f(-1.0f,0.0f);
    glVertex2f( 1.0f,0.0f);
    glVertex2f(0.0f,0.0f);
    glVertex2f(0.0f,-1.0f);
    glEnd();

    glEnable(GL_LINE_STIPPLE);

    //在上方画三条线
    glViewport(0,300,600,300);
    glLineWidth(4.0f);
    glColor3f(1.0f, 1.0f, 1.0f);
    glLineStipple(1, 0xFFFF);
    glBegin(GL_LINES);
    glVertex2f(-1.0f,-0.5f);
    glVertex2f( 1.0f,-0.5f);
    glEnd();

    glLineWidth(6.0f);
    glColor3f(0.0f, 1.0f, 1.0f);
    glLineStipple(2, 0x0F0F);
    glBegin(GL_LINES);
    glVertex2f(-1.0f, 0.0f);
    glVertex2f(1.0f, 0.0f);
    glEnd();

    glLineWidth(8.0f);
    glColor3f(1.0f, 1.0f, 0.0f);
    glLineStipple(10, 0x0F0F);
    glBegin(GL_LINES);
    glVertex2f(-1.0f, 0.50f);
    glVertex2f(1.0f, 0.50f);
    glEnd();

    glDisable(GL_LINE_STIPPLE);

    //在下方的左侧画线带
    glViewport(0,0,300,300);
    glColor3f(0.0f,1.0f,0.0f);
    glBegin(GL_LINE_STRIP);
    glVertex2f(-1.0f, 0.0f-0.2f);
    glVertex2f(-0.5f, 0.5f-0.2f);
    glVertex2f(-0.0f, 0.0f-0.2f);
    glVertex2f(0.5f, 0.5f-0.2f);
    glVertex2f(1.0f, 0.0f-0.2f);
    glEnd();
    //在下方的右侧画线环
    glViewport(300,0,300,300);
    glColor3f(0.0f,0.0f,1.0f);
    glBegin(GL_LINE_LOOP);
    glVertex2f(-1.0f, 0.0f+0.2f);
    glVertex2f(-0.5f, 0.5f+0.2f);
    glVertex2f(-0.0f, 0.0f+0.2f);
    glVertex2f(0.5f, 0.5f+0.2f);
    glVertex2f(1.0f, 0.0f+0.2f);
    glVertex2f(0.0f,-1.0f+0.2f);
    glEnd();
    glFlush();
}
void Init(void)
{
    glClearColor(0.50f, 0.50f, 0.50f, 0.50f);//设置默认背景色要在清理颜色缓冲区之前
    glClear(GL_COLOR_BUFFER_BIT);
}
int main(int argc, char *argv[])
{
    glutInit(&argc,argv);
    glutInitDisplayMode(GLUT_SINGLE|GLUT_RGB);
    glutInitWindowSize(615,600);
    glutInitWindowPosition(400,100);
    glutCreateWindow("各种直线的对比");
    Init();
    glutDisplayFunc(paint);
    glutMainLoop();
    return 0;
}
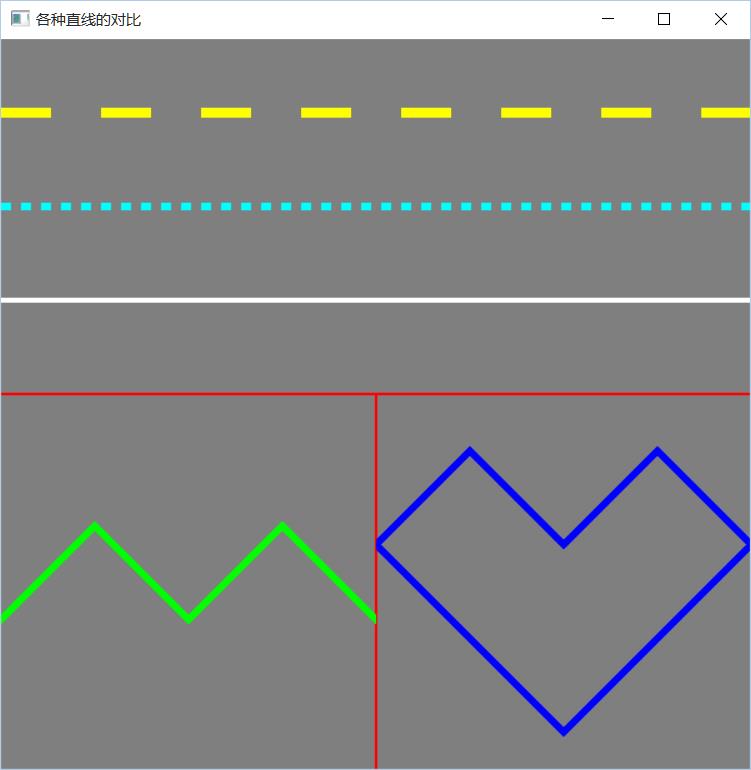
(3)调用OpenGL封装好的函数来画立方体线框:
#include <GL/glut.h>
#include <stdlib.h>
#pragma comment(linker,"/subsystem:\\"windows\\" /entry:\\"mainCRTStartup\\"")
void init(void)
{
    glClearColor(0.0, 0.0, 0.0, 0.0);
    glShadeModel(GL_FLAT);
}

void display(void)
{
    glClear(GL_COLOR_BUFFER_BIT);
    glColor3f(1.0, 0.0, 0.0);
    glLineWidth(2.5f);
    glLoadIdentity();
    gluLookAt(1.0, 1.0, 5.0, 0.0, 0.0, 0.0, 0.0, 1.0, 0.0);

    glutWireCube(1.0);
    glFlush();
}
//此函数能在窗口被拉伸时按比例拉伸我们画的立方体框架
void reshape(int w, int h)
{
    glViewport(0, 0, (GLsizei)w, (GLsizei)h);
    glMatrixMode(GL_PROJECTION);
    glLoadIdentity();
    glFrustum(-2.0, 2.0, -2.0, 2.0, 3.0, 40.0);
    glMatrixMode(GL_MODELVIEW);

}
int main(int argc, char* argv[])
{
    glutInit(&argc, argv);
    glutInitDisplayMode(GLUT_SINGLE | GLUT_RGB);
    glutInitWindowSize(600, 400);
    glutInitWindowPosition(300, 100);
    //glutCreateWindow(argv[0]);argv[0]为默认的应用程序文件所在的路径
    glutCreateWindow("用直线画立方体");
    init();
    glutDisplayFunc(display);
    glutReshapeFunc(reshape);
    glutMainLoop();
    return 0;
}
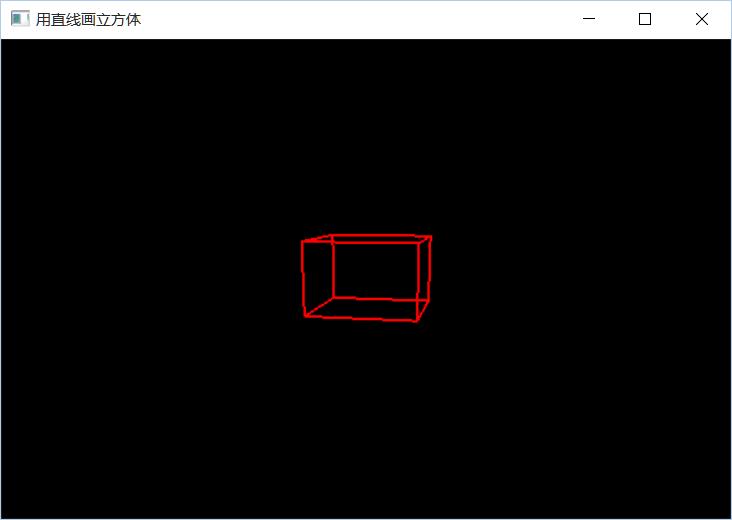
1)代码解释:
1.void glShadeModel ( GLenum mode);
设置着色模式,参数一般为GL_SMOOTH或GL_FLAT。
GL_SMOOTH光滑着色模式:使用时,独立的处理图元中各个顶点的颜色。对于线段图元,线段上各点的颜色将根据两个顶点的颜色通过插值得到。对于多边形图元,多边形内部区域的颜色将根据所有顶点的颜色插值得到。
GL_FLAT恒定着色模式,使用图元中某个顶点的颜色来渲染整个图元。
如果两点的颜色相同,使用两个参数效果相同。


*滑着色没有明显颜色的过度。
2.void gluLookAt(GLdouble eyex,GLdouble eyey,GLdouble eyez,GLdouble centerx,GLdouble centery,GLdouble centerz,GLdouble upx,GLdouble upy,GLdouble upz);
第一组eyex, eyey,eyez 相机在世界坐标的位置
第二组centerx,centery,centerz 相机镜头对准的物体在世界坐标的位置
第三组upx,upy,upz 相机向上的方向在世界坐标中的方向
该函数定义了视点矩阵,并用该矩阵乘以当前矩阵。(http://cowboy.1988.blog.163.com/blog/static/751057982010101574732212/)

3.OpenGL中自带绘制基本立体图形的函数:
glutWireSphere绘制球
glutWireCone绘制椎体
glutWireCube绘制立体
glutWireTorus绘制甜圈
glutWireTeapot绘制茶壶
glutWireOctahedron绘制八面体
4.透视函数glFrustum(), gluPerspective()和glOrtho()的用法:
首先先介绍透视函数运用的背景:
在OpenGL中,如果想对模型进行操作,就要对这个模型的状态(当前的矩阵)乘上这个操作对应的一个矩阵。
如果乘以变换矩阵(*移, 缩放, 旋转), 那相乘之后, 模型的位置被变换;
如果乘以投影矩阵(将3D物体投影到2D*面), 相乘后, 模型的投影方式被设置;
如果乘以纹理矩阵(), 模型的纹理方式被设置.
glMatriMode(GLenum mode)用来指定乘以什么类型的矩阵; glMatrixMode有3种模式: GL_PROJECTION 投影, GL_MODELVIEW 模型视图, GL_TEXTURE 纹理。
透视函数就运用在对模型进行投影操作这个过程中:
1.glMatrixMode(GL_PROJECTION); //将当前矩阵指定为投影矩阵
2.glLoadIdentity();然后把矩阵设为单位矩阵:
3.然后调用glFrustum()或gluPerspective(),它们生成的矩阵会与当前的矩阵相乘,生成透视的效果;
void glFrustum(GLdouble left, GLdouble Right, GLdouble bottom, GLdouble top, GLdouble near, GLdouble far);
此函数创建一个透视型的视景体。其操作是创建一个透视投影的矩阵,并且用这个矩阵乘以当前矩阵。
这个函数的参数只定义*裁剪*面的左下角点和右上角点的三维空间坐标,即(left,bottom,-near)和(right,top,-near);最后一个参数far是远裁剪*面的离视点的距离值,其左下角点和右上角点空间坐标由函数根据透视投影原理自动生成。near和far表示离视点的远*,它们总为正值(near/far 必须>0)。
void gluPerspective(GLdouble fovy,GLdouble aspect,GLdouble zNear, GLdouble zFar);
创建一个对称的透视型视景体,但它的参数定义于前面的不同。
参数fovy定义视野在Y-Z*面的角度,范围是[0.0, 180.0];参数aspect是投影*面宽度与高度的比率;参数Near和Far分别是*远裁剪面到视点(沿Z负轴)的距离,它们总为正值。
以上两个函数缺省时,视点都在原点,视线沿Z轴指向负方向。
glOrtho(GLdouble left, GLdouble right, GLdouble bottom, GLdouble top, GLdouble near, GLdouble far);
它创建一个*行视景体(就是一个长方体空间区域)。实际上这个函数的操作是创建一个正射投影矩阵,并且用这个矩阵乘以当前矩阵。
六个参数, 前两个是x轴最小坐标和最大坐标,中间两个是y轴,最后两个是z轴值。其中*裁剪*面是一个矩形,矩形左下角点三维空间坐标是(left,bottom,-near),右上角点是(right,top,-near);远裁剪*面也是一个矩形,左下角点空间坐标是(left,bottom,-far),右上角点是(right,top,-far)。
注意:所有的near和far值同时为正或同时为负, 值不能相同。如果没有其他变换,正射投影的方向*行于Z轴,且视点朝向Z负轴。这意味着物体在视点前面时far和near都为负值,物体在视点后面时far和near都为正值。只有在视景体里的物体才能显示出来。如果最后两个值是(0,0),也就是near和far值相同了,视景体深度没有了,整个视景体都被压成个*面了,就会显示不正确。
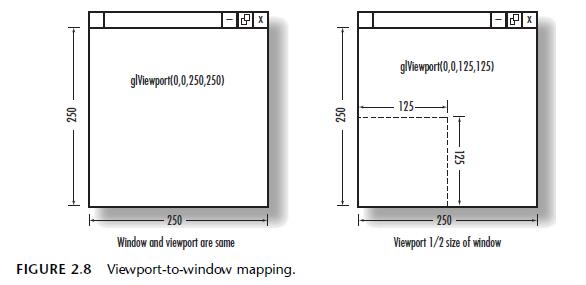
5.void glViewport(GLint x, GLint y, GLsizei width, GLsizei height);
The x and y parameters specify the lower-left corner of the viewport within the window, and the width and height parameters specify these dimensions in pixels. Usually, x and y are both 0, but you can use viewports to render more than one drawing in different areas of a window.
The viewport defines the area within the window in actual screen coordinates that OpenGL can use to draw in (see Figure 2.8). The current clipping volume is then mapped to the new viewport. If you specify a viewport that is smaller than the window coordinates, the rendering is scaled smaller, as you see in Figure 2.8.
The last requirement of our ChangeSize function is to redefine the clipping volume so that the aspect ratio remains square. The aspect ratio is the ratio of the number of pixels along a unit of length in the vertical direction to the number of pixels along the same unit of length in the horizontal direction. In English, this just means the width of the window divided by the height. An aspect ratio of 1.0 defines a square aspect ratio. An aspect ratio of 0.5 specifies that for every two pixels in the horizontal direction for a unit of length, there is one pixel in the vertical direction for the same unit of length. If you specify a viewport that is not square and it is mapped to a square clipping volume, the image will be distorted. For example, a viewport matching the window size and dimensions but mapped to a square clipping volume would cause images to appear tall and thin in tall and thin windows and wide and short in wide and short windows. In this case, our square would appear square only when the window was sized to be a square. In our example, an orthographic projection is used for the clipping volume. The OpenGL command to create this projection is glOrtho: void glOrtho(GLdouble left, GLdouble right, GLdouble bottom, GLdouble top, GLdouble near, GLdouble far ); In 3D Cartesian space, the left and right values specify the minimum and maximum coordinate value displayed along the x-axis; bottom and top are for the y-axis. The near and far parameters are for the z-axis
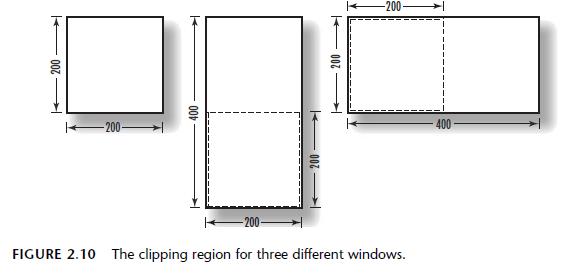
glViewport是一块画布的大小,而gluOrtho(修剪空间)则定义了画布的可视范围。(我上面的例子也是很好的窗口裁剪实例,采用模型视景时多用此函数。)
2)相关知识:
1.模型变换与视图变换:(http://www.cnblogs.com/opengl/archive/2012/11/06/2757854.html)
视图变换,即模型(参照物)位置不变,但视图在发生变化;
模型变换,即视图位置观察方式不变,模型发生变化。
2.坐标系:(http://blog.csdn.net/hunter8777/article/details/5890899)
openGL使用右手坐标从左到右,x递增从下到上,y递增从远到*,z递增。
OPENGL坐标系可分为:世界坐标系和当前绘图坐标系:
世界坐标系以屏幕中心为原点(0, 0, 0)。你面对屏幕,你的右边是x正轴,上面是y正轴,屏幕指向你的为z正轴。长度单位这样来定: 窗口范围按此单位恰好是(-1,-1)到(1,1)。
当前绘图坐标系是绘制物体时的坐标系。
程序刚初始化时,世界坐标系和当前绘图坐标系是重合的。当用glTranslatef(),glScalef(), glRotatef()对当前绘图坐标系进行*移、伸缩、旋转变换之后, 世界坐标系和当前绘图坐标系不再重合。改变以后,再用glVertex3f()等绘图函数绘图时,都是在当前绘图坐标系进行绘图,所有的函数参数也都是相 对当前绘图坐标系来讲的。
OpenGL中存在6种坐标系:
1. Object or model coordinates
2. World coordinates
3. Eye (or Camera) coordinates
4. Clip coordinates
5. Normalized device coordinates
6. Window (or screen) coordinates
(4)在3D空间内绘制直线并动态查看:
#include <GL/glut.h>
#include <math.h>

#define GL_PI 3.1416f
static GLfloat xRot = 0.0f;
static GLfloat yRot = 0.0f;

void SetupRC()
{
    glClearColor(0.0f, 0.0f, 0.0f, 1.0f);
    glColor3f(0.0f, 1.0f, 1.0f);
}

void RenderScene()
{
    GLfloat x, y, z, angle;
    glClear(GL_COLOR_BUFFER_BIT);

    glPushMatrix();
    glRotatef(xRot, 1.0f, 0.0f, 0.0f);
    glRotatef(yRot, 0.0f, 1.0f, 0.0f);
    // 开始绘制直线(图元)
    glBegin(GL_LINES);
    // 设置Z等于零,绘制的直线完全位于X-Y*面
    z = 0.0f;
    // 画线
    for (angle = 0.0f; angle <= GL_PI; angle += (GL_PI / 20.0f)) {
        // 圆的上半部分,计算X、Y坐标
        x = 50.0f * sin(angle);
        y = 50.0f * cos(angle);
        // 指定顶点位置,直线的第一顶点
        glVertex3f(x, y, z);

        // 圆的下半部分,计算X、Y坐标
        x = 50.0f * sin(angle + GL_PI);
        y = 50.0f * cos(angle + GL_PI);
        // 指定顶点位置,直线的第二顶点,与第一顶点相对应
        glVertex3f(x, y, z);
    }
    glEnd();

    // 恢复矩阵状态
    glPopMatrix();
    // 刷新绘图命令,此时所有未执行的OpenGL命令被执行
    glutSwapBuffers();
}

void ChangeSize(GLsizei w, GLsizei h)
{
    GLfloat nRange = 100.0f;

    GLfloat aspectRatio;
    if (0 == h){
        h = 1;
    }
    // 根据窗口大小设置视口
    glViewport(0, 0, w, h);

    // 选择投影矩阵,并重置坐标系统
    glMatrixMode(GL_PROJECTION);
    glLoadIdentity();
    // 计算窗口的纵横比(像素比)
    aspectRatio = (GLfloat)w / (GLfloat)h;
    // 定义裁剪区域(根据窗口的纵横比,并使用正投影)
    if (w <= h) {
        glOrtho(-nRange, nRange, -nRange / aspectRatio, nRange / aspectRatio, -nRange, nRange);
    }
    else {
        glOrtho(-nRange * aspectRatio, nRange *aspectRatio, -nRange, nRange, -nRange, nRange);
    }
    // 选择模型视图矩阵,并重置坐标系统
    glMatrixMode(GL_MODELVIEW);
    glLoadIdentity();
}

void SpecialKeys(int key, int x, int y)
{
    if (key == GLUT_KEY_UP)
        xRot -= 5.0f;

    if (key == GLUT_KEY_DOWN)
        xRot += 5.0f;

    if (key == GLUT_KEY_LEFT)
        yRot -= 5.0f;

    if (key == GLUT_KEY_RIGHT)
        yRot += 5.0f;

    if (key> 356.0f)
        xRot = 0.0f;

    if (key< -1.0f)
        xRot = 355.0f;

    if (key> 356.0f)
        yRot = 0.0f;

    if (key< -1.0f)
        yRot = 355.0f;

    // 使用新的坐标重新绘制场景
    glutPostRedisplay();
}

int main(int argc, char *argv[])
{
    glutInit(&argc, argv);
    glutInitDisplayMode(GLUT_DOUBLE | GLUT_RGB);
    glutInitWindowSize(480, 320);
    glutCreateWindow("在3D空间内绘制直线");
    glutDisplayFunc(RenderScene);
    glutReshapeFunc(ChangeSize);
    glutSpecialFunc(SpecialKeys);
    SetupRC();
    glutMainLoop();

    return 0;
}
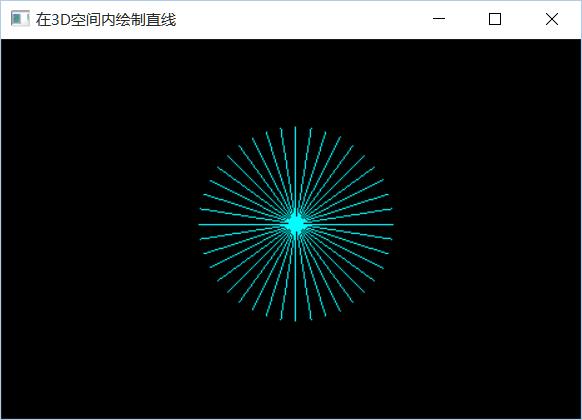
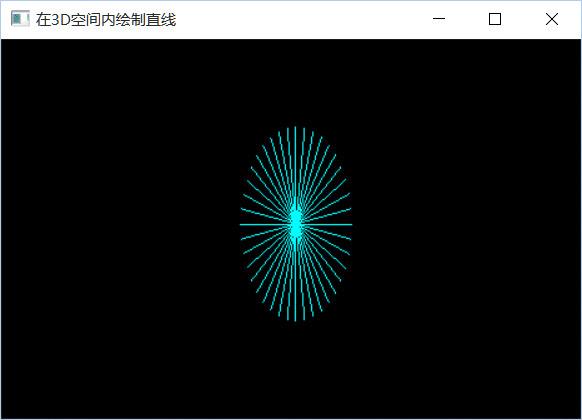
以上是关于OpenGl学习进程第五课:点边和图形边的主要内容,如果未能解决你的问题,请参考以下文章