69.Android之天气预报app
Posted chaoer
tags:
篇首语:本文由小常识网(cha138.com)小编为大家整理,主要介绍了69.Android之天气预报app相关的知识,希望对你有一定的参考价值。
最近买了本书《android第一行代码》,通篇看了下感觉不错,书本最后有个实战项目酷欧天气,闲来无事就照着敲了一遍代码,主要在请求天气接口和背景优化做了些小改动,现在来记录下。
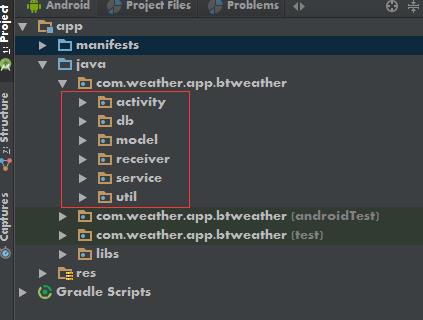
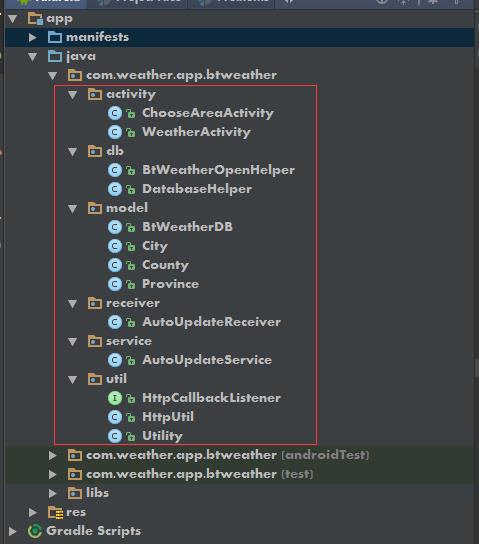
(1) android studio完成代码目录结构


其中activity包存放天气所有活动有关的代码,db包用于存放所有数据库相关的代码,model包存放所有模型相关的代码,receiver包用于存放所有广播接收器相关的代码,service包用于存放所有服务相关的代码,util包用于存放所有工具相关的代码。
(2) 创建好数据库和表
在db包下新建一个BtWeatherOpenHelper类,这里我准备建立三张表,Provice、City、County,分别用于存放省、市、县,代码如下:
 1 public class BtWeatherOpenHelper extends SQLiteOpenHelper {
 2
 3     /**
 4      *  Province表建表语句
 5      */
 6     public static final String CREATE_PROVINCE = "create table Province ("
 7             + "id integer primary key autoincrement,"
 8             + "province_name text,"
 9             + "province_code text)";
10
11     /**
12      * City表建表语句
13      */
14     public static final String CREATE_CITY = "create table City ("
15             + "id integer primary key autoincrement,"
16             + "city_name text, "
17             + "city_code text, "
18             + "province_id integer)";
19
20     /**
21      * County表建表语句
22      */
23     public static final String CREATE_COUNTY = "create table County ("
24             + "id integer primary key autoincrement, "
25             + "county_name text, "
26             + "county_code text, "
27             + "city_id integer)";
28
29
30     public BtWeatherOpenHelper(Context context, String name, SQLiteDatabase.CursorFactory factory, int version) {
31         super(context, name, factory, version);
32     }
33
34     @Override
35     public void onCreate(SQLiteDatabase db) {
36         db.execSQL(CREATE_PROVINCE);    // 创建Province表
37         db.execSQL(CREATE_CITY);    // 创建City表
38         db.execSQL(CREATE_COUNTY); // 创建County表
39     }
40
41     @Override
42     public void onUpgrade(SQLiteDatabase db, int oldVersion, int newVersion) {
43
44     }
45 }
对于Province建表语句里,其中id是自增长主键,province_name表示省名,province_code表示省级代号;
对于City建表语句里,其中id是自增长主键,city_name表示城市名,city_code表示市级代号,province_id是City表关联Province表的外键;
对于County建表语句里,其中id是自增长主键,county_name表示县名,county_code表示县级代号,city_id是County表关联City表的外键。
接下来我们要在每张表写一个对应的实体类,这样方便我们后续的开发工作。因此,在model包下新建一个Province类,如下:
 1 public class Province {
 2     private int id;
 3     private String provinceName;
 4     private String provinceCode;
 5
 6
 7     public int getId() {
 8         return id;
 9     }
10
11     public void setId(int id) {
12         this.id = id;
13     }
14
15     public String getProvinceName() {
16         return provinceName;
17     }
18
19     public void setProvinceName(String provinceName) {
20         this.provinceName = provinceName;
21     }
22
23     public String getProvinceCode() {
24         return provinceCode;
25     }
26
27     public void setProvinceCode(String provinceCode) {
28         this.provinceCode = provinceCode;
29     }
30 }
同理也在model包下新建一个City和County类,可以看到实体类的内容非常简单,基本就是生成数据库表对应字段的get和set方法就可以了。接着我们还需要创建一个BtWeatherDB类,这个类会把一些常用的数据库操作封装起来,以方便我们后面实用,代码如下:
  1 public class BtWeatherDB {
  2     /**
  3      * 数据库名
  4      */
  5     public static final String DB_NAME = "Bt_weather";
  6
  7     /**
  8      * 数据库版本
  9      */
 10     public static final int VERSION = 1;
 11     private static BtWeatherDB btWeatherDB;
 12     private SQLiteDatabase db;
 13
 14     /**
 15      * 将构造方法私有化
 16      */
 17     private BtWeatherDB(Context context){
 18         BtWeatherOpenHelper dbHelper = new BtWeatherOpenHelper(context,DB_NAME,null,VERSION);
 19         db = dbHelper.getWritableDatabase();
 20     }
 21
 22     /**
 23      * 获取BtWeatherDB的实例
 24      */
 25     public synchronized static BtWeatherDB getInstance(Context context){
 26         if (btWeatherDB == null){
 27             btWeatherDB = new BtWeatherDB(context);
 28         }
 29         return btWeatherDB;
 30     }
 31
 32     /**
 33      * 将Province实例存储到数据库
 34      */
 35     public void saveProvince(Province province){
 36         if (province != null){
 37             ContentValues values = new ContentValues();
 38             values.put("province_name",province.getProvinceName());
 39             values.put("province_code",province.getProvinceCode());
 40             db.insert("Province",null,values);
 41         }
 42     }
 43
 44     /**
 45      * 从数据库获取全国所有省份信息
 46      */
 47     public List<Province> loadProvince(){
 48         List<Province> list = new ArrayList<Province>();
 49         Cursor cursor = db.query("Province",null,null,null,null,null,null);
 50         if (cursor.moveToFirst()){
 51             do{
 52                 Province province = new Province();
 53                 province.setId(cursor.getInt(cursor.getColumnIndex("id")));
 54                 province.setProvinceName(cursor.getString(cursor.getColumnIndex("province_name")));
 55                 province.setProvinceCode(cursor.getString(cursor.getColumnIndex("province_code")));
 56                 list.add(province);
 57             } while(cursor.moveToNext());
 58         }
 59         if (cursor != null){
 60             cursor.close();
 61         }
 62         return list;
 63     }
 64
 65     /**
 66      * 将City实例存储到数据库
 67      */
 68     public void saveCity(City city){
 69         if (city != null){
 70             ContentValues values = new ContentValues();
 71             values.put("city_name",city.getCityName());
 72             values.put("city_code",city.getCityCode());
 73             values.put("province_id",city.getProvinceId());
 74             db.insert("City",null,values);
 75         }
 76     }
 77
 78     /**
 79      * 将数据库读取某省下所有的城市信息
 80      */
 81     public List<City> loadCities(int provinceId){
 82         List<City> list = new ArrayList<City>();
 83         Cursor cursor = db.query("City",null,"province_id = ?",
 84                 new String[]{String.valueOf(provinceId)},null,null,null);
 85
 86         if (cursor.moveToFirst()){
 87             do{
 88                 City city = new City();
 89                 city.setId(cursor.getInt(cursor.getColumnIndex("id")));
 90                 city.setCityName(cursor.getString(cursor.getColumnIndex("city_name")));
 91                 city.setCityCode(cursor.getString(cursor.getColumnIndex("city_code")));
 92                 city.setProvinceId(provinceId);
 93                 list.add(city);
 94             }while (cursor.moveToNext());
 95         }
 96         if (cursor != null){
 97             cursor.close();
 98         }
 99         return list;
100     }
101
102     /**
103      * 将County实例存储到数据库
104      */
105     public void saveCounty(County county){
106         if (county != null){
107             ContentValues values = new ContentValues();
108             values.put("county_name",county.getCountyName());
109             values.put("county_code",county.getCountyCode());
110             values.put("city_id",county.getCityId());
111             db.insert("County",null,values);
112         }
113     }
114
115     /**
116      * 从数据库读取某城市下所有的县信息
117      */
118     public List<County> loadCounties(int cityId){
119         List<County> list = new ArrayList<County>();
120         Cursor cursor = db.query("County",null,"City_id = ?",
121                 new String[] {String.valueOf(cityId)},null,null,null);
122         if (cursor.moveToFirst()){
123             do{
124                 County county = new County();
125                 county.setId(cursor.getInt(cursor.getColumnIndex("id")));
126                 county.setCountyName(cursor.getString(cursor.getColumnIndex("county_name")));
127                 county.setCountyCode(cursor.getString(cursor.getColumnIndex("county_code")));
128                 county.setCityId(cityId);
129                 list.add(county);
130             } while(cursor.moveToNext());
131         }
132         if (cursor != null){
133             cursor.close();
134         }
135         return list;
136     }
137 }
从上面可以看到,BtWeatherDB是一个单例类,我们将它的构造方法私有化,并提供一个getInstance()方法来获取BtWeatherDB的实例,这样就可以保证全局范围内只有一个BtWeathereDB的实例。接下来我们在BtWeatherDB中提供了六组方法,saveProvince()、loadProvince()、saveCity()、loadCities()、saveCounty()、loadCounties(),分别用于存储省份数据、读取所有省份数据、存储城市数据、读取某省内所有城市数据、存储县数据、读取某市内所有县的数据。
(3) 遍历全国省市县数据
我们知道,全国省市县的数据都是通过网络请求服务器端获得的,因此这里和服务器的交互必不可少,所以我们在util包下先增加一个HttpUtil类,代码如下:
 1 public class HttpUtil {
 2     public static void sendHttpRequest(final String address, final HttpCallbackListener listener){
 3         new Thread( new Runnable() {
 4             @Override
 5             public void run() {
 6                 HttpURLConnection connection = null;
 7                 try{
 8                     URL url = new URL(address);
 9                     connection = (HttpURLConnection)url.openConnection();
10                     connection.setRequestMethod("GET");
11                     connection.setConnectTimeout(8000);
12                     connection.setReadTimeout(8000);
13                     InputStream in = connection.getInputStream();
14                     BufferedReader reader = new BufferedReader(new InputStreamReader(in));
15                     StringBuilder response = new StringBuilder();
16                     String line;
17                     while ((line = reader.readLine()) != null){
18                         response.append(line);
19                     }
20                     if (listener != null){
21                         // 回调onFinish()方法
22                         listener.onFinish(response.toString());
23                     }
24                 }catch (Exception e){
25                     if (listener != null){
26                         // 回调onError()方法
27                         listener.onError(e);
28                     }
29                 }finally {
30                     if (connection != null){
31                         connection.disconnect();
32                     }
33                 }
34             }
35         }).start();
36     }
37 }
HttpUtil类中使用到了HttpCallbackListener接口来回调服务返回的结果,因此我们需要在util包下添加这个接口,如下:
1 public interface HttpCallbackListener {
2     void onFinish(String response);
3
4     void onError(Exception e);
5 }
另外,由于服务器返回的省市县数据都是“代号|城市,代号|城市”这种格式的,所以我们最好在提供一个工具类来解析和处理这种数据,故在util包下新建一个Utility类,代码如下:
  1 public class Utility {
  2
  3     /**
  4      * 解析和处理服务器返回的省级数据
  5      */
  6     public synchronized static boolean handleProvinceResponse(BtWeatherDB btWeatherDB,String response){
  7         if (!(TextUtils.isEmpty(response))){
  8             String[] allProvince = response.split(",");
  9             if (allProvince != null && allProvince.length > 0){
 10                 for (String p : allProvince){
 11                     String[] array = p.split("\\\\|");
 12                     Province province = new Province();
 13                     province.setProvinceCode(array[0]);
 14                     province.setProvinceName(array[1]);
 15                     // 将解析出来的数据存储到Province类
 16                     btWeatherDB.saveProvince(province);
 17                 }
 18                 return true;
 19             }
 20         }
 21         return false;
 22     }
 23
 24     /**
 25      * 解析和处理服务器返回的市级数据
 26      */
 27     public static boolean handleCitiesResponse(BtWeatherDB btWeatherDB,String response,int provinceId){
 28         if (!TextUtils.isEmpty(response)){
 29             String[] allCities = response.split(",");
 30             if (allCities != null && allCities.length > 0){
 31                 for (String c: allCities){
 32                     String[] array = c.split("\\\\|");
 33                     City city = new City();
 34                     city.setCityCode(array[0]);
 35                     city.setCityName(array[1]);
 36                     city.setProvinceId(provinceId);
 37                     // 将解析出来的数据存储到City类
 38                     btWeatherDB.saveCity(city);
 39                 }
 40                 return true;
 41             }
 42         }
 43         return false;
 44     }
 45
 46     /**
 47      * 解析和处理服务器返回的县级数据
 48      */
 49     public static boolean handleCountiesResponse(BtWeatherDB btWeatherDB,String response,int CityId){
 50         if (!TextUtils.isEmpty(response)){
 51             String[] allCounties = response.split(",");
 52             if (allCounties != null && allCounties.length > 0){
 53                 for (String c: allCounties){
 54                     String[] array = c.split("\\\\|");
 55                     County county = new County();
 56                     county.setCountyCode(array[0]);
 57                     county.setCountyName(array[1]);
 58                     county.setCityId(CityId);
 59                     btWeatherDB.saveCounty(county);
 60                 }
 61                 return true;
 62             }
 63         }
 64         return false;
 65     }
 66
 67     /**
 68      * 解析服务器返回的JSON数据,并将解析出的数据存储到本地
 69      */
 70     public static void handleWeatherResponse(Context context,String response){
 71         try{
 72             JSONObject jsonObject = new JSONObject(response);
 73             JSONObject weatherInfo = jsonObject.getJSONObject("weatherinfo");
 74             String cityName = weatherInfo.getString("city");
 75             String weatherCode = weatherInfo.getString("cityid");
 76             String temp1 = weatherInfo.getString("temp1");
 77             String temp2 = weatherInfo.getString("temp2");
 78             String weatherDesp = weatherInfo.getString("weather");
 79             String publishTime = weatherInfo.getString("ptime");
 80             saveWeatherInfo(context, cityName, weatherCode, temp1, temp2, weatherDesp, publishTime);
 81         } catch (JSONException e){
 82             e.printStackTrace();
 83         }
 84     }
 85
 86     /**
 87      * 将服务器返回的所有的天气信息存储到SharePreferences文件中
 88      */
 89     public static void saveWeatherInfo(Context context, String cityName, String weatherCode, String temp1, String temp2,
 90             String weatherDesp, String publishTime){
 91         SimpleDateFormat sdf = new SimpleDateFormat("yyyy年M月d日", Locale.CANADA);
 92         SharedPreferences.Editor editor = PreferenceManager.getDefaultSharedPreferences(context).edit();
 93         editor.putBoolean("city_selected",true);
 94         editor.putString("city_name",cityName);
 95         editor.putString("weather_code",weatherCode);
 96         editor.putString("temp1",temp1);
 97         editor.putString("temp2",temp2);
 98         editor.putString("weather_desp",weatherDesp);
 99         editor.putString("publish_time",publishTime);
100         editor.putString("current_date",sdf.format(new Date()));
101         editor.commit();
102     }
103 }
可以看到,我们提供了 handleProvinceResponse()、handleCitiesResponse()、handleCountiesResponse()、handleWeatherResponse()、saveWeatherInfo()这五个方法,分别用于解析和处理服务器返回的省级、市级、县级数据,用于JSON格式的天气信息解析出来和保存天气信息到文件里。
然后我们写下界面,在res/layout目录中新建choose_area.xml布局,代码如下:
 1 <?xml version="1.0" encoding="utf-8"?>
 2 <LinearLayout xmlns:android="http://schemas.android.com/apk/res/android"
 3               android:layout_width="match_parent"
 4               android:layout_height="match_parent"
 5               android:orientation="vertical">
 6
 7     <RelativeLayout
 8         android:layout_width="match_parent"
 9         android:layout_height="50dp"
10         android:background="#484E61">
11
12         <TextView
13             android:layout_width="wrap_content"
14             android:layout_height="wrap_content"
15             android:layout_centerInParent="true"
16             android:textColor="#fff"
17             android:textSize="24sp"
18             android:id="@+id/title_text"/>
19     </RelativeLayout>
20
21     <ListView
22         android:layout_width="match_parent"
23         android:layout_height="match_parent"
24         android:id="@+id/list_view">
25     </ListView>
26
27 </LinearLayout>
接下来最关键一步,就是要编写用于遍历省市县数据的活动了,在activity包下新建ChooseAreaActivity继承于Activity,代码如下:
  1 public class ChooseAreaActivity extends Activity {
  2
  3     以上是关于69.Android之天气预报app的主要内容,如果未能解决你的问题,请参考以下文章