iOS UITableView
Posted itdali
tags:
篇首语:本文由小常识网(cha138.com)小编为大家整理,主要介绍了iOS UITableView相关的知识,希望对你有一定的参考价值。
UITableview系列内容包括:
1.纯代码创建UITableview;
2.cell的样式、点击事件,cell的重用等;
3.页面的下拉刷新、上拉加载;
4.自定义cell。
2017-03-17更新:代码更新到 Swift 3
由于内容过多,分成多篇来介绍。
本文主要介绍创建UITableview、cell的样式、cell的重用、cell的点击事件、cell左滑按钮等内容。
1.创建UITableview
首先在ViewController的类名后面添加UITableViewDelegate和UITableViewDataSource。
如图所致
Swift:

Objective-C:

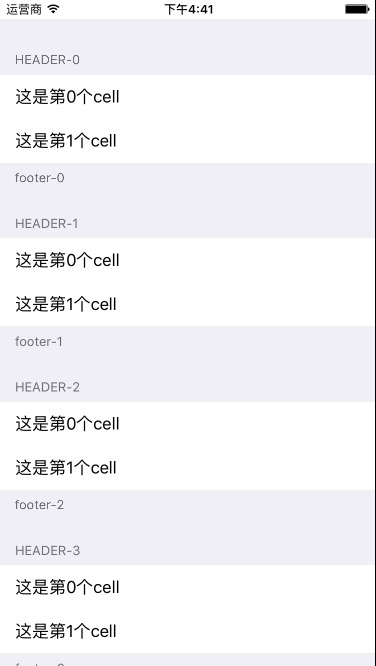
UITableView的样式有两种:Grouped 和 Plain
Grouped:
Plain:
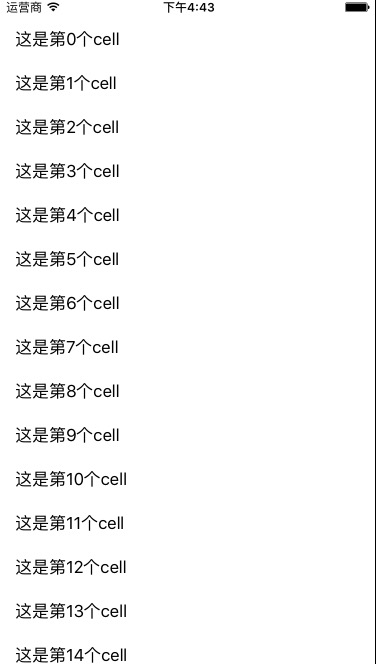
根据自己的需要,选择创建对应的样式。
下面会对两种样式都做说明。
1).创建一个UITableview并添加到View:
Swift版
// 创建UItableView,style选择Grouped或Plain,这里我们以Grouped为例
let tableView = UITableView(frame: CGRect(x: 0, y: 0, width: self.view.frame.size.width, height: self.view.frame.size.height), style: .plain)
// 声明 tableView 的代理和数据源
tableView.delegate = self
tableView.dataSource = self
// 根据cellID给tableView注册cell。
tableView.register(UITableViewCell.self, forCellReuseIdentifier: cellID)
// 添加到 view 上
self.view.addSubview(tableView)
Objective-C版
// 创建UItableView,style选择Grouped或Plain,这里我们以Grouped为例
UITableView *tableView = [[UITableView alloc] initWithFrame:CGRectMake(0, 20, self.view.frame.size.width, self.view.frame.size.height-20) style:UITableViewStyleGrouped];
// 声明 tableView 的代理和数据源
tableView.delegate = self;
tableView.dataSource = self;
// 添加到 view 上
[self.view addSubview:tableView];
2).设置tableview的数据源:
tableview的style为Grouped的要实现下面的方法。
Swift版
// tableView 中 Section 的个数
func numberOfSections(in tableView: UITableView) -> Int {
    return 6
}
Objective-C版
// tableView 中 Section 的个数
-(NSInteger)numberOfSectionsInTableView:(UITableView *)tableView {
    return 6;
}
下面的方法Grouped和Plain两种类型都要实现,用来设置行数和每一行的内容。
Swift版
// 每个 Section 中的 Cell 个数
func tableView(_ tableView: UITableView, numberOfRowsInSection section: Int) -> Int {
    return 3
}
// 设置每个 Cell
func tableView(_ tableView: UITableView, cellForRowAt indexPath: IndexPath) -> UITableViewCell {
    // 从tableview的重用池里通过cellID取一个cell
    let cell: UITableViewCell = tableView.dequeueReusableCell(withIdentifier: cellID)!
    // 设置 cell 的标题
    cell.textLabel?.text = "这是第\\(indexPath.row)个cell"
    // 设置 cell 的副标题
    cell.detailTextLabel?.text = "副标题"
    return cell
}
Objective-C版
// 每个 Section 中的 Cell 个数
-(NSInteger)tableView:(UITableView *)tableView numberOfRowsInSection:(NSInteger)section {
    return 3;
}
// 设置每个 Cell
-(UITableViewCell *)tableView:(UITableView *)tableView cellForRowAtIndexPath:(NSIndexPath *)indexPath {
    // 创建一个cellID,用于cell的重用
    NSString *cellID = @"cellID";
    // 从tableview的重用池里通过cellID取一个cell
    UITableViewCell *cell = [tableView dequeueReusableCellWithIdentifier:cellID];
    if (cell == nil) {
         // 如果tableview的重用池中没有取到,就创建一个新的cell,style为Value2,并用cellID对其进行标记。
        cell = [[UITableViewCell alloc] initWithStyle:UITableViewCellStyleValue2 reuseIdentifier:cellID];
    }
    // 设置 cell 的标题
    cell.textLabel.text = [NSString stringWithFormat:@"这是第%li个cell", (long)indexPath.row];
    // 设置 cell 的副标题
    cell.detailTextLabel.text = @"副标题";
    return cell;
}
现在运行一下,会看到一个基本的UITableview已显示到界面上:
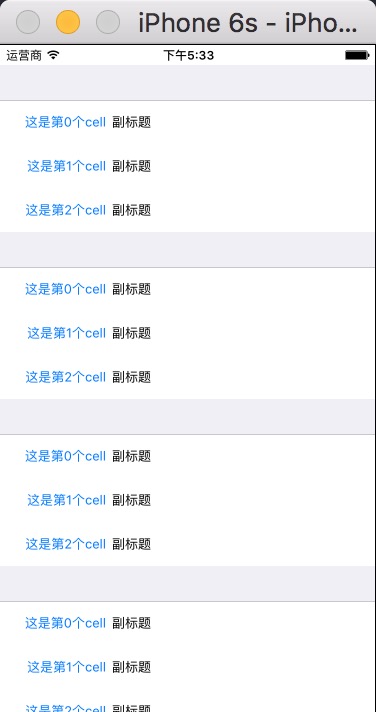
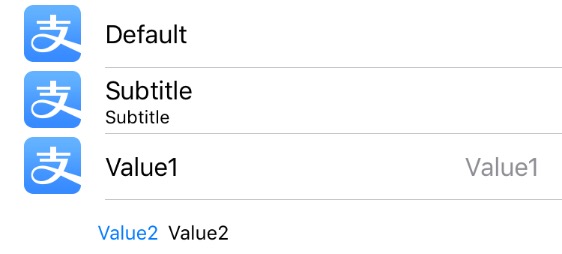
在创建cell的时候,我们选择的样式是Value2,cell有四种基本的样式:Default,Subtitle,Value1,Value2。下图是四种样式的区别:
—————————————— 分割线 ——————————————
上面是UITableview的基本实现,接下来是UITableview的一些代理方法实现,包括设置cell的高度,点击cell的触发方法等内容
2.代理方法的介绍
1)样式相关方法
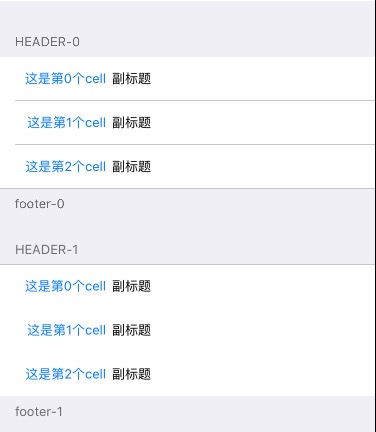
a.设置每个section的header和footer文字内容
Swift版
// 设置 section 的 header 文字
func tableView(_ tableView: UITableView, titleForHeaderInSection section: Int) -> String? {
    return "header-\\(section)"
}
// 设置 section 的 footer 文字
func tableView(_ tableView: UITableView, titleForFooterInSection section: Int) -> String? {
    return "footer-\\(section)"
}
Objective-C版
// 设置 section 的 header 文字
-(NSString *)tableView:(UITableView *)tableView titleForHeaderInSection:(NSInteger)section {
    return [NSString stringWithFormat:@"header-%li", (long)section];
}
// 设置 section 的 footer 文字
-(NSString *)tableView:(UITableView *)tableView titleForFooterInSection:(NSInteger)section {
    return [NSString stringWithFormat:@"footer-%li", (long)section];
}
b.设置header,footer,cell的高度
Swift版
// 设置 section 的 header 高度
func tableView(_ tableView: UITableView, heightForHeaderInSection section: Int) -> CGFloat {
        return 20
    }
// 设置 section 的 footer 高度
func tableView(_ tableView: UITableView, heightForFooterInSection section: Int) -> CGFloat {
    return 20
}
// 设置 cell 的高度
func tableView(_ tableView: UITableView, heightForRowAt indexPath: IndexPath) -> CGFloat {
    return 60
}
Objective-C版
// 设置 section 的 header 高度
-(CGFloat)tableView:(UITableView *)tableView heightForHeaderInSection:(NSInteger)section {
    return 10;
}
// 设置 section 的 footer 高度
-(CGFloat)tableView:(UITableView *)tableView heightForFooterInSection:(NSInteger)section {
    return 10;
}
// 设置 cell 的高度
-(CGFloat)tableView:(UITableView *)tableView heightForRowAtIndexPath:(NSIndexPath *)indexPath {
    return 80;
}
c.设置cell文字的缩进,cell中的文字会向右缩进相应的数值
Swift版
// cell 的文字缩进
func tableView(_ tableView: UITableView, indentationLevelForRowAt indexPath: IndexPath) -> Int {
    return 10
}
Objective-C版
// cell 的文字缩进
-(NSInteger)tableView:(UITableView *)tableView indentationLevelForRowAtIndexPath:(NSIndexPath *)indexPath {
    return 10;
}
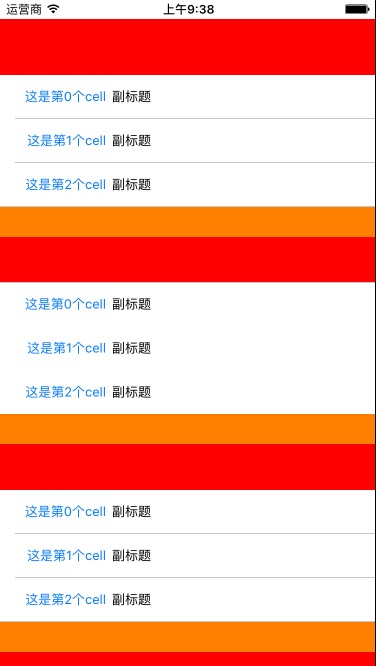
d.自定义header和footer,将header和footer设置为自定义的view。
注:当使用自定义的header和footer时,上面设置header和footer文字内容的方法就无效,要显示文字需要在自定义的view上创建。
Swift版
// 自定义 section 的 header
func tableView(_ tableView: UITableView, viewForHeaderInSection section: Int) -> UIView? {
    let headerView = UIView()
    headerView.backgroundColor = UIColor.orange
    return headerView
}
// 自定义 section 的 header
func tableView(_ tableView: UITableView, viewForFooterInSection section: Int) -> UIView? {
    let footerView = UIView()
    footerView.backgroundColor = UIColor.blue
    return footerView
}
Objective-C版
// 自定义 section 的 header
-(UIView *)tableView:(UITableView *)tableView viewForHeaderInSection:(NSInteger)section {
    UIView *headerView = [[UIView alloc] initWithFrame:CGRectMake(0, 0, 100, 10)];
    headerView.backgroundColor = [UIColor redColor];
    return headerView;
}
// 自定义 section 的 footer
-(UIView *)tableView:(UITableView *)tableView viewForFooterInSection:(NSInteger)section {
    UIView *footerView = [[UIView alloc] initWithFrame:CGRectMake(0, 0, 100, 10)];
    footerView.backgroundColor = [UIColor orangeColor];
    return footerView;
}
自定义header和footer的效果图:
2)操作相关方法
a.选中 cell 时触发的方法
Swift版
// 选中了 cell 时触发
func tableView(_ tableView: UITableView, didSelectRowAt indexPath: IndexPath) {
    print("选中了第\\(indexPath.row)个cell")
}
Objective-C版
// 选中了 cell 时触发
-(void)tableView:(UITableView *)tableView didSelectRowAtIndexPath:(NSIndexPath *)indexPath {
    NSLog(@"选中了第%li个cell", (long)indexPath.row);
}
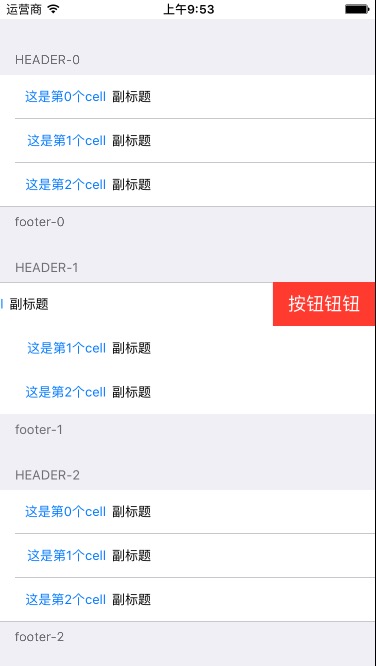
b.设置cell左滑删除
使用系统默认的左滑删除按钮
Swift版
// 设置 cell 是否允许左滑
func tableView(_ tableView: UITableView, canEditRowAt indexPath: IndexPath) -> Bool {
    return true
}
// 设置默认的左滑按钮的title
func tableView(_ tableView: UITableView, titleForDeleteConfirmationButtonForRowAt indexPath: IndexPath) -> String? {
    return "按钮钮钮"
}
// 点击左滑出现的按钮时触发
func tableView(_ tableView: UITableView, commit editingStyle: UITableViewCellEditingStyle, forRowAt indexPath: IndexPath) {
    print("点击左滑出现的按钮时触发")
    return
}
// 左滑结束时调用(只对默认的左滑按钮有效,自定义按钮时这个方法无效)
func tableView(_ tableView: UITableView, didEndEditingRowAt indexPath: IndexPath?) {
}
Objective-C版
// 设置 cell 是否允许左滑
-(BOOL)tableView:(UITableView *)tableView canEditRowAtIndexPath:(NSIndexPath *)indexPath {
    return true;
}
// 设置默认的左滑按钮的title
-(NSString *)tableView:(UITableView *)tableView titleForDeleteConfirmationButtonForRowAtIndexPath:(NSIndexPath *)indexPath {
    return @"按钮钮钮";
}
// 点击左滑出现的按钮时触发
-(void)tableView:(UITableView *)tableView commitEditingStyle:(UITableViewCellEditingStyle)editingStyle forRowAtIndexPath:(NSIndexPath *)indexPath {
    NSLog(@"点击左滑出现的按钮时触发");
}
// 左滑结束时调用(只对默认的左滑按钮有效,自定义按钮时这个方法无效)
-(void)tableView:(UITableView *)tableView didEndEditingRowAtIndexPath:(NSIndexPath *)indexPath {
    NSLog(@"左滑结束");
}
效果图:
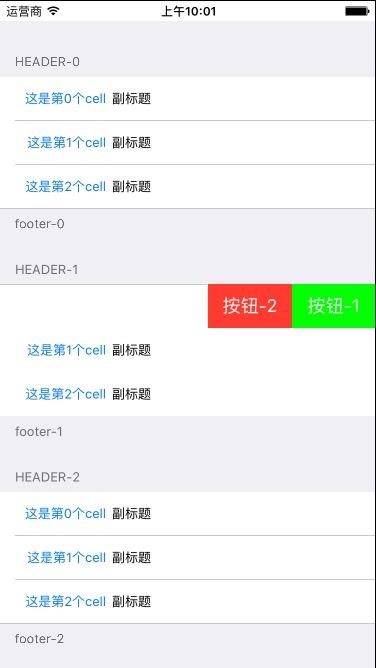
自定义左滑时显示的按钮和触发事件
Swift版
// 自定义左滑cell时的按钮和触发方法
func tableView(_ tableView: UITableView, editActionsForRowAt indexPath: IndexPath) -> [UITableViewRowAction]? {
    let cellActionA = UITableViewRowAction(style: .default, title: "按钮-1", handler: {_,_ in
        print("点击了 按钮-1")
    })
    cellActionA.backgroundColor = UIColor.green

    let cellActionB = UITableViewRowAction(style: .default, title: "按钮-2", handler: {_,_ in
        print("点击了 按钮-2")
    })
    return [cellActionA, cellActionB]
}
Objective-C版
// 自定义左滑cell时的按钮和触发方法
- (nullable NSArray<UITableViewRowAction *> *)tableView:(UITableView *)tableView editActionsForRowAtIndexPath:(NSIndexPath *)indexPath {
    // 创建第一个按钮和触发事件
    UITableViewRowAction *cellActionA = [UITableViewRowAction rowActionWithStyle:UITableViewRowActionStyleDefault title:@"按钮-1" handler:^(UITableViewRowAction *action, NSIndexPath *indexPath){
        // 在此写点击按钮时的触发事件
        // ......
        NSLog(@"点击了 按钮-1");
    }];
    // 定义按钮的颜色
    cellActionA.backgroundColor = [UIColor greenColor];

    // 创建第二个按钮和触发事件
    UITableViewRowAction *cellActionB = [UITableViewRowAction rowActionWithStyle:UITableViewRowActionStyleDefault title:@"按钮-2" handler:^(UITableViewRowAction *action, NSIndexPath *indexPath){
        // 在此写点击按钮时的触发事件
        // ......
    }];
    // 注意这里返回的是一个按钮组,即使只定义了一个按钮也要返回一个组
    return @[cellActionA, cellActionB];
}
效果图:
以上内容,是UITableview的基本操作。下一篇会介绍UITableview的下拉刷新、上拉加载、自定义cell等内容。
以上是关于iOS UITableView的主要内容,如果未能解决你的问题,请参考以下文章
用于截取整个 UITableView 的代码在 iOS 13 中不再起作用