Android应用开发基础篇(13)-----GestureDetector(手势识别)
Posted
tags:
篇首语:本文由小常识网(cha138.com)小编为大家整理,主要介绍了Android应用开发基础篇(13)-----GestureDetector(手势识别)相关的知识,希望对你有一定的参考价值。
链接地址:http://www.cnblogs.com/lknlfy/archive/2012/03/05/2381025.html
一、概述
GestureDetector是一个用于识别手势的类,这里所讲的手势识别,不是模式识别里所讲的手势(用户的手在用摄像头前做的动作)识别,而是说用户的手在触摸屏上做的手势(比如滑动等),它可以识别一般的手势,也可以识别用户自定义的手势。
二、要求
利用GestureDetector、ViewFlipper类实现两个View之间的切换。
三、实现
新建工程MyGesture,修改/res/layout/main.xml文件,在里面添加一个ViewFlipper,完整的main.xml文件如下:
 1 <?xml version="1.0" encoding="utf-8"?>
 2 <LinearLayout xmlns:android="http://schemas.android.com/apk/res/android"
 3     android:layout_width="fill_parent"
 4     android:layout_height="fill_parent"
 5     android:orientation="vertical" >
 6
 7     <ViewFlipper
 8         android:id="@+id/viewflipper"
 9         android:layout_width="fill_parent"
10         android:layout_height="fill_parent"
11         >
12
13     </ViewFlipper>
14
15 </LinearLayout>
接着,在/res/layout下添加2个布局文件:firstview.xml和secondview.xml,它们的内容都是一个TextView和一个ImageView,firstview.xml如下:
 1 <LinearLayout xmlns:android="http://schemas.android.com/apk/res/android"
 2     android:layout_width="fill_parent"
 3     android:layout_height="fill_parent"
 4     android:orientation="vertical" >
 5
 6     <TextView
 7         android:layout_width="fill_parent"
 8         android:layout_height="wrap_content"
 9         android:text="这是第一个View"
10         android:textColor="#FFFF0000"
11         android:gravity="center_horizontal"
12         android:textSize="20dip"
13         />
14
15
16     <ImageView
17         android:id="@+id/fimg"
18         android:layout_width="fill_parent"
19         android:layout_height="wrap_content"
20         android:src="@drawable/sir"
21         />
22
23
24 </LinearLayout>
secondview.xml内容如下:
 1 <?xml version="1.0" encoding="utf-8"?>
 2 <LinearLayout xmlns:android="http://schemas.android.com/apk/res/android"
 3     android:layout_width="fill_parent"
 4     android:layout_height="fill_parent"
 5     android:orientation="vertical" >
 6
 7     <TextView
 8         android:layout_width="fill_parent"
 9         android:layout_height="wrap_content"
10         android:text="这是第二个View"
11         android:textColor="#FF0000FF"
12         android:gravity="center_horizontal"
13         android:textSize="20dip"
14         />
15
16     <ImageView
17         android:id="@+id/fimg"
18         android:layout_width="fill_parent"
19         android:layout_height="wrap_content"
20         android:src="@drawable/android"
21         />
22
23
24 </LinearLayout>
最后,修改MyGestureActivity.java文件,主要定义一个GestureDetectorListener类用于实现GestureDetector.OnGestureListener接口,完整的内容如下:
  1 package com.nan.gesture;
  2
  3 import android.app.Activity;
  4 import android.os.Bundle;
  5 import android.view.GestureDetector;
  6 import android.view.LayoutInflater;
  7 import android.view.MotionEvent;
  8 import android.view.View;
  9 import android.widget.ViewFlipper;
 10
 11
 12
 13 public class MyGestureActivity extends Activity
 14 {
 15     //滑动距离的差值
 16     private static final int DISTANCE = 40;
 17
 18     private ViewFlipper mViewFlipper = null;
 19     private LayoutInflater mLayoutInflater = null;
 20     private GestureDetector mGestureDetector = null;
 21
 22     /** Called when the activity is first created. */
 23     @Override
 24     public void onCreate(Bundle savedInstanceState)
 25     {
 26         super.onCreate(savedInstanceState);
 27         setContentView(R.layout.main);
 28
 29         mViewFlipper = (ViewFlipper)this.findViewById(R.id.viewflipper);
 30         mLayoutInflater = LayoutInflater.from(MyGestureActivity.this);
 31         mGestureDetector = new GestureDetector(this,new GestureDetectorListener());
 32
 33         //将布局文件firstview.xml变为View对象
 34         View firstView = mLayoutInflater.inflate(R.layout.firstview, null);
 35         //将布局文件secondview.xml变为View对象
 36         View secondView = mLayoutInflater.inflate(R.layout.secondview, null);
 37         //添加View
 38         mViewFlipper.addView(firstView);
 39         //添加View
 40         mViewFlipper.addView(secondView);
 41
 42     }
 43
 44     @Override
 45     public boolean onTouchEvent(MotionEvent event)
 46     {
 47         //将触摸事件交给GestureDetector来处理
 48         return mGestureDetector.onTouchEvent(event);
 49     }
 50
 51
 52     public class GestureDetectorListener implements GestureDetector.OnGestureListener
 53     {
 54         @Override
 55         public boolean onDown(MotionEvent e)
 56         {
 57             // TODO Auto-generated method stub
 58
 59
 60             return false;
 61         }
 62
 63         @Override
 64         public boolean onFling(MotionEvent e1, MotionEvent e2, float velocityX,
 65                 float velocityY)
 66         {
 67             // TODO Auto-generated method stub
 68
 69             if((e1.getX()-e2.getX())>DISTANCE)
 70             {
 71                 //显示下一个view
 72                 mViewFlipper.showNext();
 73                 return true;
 74             }
 75             else if((e2.getX()-e1.getX())>DISTANCE)
 76             {
 77                 //显示前一个view
 78                 mViewFlipper.showPrevious();
 79                 return true;
 80             }
 81             return false;
 82         }
 83
 84         @Override
 85         public void onLongPress(MotionEvent e)
 86         {
 87             // TODO Auto-generated method stub
 88
 89         }
 90
 91         @Override
 92         public boolean onScroll(MotionEvent e1, MotionEvent e2,
 93                 float distanceX, float distanceY)
 94         {
 95             // TODO Auto-generated method stub
 96             return false;
 97         }
 98
 99         @Override
100         public void onShowPress(MotionEvent e)
101         {
102             // TODO Auto-generated method stub
103
104         }
105
106         @Override
107         public boolean onSingleTapUp(MotionEvent e)
108         {
109             // TODO Auto-generated method stub
110             return false;
111         }
112
113     }
114
115 }
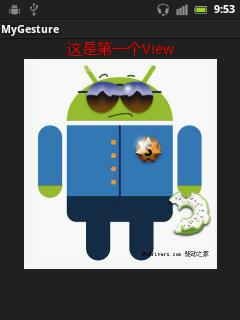
好了,运行该程序:

用手在屏幕上左右滑动试下:

OK了。
这里view之间的切换并没有加上动画效果,如果加上动画的话就可以做出翻页的效果。
以上是关于Android应用开发基础篇(13)-----GestureDetector(手势识别)的主要内容,如果未能解决你的问题,请参考以下文章
Android应用开发基础篇-----SharedPreferences
Android应用开发基础篇(12)-----Socket通信
Android应用开发基础篇-----Handler与多线程
