windows 下配置 theano 及 pygpu
Posted citycomputing
tags:
篇首语:本文由小常识网(cha138.com)小编为大家整理,主要介绍了windows 下配置 theano 及 pygpu相关的知识,希望对你有一定的参考价值。
首次在windows上搭建 theano ,为了实现在 gpu 加速运算,在配置运行环境上多次踩坑,特记录下来。
一、GPU驱动安装
1.1 进入NVIDIA驱动下载进行符合条件的下载安装。
二、CUDA的下载安装
2.1 从NVIDIA官网选择一个CUDA版本进行下载。
2.2 使用如下命令查看是否安装成功:
nvcc -V
2.3 配置path环境
我安装的是 10.1 所以为:
三、CUDNN的下载安装
3.1 这里是下载地址。根据自己安装的CUDA版本选择相应的CUDNN的版本。
3.2 我解压后放到目录 C:\\Cuda10.1 目录下了。
四、Anacond安装
4.1 下载地址:https://www.anaconda.com/download/
4.2 安装 anacond
4.3 系统 path 变量增加
C:\\Anaconda3
C:\\Anaconda3\\Scripts
C:\\Anaconda3\\Library\\bin
4.4 anacond 运行环境配置
conda create -n env_name37 anaconda python=3.7
4.5 在windows 菜单上更换 anacond 运行环境
Anaconda Prompt (env_name37)
4.6 安装 theano
conda install theano
4.7 在目录 C:\\Users\\ [Your_User] 下创建配置文件 .theanorc
该文件内容如下:
[global]
device = cuda
floatX=float32

[nvcc]
flags=--machine=64

[cuda]
root = C:\\Program Files\\NVIDIA GPU Computing Toolkit\\CUDA\\v10.1

[dnn]
library_path = C:\\cuda10.1\\lib\\x64
include_path = C:\\cuda10.1\\include

[lib]
cnmem=100
五、Theano 1.0.3 issue with pygpu: ERROR (theano.gpuarray): Could not initialize pygpu, support disabled 出错处理
5.1 在 python 下运行 import theano 会出错:
ERROR (theano.gpuarray): Could not initialize pygpu, support disabled
Traceback (most recent call last):
  File "C:\\ProgramData\\Anaconda3\\lib\\site-packages\\theano\\gpuarray\\__init__.py", line 227, in
    use(config.device)
  File "C:\\ProgramData\\Anaconda3\\lib\\site-packages\\theano\\gpuarray\\__init__.py", line 214, in use
    init_dev(device, preallocate=preallocate)
  File "C:\\ProgramData\\Anaconda3\\lib\\site-packages\\theano\\gpuarray\\__init__.py", line 99, in init_dev
    **args)
  File "pygpu\\gpuarray.pyx", line 658, in pygpu.gpuarray.init
  File "pygpu\\gpuarray.pyx", line 587, in pygpu.gpuarray.pygpu_init
pygpu.gpuarray.GpuArrayException: b‘Could not load "nvrtc64_70.dll": \\xd5\\xd2\\xb2\\xbb\\xb5\\xbd\\xd6\\xb8\\xb6\\xa8\\xb5\\xc4\\xc4\\xa3\\xbf\\xe9\\xa1\\xa3\\r\\n‘
这是因为我使用的 cuda是10.1 而 pygpu 0.7.6 并不支持。虽然 git 上的代码已经修改,但并未生成新版本。所以需要自己手动编译来解决这个问题。
5.2 git 获得源码
conda install cmake
git clone https://github.com/Theano/libgpuarray.git
cd libgpuarray
mkdir build
cd build
cmake .. -DCMAKE_BUILD_TYPE=Release -G "Visual Studio 15 Win64"
5.3 手动编译
用VS编译gpuarray.vcxproj 工程生成新的 gpuarray.dll
复盖 C:/Anaconda3/Library/bin 目录下的同名文件
这时重新运行 import theano 会获得如下错误:
pygpu.gpuarray.GpuArrayException: b‘Could not load "nvrtc64_101.dll": The specified module could not be found.\\r\\n‘
5.4 手动生成 nvrtc64_101.dll
将 C:\\Program Files\\NVIDIA GPU Computing Toolkit\\CUDA\\v10.1\\bin\\目录下的 nvrtc64_101_0.dll 文件 copy 到C:/Anaconda3/Library/bin 目录下,并更名为 nvrtc64_101.dll
这时重新运行 import theano 会获得如下错误:
pygpu.gpuarray.GpuArrayException: (b‘Missing Blas library‘, 5)
5.5 手动生成 cublas64_101.dll
将 C:\\Program Files\\NVIDIA GPU Computing Toolkit\\CUDA\\v10.1\\bin\\目录下的 cublas64_10.dll 文件 copy 到C:/Anaconda3/Library/bin 目录下,并更名为 cublas64_101.dll
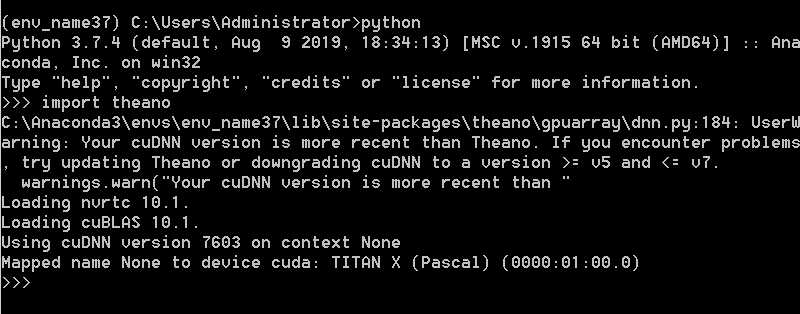
这时重新运行 import theano 成功。

*如果还有其它什么错,通常是 path 变量中没有包含需要执行的文件的目录。5.6 下载 check_blas.py
下载地址:https://raw.githubusercontent.com/Theano/Theano/master/theano/misc/check_blas.py
运行:
python check_blas.py
结果终于成功了:

以上是关于windows 下配置 theano 及 pygpu的主要内容,如果未能解决你的问题,请参考以下文章