博客园美化博客随笔目录
Posted pythonywy
tags:
篇首语:本文由小常识网(cha138.com)小编为大家整理,主要介绍了博客园美化博客随笔目录相关的知识,希望对你有一定的参考价值。
博客园美化博客随笔目录
基于孤傲苍狼在2014-5-11写的目录代码基础上进行改进
一.js代码
<!--目录-->
<script type="text/javascript">
var BlogDirectory =
    /*
        获取元素位置,距浏览器左边界的距离(left)和距浏览器上边界的距离(top)
    */
    getElementPosition:function (ele)
        var topPosition = 0;
        var leftPosition = 0;
        while (ele)
            topPosition += ele.offsetTop;
            leftPosition += ele.offsetLeft;
            ele = ele.offsetParent;

        return top:topPosition, left:leftPosition;
    ,

    /*
    获取滚动条当前位置
    */
    getScrollBarPosition:function ()
        var scrollBarPosition = document.body.scrollTop || document.documentElement.scrollTop;
        return  scrollBarPosition;
    ,

    /*
    移动滚动条,finalPos 为目的位置,internal 为移动速度
    */
    moveScrollBar:function(finalpos, interval)

        //若不支持此方法,则退出
        if(!window.scrollTo)
            return false;


        //窗体滚动时,禁用鼠标滚轮
        window.onmousewheel = function()
            return false;
        ;

        //清除计时
        if (document.body.movement)
            clearTimeout(document.body.movement);


        var currentpos =BlogDirectory.getScrollBarPosition();//获取滚动条当前位置

        var dist = 0;
        if (currentpos == finalpos) //到达预定位置,则解禁鼠标滚轮,并退出
            window.onmousewheel = function()
                return true;

            return true;

        if (currentpos < finalpos) //未到达,则计算下一步所要移动的距离
            dist = Math.ceil((finalpos - currentpos)/10);
            currentpos += dist;

        if (currentpos > finalpos)
            dist = Math.ceil((currentpos - finalpos)/10);
            currentpos -= dist;


        var scrTop = BlogDirectory.getScrollBarPosition();//获取滚动条当前位置
        window.scrollTo(0, currentpos);//移动窗口
        if(BlogDirectory.getScrollBarPosition() == scrTop)//若已到底部,则解禁鼠标滚轮,并退出

            window.onmousewheel = function()
                return true;

            return true;


        //进行下一步移动
        var repeat = "BlogDirectory.moveScrollBar(" + finalpos + "," + interval + ")";
        document.body.movement = setTimeout(repeat, interval);
    ,

    htmlDecode:function (text)
        var temp = document.createElement("div");
        temp.innerHTML = text;
        var output = temp.innerText || temp.textContent;
        temp = null;
        return output;
    ,

    /*
    创建博客目录,
    id表示包含博文正文的 div 容器的 id,
    mt 和 st 分别表示主标题和次级标题的标签名称(如 H2、H3,大写或小写都可以!),
    interval 表示移动的速度
    */
    createBlogDirectory:function (id, mt, st, interval)
         //获取博文正文div容器
        var elem = document.getElementById(id);
        if(!elem) return false;
        //获取div中所有元素结点
        var nodes = elem.getElementsByTagName("*");
        //创建博客目录的div容器
        var divSideBar = document.createElement('DIV');
        divSideBar.className = 'uprightsideBar';
        divSideBar.setAttribute('id', 'uprightsideBar');
        var divSideBarTab = document.createElement('DIV');
        divSideBarTab.setAttribute('id', 'sideBarTab');
        divSideBar.appendChild(divSideBarTab);
        var h2 = document.createElement('H2');
        divSideBarTab.appendChild(h2);
        var txt = document.createTextNode('目录导航 ');
        h2.appendChild(txt);
        var divSideBarContents = document.createElement('DIV');
        divSideBarContents.style.display = 'none';
        divSideBarContents.setAttribute('id', 'sideBarContents');
        divSideBar.appendChild(divSideBarContents);
        //创建自定义列表
        var dlist = document.createElement("dl");
        divSideBarContents.appendChild(dlist);
        var num = 0;//统计找到的mt和st
        mt = mt.toUpperCase();//转化成大写
        st = st.toUpperCase();//转化成大写
        //遍历所有元素结点
        for(var i=0; i<nodes.length; i++)

            if(nodes[i].nodeName == mt|| nodes[i].nodeName == st)

                //获取标题文本
                var nodetext = nodes[i].innerHTML.replace(/<\\/?[^>]+>/g,"");//innerHTML里面的内容可能有HTML标签,所以用正则表达式去除HTML的标签
                nodetext = nodetext.replace(/ /ig, "");//替换掉所有的
                nodetext = BlogDirectory.htmlDecode(nodetext);
                //插入锚
                nodes[i].setAttribute("id", "blogTitle" + num);
                var item;
                switch(nodes[i].nodeName)

                    case mt:    //若为主标题
                        item = document.createElement("dt");
                        break;
                    case st:    //若为子标题
                        item = document.createElement("dd");
                        break;


                //创建锚链接
                var itemtext = document.createTextNode(nodetext);
                item.appendChild(itemtext);
                item.setAttribute("name", num);
                item.onclick = function()        //添加鼠标点击触发函数
                    var pos = BlogDirectory.getElementPosition(document.getElementById("blogTitle" + this.getAttribute("name")));
                    if(!BlogDirectory.moveScrollBar(pos.top, interval)) return false;
                ;

                //将自定义表项加入自定义列表中
                dlist.appendChild(item);
                num++;


        if(num == 0) return false;
        /*鼠标进入时的事件处理*/
        divSideBarTab.onmouseenter = function()
            divSideBarContents.style.display = 'block';

        /*鼠标离开时的事件处理*/
        divSideBar.onmouseleave = function()
            divSideBarContents.style.display = 'none';


        document.body.appendChild(divSideBar);


;
    BlogDirectory.createBlogDirectory("cnblogs_post_body","h2","h3",20);
   console.log('页面加载完毕生成目录')
</script>
二.css代码
/*生成博客目录的CSS*/
/*自定制一个css3动画*/
@keyframes pulse
    25%
        transform: scale(1.05);


    75%
        transform: scale(.95);


/*调整目录框的位置*/
#uprightsideBar
    font-size: 10px;
    font-family: Arial, Helvetica, sans-serif;
    text-align: left;
    position: fixed;
    top: 50px;
    right: 0px;
    width: auto;
    height: auto;


#sideBar
    float: left;
    padding: 0 0 0 65px;


#sideBarTab
    float: left;
    width: 40px;
    height: 200px;
    border: 1px solid #e5e5e5;
    border-right: none;
    text-align: center;
    background-image: url(https://www.cnblogs.com/images/cnblogs_com/pythonywy/1455951/o_%e7%82%ab%e5%bd%a9.png);
    color: #79a3e5;


/*展开后内部内容格式*/
#sideBarContents
    float: left;
    overflow: auto;
    overflow-x: hidden;
    min-width: 0px;
    max-width: 500px;
    min-height: 200px;
    max-height: 1200px;
    border: 1px solid #e5e5e5;
    border-right: none;
    background: #fff;
    background-size: 100% 100%;
    color: #79a3e5;


#sideBarContents dl
    margin: 0;
    padding: 0;


#sideBarContents dt
    margin-top: 5px;
    margin-left: 5px;


/*CSS3hover动画*/
#sideBarContents dd:hover, dt:hover
     animation-name: pulse;
    animation-duration: 1s;
    animation-timing-function: linear;
    animation-iteration-count: infinite;
    box-shadow: none;
    color: #A7995A;


#sideBarContents dd
    margin-left: 20px;
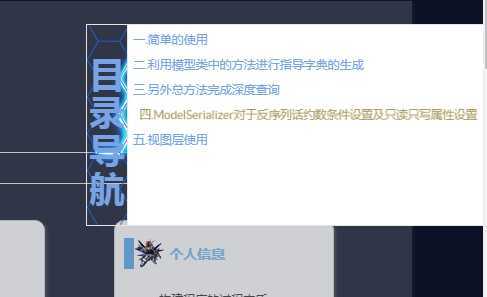
三.展示效果
未打开状态

展开效果

hover效果

三.在原先的基础上解决的bug
1.目录由于其他js导致没法加载(最主要修改的内容)
2.修改了样式
3.修改了hover样式让他看起来更加好看
以上是关于博客园美化博客随笔目录的主要内容,如果未能解决你的问题,请参考以下文章