java WebSocket的实现以及Spring WebSocket
Posted akanairen
tags:
篇首语:本文由小常识网(cha138.com)小编为大家整理,主要介绍了java WebSocket的实现以及Spring WebSocket相关的知识,希望对你有一定的参考价值。
开始学习WebSocket,准备用它来实现一个在页面实时输出log4j的日志以及控制台的日志。
首先知道一些基础信息:
- java7 开始支持WebSocket,并且只是做了定义,并未实现
- tomcat7及以上,jetty 9.1及以上实现了WebSocket,其他容器没有研究
- spring 4.0及以上增加了WebSocket的支持
- spring 支持STOMP协议的WebSocket通信
- WebSocket 作为java的一个扩展,它属于javax包目录下,通常需要手工引入该jar,以tomcat为例,可以在 tomcat/lib 目录下找到 websocket-api.jar
开始实现
先写一个普通的WebSocket客户端,直接引入tomcat目录下的jar,主要的jar有:websocket-api.jar、tomcat7-websocket.jar
 1     public static void f1() {
 2         try {
 3             WebSocketContainer container = ContainerProvider.getWebSocketContainer(); // 获取WebSocket连接器,其中具体实现可以参照websocket-api.jar的源码,Class.forName("org.apache.tomcat.websocket.WsWebSocketContainer");
 4             String uri = "ws://localhost:8081/log/log";
 5             Session session = container.connectToServer(Client.class, new URI(uri)); // 连接会话
 6             session.getBasicRemote().sendText("123132132131"); // 发送文本消息
 7             session.getBasicRemote().sendText("4564546");
 8         } catch (Exception e) {
 9             e.printStackTrace();
10         }
11     }
其中的URL格式必须是ws开头,后面接注册的WebSocket地址
Client.java 是用于收发消息
@ClientEndpoint
public class Client {

    @OnOpen
    public void onOpen(Session session) {
        System.out.println("Connected to endpoint: " + session.getBasicRemote());
    }

    @OnMessage
    public void onMessage(String message) {
        System.out.println(message);
    }

    @OnError
    public void onError(Throwable t) {
        t.printStackTrace();
    }
}
到这一步,客户端的收发消息已经完成,现在开始编写服务端代码,用Spring 4.0,其中pom.xml太长就不贴出来了,会用到jackson,spring-websocket,spring-message
 1 import org.springframework.beans.factory.annotation.Autowired;
 2 import org.springframework.context.annotation.Bean;
 3 import org.springframework.context.annotation.Configuration;
 4 import org.springframework.context.annotation.Lazy;
 5 import org.springframework.messaging.simp.SimpMessagingTemplate;
 6 import org.springframework.web.servlet.config.annotation.EnableWebMvc;
 7 import org.springframework.web.servlet.config.annotation.WebMvcConfigurerAdapter;
 8 import org.springframework.web.socket.WebSocketHandler;
 9 import org.springframework.web.socket.config.annotation.EnableWebSocket;
10 import org.springframework.web.socket.config.annotation.WebSocketConfigurer;
11 import org.springframework.web.socket.config.annotation.WebSocketHandlerRegistry;
12
13 import com.gionee.log.client.LogWebSocketHandler;
14
15 /**
16  * 注册普通WebScoket
17  * @author PengBin
18  * @date 2016年6月21日 下午5:29:00
19  */
20 @Configuration
21 @EnableWebMvc
22 @EnableWebSocket
23 public class WebSocketConfig extends WebMvcConfigurerAdapter implements WebSocketConfigurer {
24
25     @Autowired
26     @Lazy
27     private SimpMessagingTemplate template;
28
29     /** {@inheritDoc} */
30     @Override
31     public void registerWebSocketHandlers(WebSocketHandlerRegistry registry) {
32         registry.addHandler(logWebSocketHandler(), "/log"); // 此处与客户端的 URL 相对应
33     }
34
35     @Bean
36     public WebSocketHandler logWebSocketHandler() {
37         return new LogWebSocketHandler(template);
38     }
39
40 }
 1 import org.springframework.messaging.simp.SimpMessagingTemplate;
 2 import org.springframework.web.socket.TextMessage;
 3 import org.springframework.web.socket.WebSocketSession;
 4 import org.springframework.web.socket.handler.TextWebSocketHandler;
 5
 6 /**
 7  *
 8  * @author PengBin
 9  * @date 2016年6月24日 下午6:04:39
10  */
11 public class LogWebSocketHandler extends TextWebSocketHandler {
12
13     private SimpMessagingTemplate template;
14
15     public LogWebSocketHandler(SimpMessagingTemplate template) {
16         this.template = template;
17         System.out.println("初始化 handler");
18     }
19
20     @Override
21     protected void handleTextMessage(WebSocketSession session, TextMessage message) throws Exception {
22         String text = message.getPayload(); // 获取提交过来的消息
23         System.out.println("handMessage:" + text);
24         // template.convertAndSend("/topic/getLog", text); // 这里用于广播
25         session.sendMessage(message);
26     }
27 }
这样,一个普通的WebSocket就完成了,自己还可以集成安全控制等等
Spring还支持一种注解的方式,可以实现订阅和广播,采用STOMP格式协议,类似MQ,其实应该就是用的MQ的消息格式,下面是实现
同样客户端:
 1     public static void main(String[] args) {
 2         try {
 3             WebSocketContainer container = ContainerProvider.getWebSocketContainer();
 4             String uri = "ws://localhost:8081/log/hello/hello/websocket";
 5             Session session = container.connectToServer(Client.class, new URI(uri));
 6             char lf = 10; // 这个是换行
 7             char nl = 0; // 这个是消息结尾的标记,一定要
 8             StringBuilder sb = new StringBuilder();
 9             sb.append("SEND").append(lf); // 请求的命令策略
10             sb.append("destination:/app/hello").append(lf); // 请求的资源
11             sb.append("content-length:14").append(lf).append(lf); // 消息体的长度
12             sb.append("{\\"name\\":\\"123\\"}").append(nl); // 消息体
13
14             session.getBasicRemote().sendText(sb.toString()); // 发送消息
15             Thread.sleep(50000); // 等待一小会
16             session.close(); // 关闭连接
17
18         } catch (Exception e) {
19             e.printStackTrace();
20         }
21     }
这里一定要注意,换行符和结束符号,这个是STOMP协议规定的符号,错了就不能解析到
服务端配置
 1 /**
 2  * 启用STOMP协议WebSocket配置
 3  * @author PengBin
 4  * @date 2016年6月24日 下午5:59:42
 5  */
 6 @Configuration
 7 @EnableWebMvc
 8 @EnableWebSocketMessageBroker
 9 public class WebSocketBrokerConfig extends AbstractWebSocketMessageBrokerConfigurer {
10
11     /** {@inheritDoc} */
12     @Override
13     public void registerStompEndpoints(StompEndpointRegistry registry) {
14         System.out.println("注册");
15         registry.addEndpoint("/hello").withSockJS(); // 注册端点,和普通服务端的/log一样的
16         // withSockJS()表示支持socktJS访问,在浏览器中使用
17     }
18
19     /** {@inheritDoc} */
20     @Override
21     public void configureMessageBroker(MessageBrokerRegistry config) {
22         System.out.println("启动");
23         config.enableSimpleBroker("/topic"); //
24         config.setApplicationDestinationPrefixes("/app"); // 格式前缀
25     }
26
27 }
Controller
 1 @Controller
 2 public class LogController {
 3
 4     private SimpMessagingTemplate template;
 5
 6     @Autowired
 7     public LogController(SimpMessagingTemplate template) {
 8         System.out.println("init");
 9         this.template = template;
10     }
11
12     @MessageMapping("/hello")
13     @SendTo("/topic/greetings") // 订阅
14     public Greeting greeting(HelloMessage message) throws Exception {
15         System.out.println(message.getName());
16         Thread.sleep(3000); // simulated delay
17         return new Greeting("Hello, " + message.getName() + "!");
18     }
19
20 }
到这里就已经全部完成。
template.convertAndSend("/topic/greetings", "通知"); // 这个的意思就是向订阅了/topic/greetings进行广播
对于用socktJS连接的时候会有一个访问 /info 地址的请求
如果在浏览器连接收发送消息,则用sockt.js和stomp.js
  function connect() {
      var socket = new SockJS(\'/log/hello/hello\');
      stompClient = Stomp.over(socket);
      stompClient.connect({}, function(frame) {
          setConnected(true);
          console.log(\'Connected: \' + frame);
          stompClient.subscribe(\'/topic/greetings\', function(greeting) {
              showGreeting(JSON.parse(greeting.body).content);
          });
      });
  }

  function disconnect() {
      if (stompClient != null) {
          stompClient.disconnect();
      }
      setConnected(false);
      console.log("Disconnected");
  }

  function sendName() {
      var name = document.getElementById(\'name\').value;
      stompClient.send("/app/hello", {}, JSON.stringify({
          \'name\' : name
      }));
  }
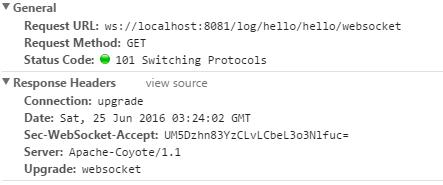
在浏览器中可以看到请求返回101状态码,意思就是切换协议

更多信息参考:
- STOMP协议 https://stomp.github.io/stomp-specification-1.2.html
- Spring官方WebSocket demo https://github.com/rstoyanchev/spring-websocket-test
- 官方文档 http://docs.spring.io/spring/docs/current/spring-framework-reference/html/websocket.html
- http://assets.spring.io/wp/WebSocketBlogPost.html
以上是关于java WebSocket的实现以及Spring WebSocket的主要内容,如果未能解决你的问题,请参考以下文章