webpack 前端构建
Posted 君华
tags:
篇首语:本文由小常识网(cha138.com)小编为大家整理,主要介绍了webpack 前端构建相关的知识,希望对你有一定的参考价值。
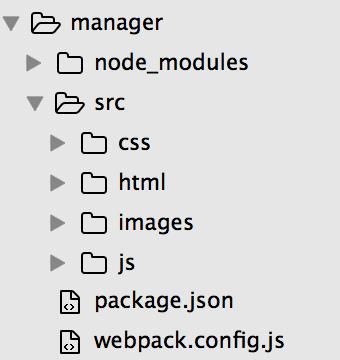
一、建立简单的项目目录
1、创建 manager 根目录(作为项目根目录)
2、执行 npm init,在根目录manager下自动生成 package.json文件
3、npm install webpack --save-dev,在项目中安装 webpack npm包
4、在根目录下 创建 webpack.config.js,所有的配置代码都写在里面
5、在根目录创建 src 目录,包含 html目录 > index.html,css目录 > index.css,js目录 > index.js,images目录 > index...
如图:
二、配置webpack.config.js文件
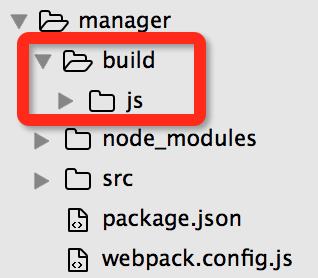
1、简单配置及使用
module.exports = {
    entry: {
        \'js/index\': \'./src/js/index.js\'
    },
    output: {
        path: \'./build\',
        filename: \'[name].js\'
    }
};
执行构建命令:./node_modules/webpack/bin/webpack.js
ok,生成下图的目录结构了
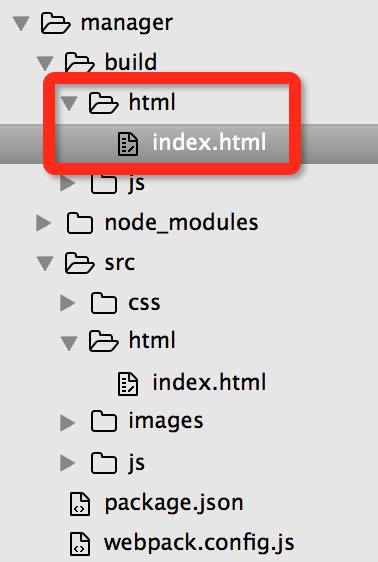
2、安装,使用html-webpack-plugin插件
上一步我们通过构建,在根目录下生成了 ./build/js/index.js 文件,我们希望 生成 ./build/html/index.html 文件
首先安装一下插件 npm install html-webpack-plugin --save-dev,再来看看我们的配置代码
var HtmlWebpackPlugin = require(\'html-webpack-plugin\');
var plugins = [];

plugins.push(
    new HtmlWebpackPlugin({
        template: \'./src/html/index.html\',
        filename: \'html/index.html\',
        inject: \'body\',
        hash: true, // index.js?hash
        cache: true, // if true (default) try to emit the file only if it was changed.
        showErrors: true, // if true (default) errors details will be written into the html page.
        chunks: [\'js/index\'] // filter chunks
    })
);

module.exports = {
    entry: {
        \'js/index\': \'./src/js/index.js\'
    },
    output: {
        path: \'./build\',
        filename: \'[name].js\'
    },
    plugins: plugins
};
执行构建命令:./node_modules/webpack/bin/webpack.js后
打开./build/html/index.html文件,发现html中自动加上了script标签,引用的js路径加上了hash值,是不是感觉很赞
<script type="text/javascript" src="../js/index.js?f5f204be195973d9d81c"></script>
构建后的项目目录如图:
3、配合babel编译器,让我们所写的js代码支持es6语法
babel官网地址:https://babeljs.io/
安装babel编译器
npm install --save-dev babel-loader babel-core
npm install --save-dev babel-preset-es2015
在根目录下创建 .babelrc 配置文件
{
  "presets": ["es2015"]
}
webpack.config.js配置如下:
var HtmlWebpackPlugin = require(\'html-webpack-plugin\');
var plugins = [];
var loaders = [
   { test: /\\.js$/, exclude: /node_modules/, loader: "babel-loader" },
   { test: /\\.css$/, loader: "style-loader!css-loader" }
];

plugins.push(
    new HtmlWebpackPlugin({
        template: \'./src/html/index.html\',
        filename: \'html/index.html\',
        inject: \'body\',
        hash: true, // index.js?hash
        cache: true, // if true (default) try to emit the file only if it was changed.
        showErrors: true, // if true (default) errors details will be written into the html page.
        chunks: [\'js/index\'] // filter chunks
    })
);

module.exports = {
    entry: {
        \'js/index\': \'./src/js/index.js\'
    },
    output: {
        path: \'./build\',
        filename: \'[name].js\'
    },
    module: {
        loaders: loaders
    },
    plugins: plugins
};
准备好了,我们在 ./src/js/index.js文件中写入:
function testEs6(a, ...args) {
    console.log(args); // [2,3,4]
}

testEs6(1,2,3,4);

console.log(Set);
console.log(Map);

new Promise(function(resolve, reject) {});
执行构建命令:./node_modules/webpack/bin/webpack.js,OK,编译成功了,并没有报错,这意味着你可以在你的项目中使用es6了
4、css文件可以作为模块在js中被引入
npm install css-loader --save-dev
npm install style-loader --save-dev
在webpack.config.js文件中配置
var loaders = [
   { test: /\\.css$/, loader: "style-loader!css-loader" }
];
在./src/js/index.js中 引入css文件
require(\'../css/index.css\');
执行构建命令:./node_modules/webpack/bin/webpack.js,可以看到 ./src/css/index.css中的css代码 放在了./build/html/index.html文件的style标签内
5、本地服务 webpack-dev-server
npm install --save-dev webpack-dev-server
执行服务启动命令:./node_modules/.bin/webpack-dev-server --progress --host 0.0.0.0 --port 8080 --colors --inline --hot --display-error-details --content-base src/
你可以通过浏览器输入下面地址来访问你的项目:
http://0.0.0.0:8080/html
localhost:8080/html
你的ip:8080/html
ok,也可以通过配置 webpack.config.js
var HtmlWebpackPlugin = require(\'html-webpack-plugin\');
var plugins = [];
var loaders = [
   { test: /\\.js$/, exclude: /node_modules/, loader: "babel-loader" },
   { test: /\\.css$/, loader: "style-loader!css-loader" }
];

plugins.push(
    new HtmlWebpackPlugin({
        template: \'./src/html/index.html\',
        filename: \'html/index.html\',
        inject: \'body\',
        hash: true,
        cache: true,
        showErrors: true,
        chunks: [\'js/index\']
    })
);

module.exports = {
    entry: {
        \'js/index\': \'./src/js/index.js\'
    },
    output: {
        path: \'./build\',
        filename: \'[name].js\'
    },
    devServer: {
        progress: true,
        host: \'0.0.0.0\',
        port: 8080,
        colors: true,
        inline: true,
        // hot: true,
        contentBase: \'./src\',
        displayErrorDetails: true
    },
    module: {
        loaders: loaders
    },
    plugins: plugins
};
配置完了后,我们 在执行命令 ./node_modules/.bin/webpack-dev-server,ok,成功了
我们随便修改一下 ./src/html/index.html代码(也可以修改css,js代码),浏览器页面将会自动刷新,实时预览,神奇吧....
6、多文件自动构建
// webpack.config.js

var glob = require(\'glob\');
var path = require(\'path\');
var HtmlWebpackPlugin = require(\'html-webpack-plugin\');
var source = getSource();

var loaders = [
   { test: /\\.js$/, exclude: /node_modules/, loader: "babel-loader" },
   { test: /\\.css$/, loader: "style-loader!css-loader" }
];

var plugins = (function() {
    var arr = [];

    source.htmlFiles.forEach(function(htmlFile) {
        arr.push(
            new HtmlWebpackPlugin({
                template: htmlFile.pageSource,
                filename: htmlFile.filename,
                inject: \'body\',
                hash: true,
                cache: true,
                showErrors: true,
                chunks: [htmlFile.jsChunkName]
            })
        );
    });

    return arr;
}());

module.exports = {
    entry: source.entry,
    output: {
        path: \'./build\',
        filename: \'[name].js\'
    },
    devServer: {
        progress: true,
        host: \'0.0.0.0\',
        port: 8080,
        colors: true,
        inline: true,
        hot: true,
        contentBase: \'./src\',
        displayErrorDetails: true
    },
    module: {
        loaders: loaders
    },
    plugins: plugins
};

function getSource() {
    var source = {
        htmlFiles: [],
        entry: {}
    };

    var pageSource = glob.sync(\'./src/html/*.html\');
    var jsSource = glob.sync(\'./src/js/**/*.js\');
    var entry = {}; // 存储 all

    jsSource.forEach(function(item) {
        entry[\'js/\' + path.basename(item, \'.js\')] = item;
    });

    pageSource.forEach(function(page) {
        var jsChunkName = \'js/\' + path.basename(page, \'.html\');
        source.htmlFiles.push({
            filename: \'html/\' + path.basename(page),
            pageSource: page,
            jsChunkName: jsChunkName
        });

        source.entry[jsChunkName] = entry[jsChunkName];
    });

    return source;
}
ps:转载请注明出处:杨君华
以上是关于webpack 前端构建的主要内容,如果未能解决你的问题,请参考以下文章