android自定义View全解
Posted 乆丩
tags:
篇首语:本文由小常识网(cha138.com)小编为大家整理,主要介绍了android自定义View全解相关的知识,希望对你有一定的参考价值。
源码在这里:CSDN
本文主要有以下内容:
* 自定义View的分类
* 自定义View的注意事项
* 自定义View的实现
* 自定义View使其支持wrap_content和padding
* 自定义属性的实现过程
首先,自定义View是为了达到更绚丽的效果。它相对来说也是一个比较难的技术体系,涉及到【View的层次结构】、【View事件分发机制】、【View的工作原理】、【View的弹性滑动】、【View的滑动冲突】等技术。
自定义View的分类
1.1. 继承 View重写 onDraw 方法
这种方式主要用于显示不规则的效果哦,即这种效果不方便用布局组合来实现,往往需要静态或者动态的显示一些不规则的图形
采用这种方式需要自己支持wrap_content,并且padding也需要自己处理。
1.2. 继承ViewGroup派生特殊的Layout
这种方法主要用于实现自定义布局,即除了LinearLayout,RelativeLayout等系统布局之外的一种重新定义的全新的布局,当某种效果很像
几种View组合在一起的时候就可以采用这种方法。
这种方法稍微复杂一些,需要合适的处理ViewGroup的测量和布局这俩个过程
1.3. 继承特定的View(比如TextView)
这种方法一般用于扩展某种已有的View功能。这种方法不需要自己支持wrap_content,padding等。
1.4. 继承特定的ViewGroup(比如LinearLayout等)
当某种效果很像几种View组合在一起的时候就可以采用这种方法。这种方法不需要自己处理ViewGroup的测量和布局这俩个过程。
与1.2比较,一般来说,1.2能实现的效果1.4也都能实现,但1.2更接近View的底层。
自定义View的注意事项
2.1. 让View支持wrap_content
这是因为直接继承View或ViewGroup的控件,如果不在onMeasure中处理wrap_content,那么外界在布局中使用wrap_content时就无法达到预期效果
2.2. 让View支持padding
直接继承View的控件,如果不再draw方法中处理padding,那么这个属性是无法起作用的。
直接继承ViewGroup的控件需要在onMeasure和onLayout中考虑padding和子元素的margin对其造成的影响,不然将导致pading和子元素的margin失效
2.3. 不要在View中使用Handler
这是因为View内部本身就提供了post系列方法,完全可以替代Handler的作用。除非你很明确要用Handler来发送消息。
2.4. View中如果有线程和动画,及时停止
如果有线程和动画需要停止的时候,onDetachedFromWindow就恶意做到。这是因为当包含此View的Activity退出或者当前View被remove时,View的onDetachedFromWindow方法就会被调用。相对的,当包含此View的Activity启动时onAttachedToWindow会被调用。同时,View不可见时,我们也需要停止线程和动画,如果不及时停止,可能会导致内存泄漏。
2.5. 如果有滑动嵌套时,当然要处理好滑动冲突的问题。
================================================
继承View重写 onDraw 方法
3.1 代码
public class CircleView extends View {
    private int mColor = Color.RED;
    private Paint mPaint = new Paint(Paint.ANTI_ALIAS_FLAG);
    public CircleView(Context context) {
        this(context, null);
    }
    public CircleView(Context context, AttributeSet attrs) {
        this(context, attrs, 0);
    }
    public CircleView(Context context, AttributeSet attrs, int defStyleAttr) {
       super(context, attrs, defStyleAttr);
        mPaint.setColor(mColor);
    }
    @Override
    protected void onDraw(Canvas canvas) {
        super.onDraw(canvas);
        int width = getWidth();
        int height = getHeight();
        int radius = Math.min(width, height) / 2;
        canvas.drawCircle(width / 2, height / 2, radius, mPaint);
    }
}

<LinearLayout xmlns:android="http://schemas.android.com/apk/res/android"
    xmlns:tools="http://schemas.android.com/tools"
    android:layout_width="match_parent"
    android:layout_height="match_parent"
    android:paddingBottom="@dimen/activity_vertical_margin"
    android:paddingLeft="@dimen/activity_horizontal_margin"
    android:paddingRight="@dimen/activity_horizontal_margin"
    android:paddingTop="@dimen/activity_vertical_margin"
    tools:context="com.peak.app.c_view.CustomViewMainActivity">
    <com.peak.app.c_view.CircleView
        android:layout_width="120dip"
        android:layout_height="120dip"
        android:padding="40dip"
        android:background="@color/colorPrimaryDark" />
</LinearLayout>
上述代码就完成了基本的自定义View,同样上述1.1,2.2,2.2中提到过,我们需要自己实现使其支持wrap_content和padding,现在我们就用上述代码来验证当前自定义view是否支持wrap_content和padding
3.2 代码验证当前自定义View是否支持wrap_content和padding
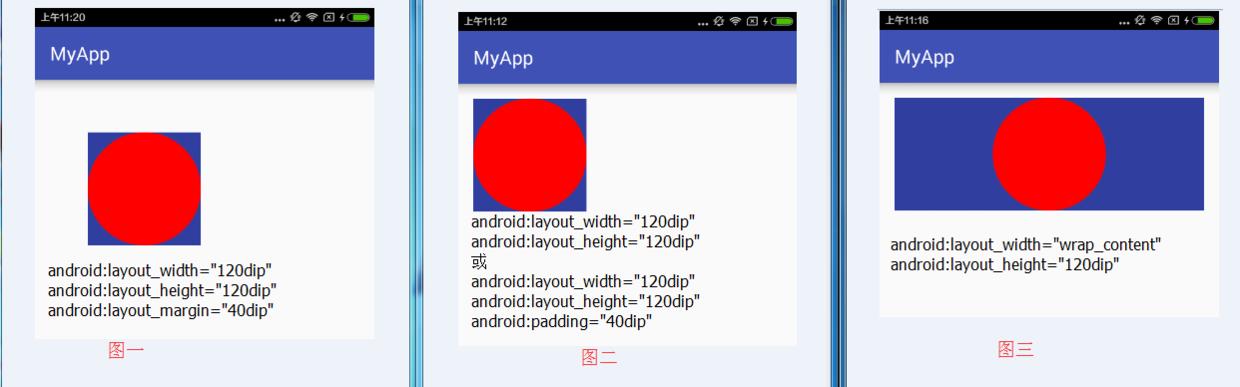
图一:证明支持layout_margin属性
图二:证明不支持padding属性
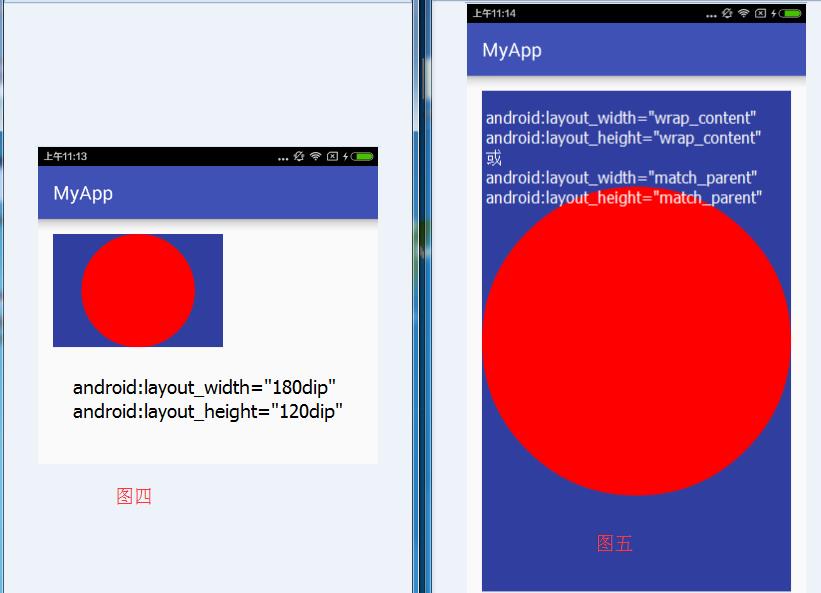
图三、图五:证明不支持wrap_content
layout_margin属性是由父容器控制的,所以支持,不需要我们处理
3.3让View支持wrap_content
之所以wrap_content失效,是因为:如果View在使用wrap_content时,那么他的specMode是AT_MOST模式,这种模式下它的宽高等于specSize,而这种情况下specSize是parentSize,而parentSize是父容器当前剩余的大小。
解决方法就是:我们为View指定一个默认的宽高,并在wrap_content时使用此宽高即可。当然这个默认值如何取舍,没有一个固定的依据,我们只能根据需求自行选取一个合适的值。下面的代码是通过Math.min函数来设置默认值的,道理一样。
    @Override
    protected void onMeasure(int widthMeasureSpec, int heightMeasureSpec) {
        int mWidth=600;
        int mHeight =600;
        int widthMode = MeasureSpec.getMode(widthMeasureSpec);
        int widthSize = MeasureSpec.getSize(widthMeasureSpec);
        int heightMode = MeasureSpec.getMode(heightMeasureSpec);
        int heightSize = MeasureSpec.getSize(heightMeasureSpec);
        if(widthMode==MeasureSpec.AT_MOST && heightMode==MeasureSpec.AT_MOST){
            setMeasuredDimension(Math.min(mWidth, widthSize),Math.min(mHeight, heightSize));
        }else if(widthMode==MeasureSpec.AT_MOST){
            setMeasuredDimension(Math.min(mWidth, widthSize),heightSize);
        }else if( heightMode==MeasureSpec.AT_MOST){
            setMeasuredDimension(widthSize,Math.min(mWidth, widthSize));
        }
    }
测试修改后的View:
        android:layout_width="wrap_content"
        android:layout_height="wrap_content"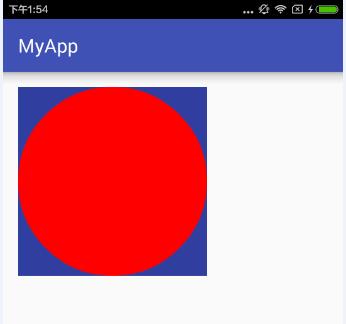
3.4让View支持padding属性。
这个只需要在绘制的时候把padding考虑进去即可。
首先在onDraw方法中通过
int width = getWidth() - (paddingLeft + paddingRight);
int height = getHeight() - (paddingTop + paddingBottom);
重新计算圆的实际宽高,
然后,通过
canvas.drawCircle(paddingLeft+width / 2, paddingTop+height / 2, radius, mPaint);重新定义圆的圆点,使其四周留下空白(也就是padding)
全部代码如下:
    @Override
    protected void onDraw(Canvas canvas) {
        super.onDraw(canvas);
        final int paddingLeft = getPaddingLeft();
        final int paddingRight = getPaddingRight();
        final int paddingTop = getPaddingTop();
        final int paddingBottom = getPaddingBottom();
        int width = getWidth() - (paddingLeft + paddingRight);
        int height = getHeight() - (paddingTop + paddingBottom);
        int radius = Math.min(width, height) / 2;
        canvas.drawCircle(paddingLeft+width / 2, paddingTop+height / 2, radius, mPaint);
    }

    <com.peak.app.c_view.CircleView
        android:layout_width="wrap_content"
        android:layout_height="wrap_content"
        android:background="@color/colorPrimaryDark"
        android:padding="10dip"/>
继承特定的ViewGroup(比如LinearLayout等)
这种方式主要用于实现自定义布局,实现起来也比较简单,直接上代码:
ActionBarView.java:
public class ActionBarView extends LinearLayout {
    public static final int KEY_BACK = 111;
    public static final int KEY_CONTENT = 222;
    private Context context = null;
    private ImageView iv_back;
    private TextView tv_context;
    private OnClickListener onClickListener = null;
    public ActionBarView(Context context) {
        this(context, null);
    }
    public ActionBarView(Context context, AttributeSet attrs) {
        super(context, attrs);
        this.context = context;
        View contentView = LayoutInflater.from(context).inflate(R.layout.actionbar_layout, this);
        iv_back = (ImageView) contentView.findViewById(R.id.iv_back);
        tv_context = (TextView) contentView.findViewById(R.id.tv_context);
        iv_back.setOnClickListener(new MyOnClickListener(KEY_BACK));
        tv_context.setOnClickListener(new MyOnClickListener(KEY_CONTENT));
    }
    // 通过这个方法来动态设置标题
    public void setContent(String str) {
        tv_context.setText(str);
    }
    // 通过回调接口在外部监听点击事件
    private class MyOnClickListener implements android.view.View.OnClickListener {
        private int key = -1;
        private MyOnClickListener(int position) {
            this.key = position;
        }
        @Override
        public void onClick(View v) {
            if (onClickListener != null) {
                onClickListener.onClick(key, v);
            }
        }
    }
    public void setOnClickListener(OnClickListener onClickListener) {
        this.onClickListener = onClickListener;
    }
    public interface OnClickListener {
        public void onClick(int key, View v);
    }
}

actionbar_layout.xml:
<?xml version="1.0" encoding="utf-8"?>
<FrameLayout xmlns:android="http://schemas.android.com/apk/res/android"
    android:layout_width="match_parent"
    android:layout_height="44dip"
    android:background="@drawable/bg_top">
    <ImageView
        android:id="@+id/iv_back"
        android:layout_width="wrap_content"
        android:layout_height="wrap_content"
        android:src="@drawable/ic_top_return" />
    <TextView
        android:id="@+id/tv_context"
        android:layout_width="wrap_content"
        android:layout_height="match_parent"
        android:layout_gravity="center_horizontal"
        android:gravity="center"
        android:text="标题" />
</FrameLayout>

activity的xml文件中引用:
    <com.peak.app.c_view.ActionBarView
        android:id="@+id/barView"
        android:layout_width="match_parent"
        android:layout_height="wrap_content"
        android:layout_marginBottom="20dip"
        android:padding="20dip"
        android:background="@color/colorPrimary"/>

activity中:
        ActionBarView barView = (ActionBarView) findViewById(R.id.barView);
        barView.setContent("自定义View标题");
        barView.setOnClickListener(new ActionBarView.OnClickListener() {
            @Override
            public void onClick(int key, View v) {
                if (key == ActionBarView.KEY_BACK) {
                    Log.i("CustomViewMainActivity", "ActionBarView 点击返回按钮");
                }
                if (key == ActionBarView.KEY_CONTENT) {
                    Log.i("CustomViewMainActivity", "ActionBarView 点击标题");
                }
            }
        });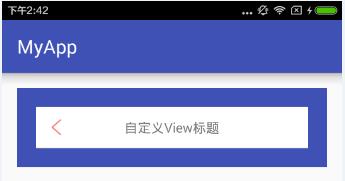
图中,蓝色区域是整个ActionBarView 所占的区域,蓝色区域外是的空白是父布局设置的padding,蓝色区域和其围着的白色区域之间的距离是ActionBarView 设置的padding。所以,这种方式会自动支持padding属性,不需要我们自己处理。
代码中通过public void setContent(String str)方法来动态设置标题,其实我们还可以在xml中来设置,不过这需要我们自定义属性,这个稍后来说。
继承ViewGroup派生特殊的Layout
这种方式使用起来比较复杂,而且也不是很常用,这里就先不说了。
继承特定的View
这里我们继承EditText,实现全部删除的功能,【源码见附件】
自定义属性
有时候,业务需要,或者是单纯的为了使用方便,我们需要自定义属性,使其可以在xml中快速配置属性。比如CircleView中我们可以配置背景色的属性,ActionBarView我们可以配置标题属性。
这里我们以CircleView为例(ActionBarView的自定义属性见【源码】,这里就不往出贴了):
第一步:在res/values/下创建atts开头的自定义属性xml,内容如下:
<?xml version="1.0" encoding="utf-8"?>
<resources>
    <declare-styleable name="CircleView">
        <attr name="circle_color" format="color" />
    </declare-styleable>
</resources>
上述代码首先定义了一个名称为CircleView的属性集合,当然,既然是集合,就可以有多个属性。这里的属性名是circle_color,格式是color
第二步:在View的构造方法中解析自定义属性的值并做处理,代码如下:
    public CircleView(Context context, AttributeSet attrs, int defStyleAttr) {
        super(context, attrs, defStyleAttr);
//        TypedArray a = context.getTheme().obtainStyledAttributes(attrs, R.styleable.CircleView, defStyleAttr, 0);
//        TypedArray a = context.obtainStyledAttributes(attrs, R.styleable.CircleView, defStyleAttr, 0);
        TypedArray a = context.obtainStyledAttributes(attrs, R.styleable.CircleView);
        mColor = a.getColor(R.styleable.CircleView_circle_color, Color.YELLOW);
        a.recycle();
        mPaint.setColor(mColor);
    }
**第三步:在xml布局中使用自定义属性,代码如下:
<?xml version="1.0" encoding="utf-8"?>
<LinearLayout xmlns:android="http://schemas.android.com/apk/res/android"
    xmlns:app="http://schemas.android.com/apk/res-auto"
    xmlns:tools="http://schemas.android.com/tools"
    android:layout_width="match_parent"
    android:layout_height="match_parent"
    android:orientation="vertical"
    android:paddingBottom="@dimen/activity_vertical_margin"
    android:paddingLeft="@dimen/activity_horizontal_margin"
    android:paddingRight="@dimen/activity_horizontal_margin"
    android:paddingTop="@dimen/activity_vertical_margin"
    tools:context="com.peak.app.c_view.CustomViewMainActivity">
    <com.peak.app.c_view.CircleView
        android:layout_width="wrap_content"
        android:layout_height="wrap_content"
        android:background="@color/colorPrimaryDark"
        android:padding="10dip"
        app:circle_color="@color/colorAccent" />
</LinearLayout>
这里需要注意:必须在布局文件中添加schemas声明:
其中,app是自定义属性的前缀,与下边的
xmlns:app="http://schemas.android.com/apk/res-auto"。
app:circle_color="@color/colorAccent"呼应。当然这个前缀是可以改的,是可以自定义的。
另外自定义属性有如下格式:
- reference:指资源ID
- color:颜色值。
- boolean:布尔值
- dimension:尺寸值。
- float:浮点值。
- integer:整型值
- string:字符串。
- fraction:百分数
- enum:枚举值
- flag:位或运算
- 多类型。
更多内容请关注 我的简书专题
转载请注明 原文链接: http://blog.csdn.net/jasonpeak/article/details/51729192
以上是关于android自定义View全解的主要内容,如果未能解决你的问题,请参考以下文章