基于Puppeteer前端自动化框架PO模式,断言(如何更简便逻辑的写测试代码)
Posted totoro-cat
tags:
篇首语:本文由小常识网(cha138.com)小编为大家整理,主要介绍了基于Puppeteer前端自动化框架PO模式,断言(如何更简便逻辑的写测试代码)相关的知识,希望对你有一定的参考价值。
一、概要
前面介绍了Puppeteer+jest+TypeScript做UI自动化,但是这知识基础的,我们实现自动化要考虑的很多,比如PO模式,比如配置文件,比如断言等等。下面就来一一实现我是怎么用puppeteer 做UI自动化的
二、断言
(一)需要依赖的安装包
| 依赖包 | 命令 |
|---|---|
| Jest | npm install jest --save-dev |
| @types/jest | npm install @types/jest --save-dev |
| expect-puppeteer | npm install expect-puppeteer --save-dev |
| @types/expect-puppeteer | npm install @types/expect-puppeteer --save-dev |
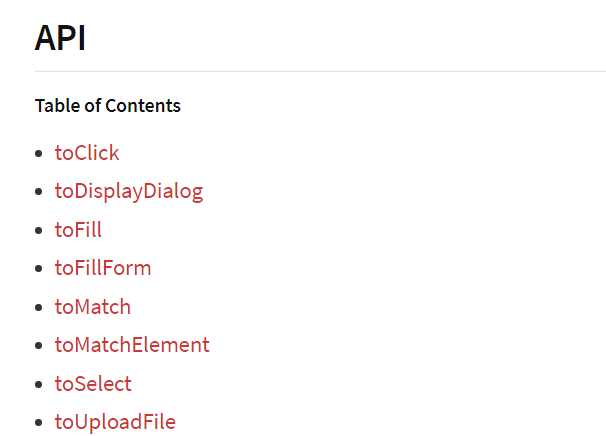
==我们写过Jest的知道Jest自己就带有断言,但是Jest的断言有时候可能不全满足我们,我们来看看expect-puppeteer的api==
链接:expect-puppeteer(api)
(二) 简单介绍下api

- 看api的介绍,expect-puppeteer封装了一些可供我们使用的方法,断言比如toMatch(验证页面是否能匹配到值),toMathcElement((验证页面是否能匹配到元素),这两个还是比较好用的,尤其toMathcElement,具体实战再说
- 其他api,看跟puppeteer api有点不一样,puppeteer一样有click方法那么expect-puppeteer好处是什么呢?这个时候我们就要看源码了==这里建议即使有现成的库,我们也要多看看源码==
- 查看expect-puppeteer - index.d.ts 发现写了一个ExpectPuppeteer接口,这里里面就有我们所有的api,我们顺便点看任意一个js文件看看,目录(expect-puppeteer - lib - options.js),我们就看看这个文件,看不懂没关系,但是大概我们能猜出,就是控制运行时间的嘛,实际工作中一个case可能会写大量的waitfor()是不是很麻烦,所以,我建议,吧options.js的timeout设置长一点,这样方便更准确的寻找页面元素
- api不多做介绍,照着api文档就会了,比较简单
options.js -> 修改timeout为2s
let defaultOptionsValue =
  timeout: 2000
;
三、PO 模式
问:什么是PO模式?
答:概念自行百度,我就不粘贴了,我想稍微写过一点UI自动化的,应该都会多多少少了解一点,通俗的说,我们把元素,方法,测试case 分开写,这样方便我们去管理,逻辑也不叫清晰,具体下面拿实例来说明
四、实例 (以同程网站为实例)
今天我们来写,从首页进入ly.com,点击机票 - 国内机票 - 验证机票默认弹框
(一)我的脚本目录
-----__tests__
-------ui
--------DomesticTictet
-------- cases
--------   basic.test.ts
-------- element
--------Index
-------- action
--------   Navi.action.help.ts
-------- element
--------   Navigation.help.ts
-----env
------ ly.yaml
-----utils
------ config.js- 测试用例都在__tests__文件夹中,DomesticTictet,Index 不同模块的文件夹,分别有cases(测试用例存放的文件夹)element(管理页面元素)action(方法)
- env,管理yaml文件的文件夹,所有的yaml文件放在这里
- utils 自己写的工具类,config.js读取yaml文件
(二)element类管理
Navigation.help.ts

import  Page  from 'puppeteer';
import expectPuppeteer = require('expect-puppeteer');
export const Nav_Ticket = '#menuNav li:nth-child(3) b';
export const DomesticTicket = '.submenu-nav .flight-submenu1';
home.help.ts
// 标题名
export const titleContent = '.s-title.dflex span';
// 出发城市
export const start_city_input = '.s-box:nth-child(1) input[value]';
// 到达城市
export const arrive_city_input = '.s-box:nth-child(3) input[value]';
// 出发时间
export const start_data_input = 'input[placeholder="出发日期"]';
// 到达时间
export const return_data_input = 'input[placeholder="返回日期"]';
// 搜索按钮
export const domestic_tictet_search = '.s-button';
// 搜索不到航班信息提示
export const flight_no_data_tip = '.flight-no-data span'
// 存在航班的元素
export const flight_get_data = '.top-flight-info span b'
(三)action方法编写
Navi.action.help.ts

import  Page  from 'puppeteer';
import expectPuppeteer = require('expect-puppeteer');
const navi_element = require('../element/Navigation.help');

export class Navi_Action
    /**
     * 点击国内机票
     */
    public async hover_home_ticket(page:Page)
        await page.waitForSelector(navi_element.Nav_Ticket);
        await page.hover(navi_element.Nav_Ticket);
        await page.waitFor(3000);
        await expectPuppeteer(page).toClick(navi_element.DomesticTicket);
        await page.waitFor(3000);
(四)yaml配置文件编写
ly.yaml

url:
  web: https://www.ly.com/
  flighthome: https://www.ly.com/flights/home

# puppeteer lanuch配置
puppeteer:
  proxy:
  viewport:
    width: 1920
    height: 1080
(五)测试用例编写
basic.test.ts

import  Page  from 'puppeteer';
import  Navi_Action  from '../../Index/action/Navi.action.help';
const config = require('../../../../utils/config');
const Home_Element = require('../element/home.help');
const time = require('silly-datetime');

const ly = config.readConfig('ly');

describe('domestic ticket page content verification', () =>
    let page : Page;
    beforeEach( async () =>
        page = await browser.newPage();
        await page.setViewport(ly.puppeteer.viewport);
        await page.goto(ly.url.web,waitUntil:'networkidle2');

        let navi_action = new Navi_Action();
        await navi_action.hover_home_ticket(page);

    ,30000)
    afterEach ( async () =>
        await page.close();
    )

    test('TEST_001:验证跳转链接' , async() =>
        const url = await page.url();
        await expect(url).toBe(ly.url.flighthome);
    ,30000);


    test('TEST_002:验证标题名' , async() =>
        const titleElement = Home_Element.titleContent;
        const content = await page.evaluate( (titleElement) =>
            return document.querySelector(titleElement).innerhtml;
        ,titleElement);
        await expect(content).toEqual('国内机票');
    ,30000);

    test('TEST_003:验证出发默认城市' , async() =>
        const content = await page.$eval(Home_Element.start_city_input,el => el.getAttribute('value'));
        await expect(content).toEqual('上海');
    ,30000);

    test('TEST_004:验证到达默认城市' , async() =>
        const content = await page.$eval(Home_Element.arrive_city_input,el => el.getAttribute('value'));
        await expect(content).toEqual('北京');
    ,30000);

    test('TEST_004:验证时间为当天时间' , async() =>
        const current_time = time.format(new Date(),'YYYY-MM-DD');
        const start_time_element = Home_Element.start_data_input;
        const start_time_content = await page.evaluate( (start_time_element) =>
            return document.querySelector(start_time_element).value;
        ,start_time_element);
        await expect(start_time_content).toEqual(current_time);
    ,30000);

    test('TEST_005:验证到达默认值' , async() =>
        const return_input = await page.$eval(Home_Element.return_data_input,el => el.getAttribute('placeholder'));
        await expect(return_input).toEqual('返回日期');
    ,30000);
)
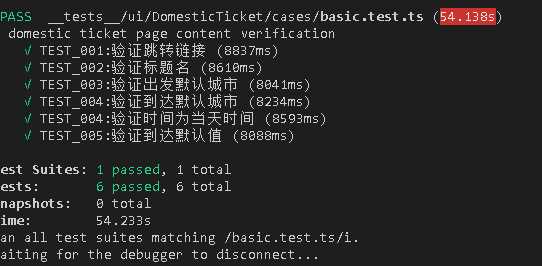
结果

以上是关于基于Puppeteer前端自动化框架PO模式,断言(如何更简便逻辑的写测试代码)的主要内容,如果未能解决你的问题,请参考以下文章