redux简单使用
Posted yuyujuan
tags:
篇首语:本文由小常识网(cha138.com)小编为大家整理,主要介绍了redux简单使用相关的知识,希望对你有一定的参考价值。
在前面的随便中有简单的使用过redux和react-redux,但是感觉写在一起,总是理不清楚,后面看了技术胖老师关于redux的视频后,感觉自己又有了新的理解,在这里简单记录一下。
项目准备
首先安装脚手架:npm install -g create-react-app
然后创建项目:create-react-app demo01
项目创建成功后,删除src下面除index.js以后所有的文件,然后新建一个TodoList.js,然后在index.js中引入:

接下来安装AntDesign和redux:
npm install antd --savenpm install --save redux最后在TodoList.js中引入antd并使用,关于antd的使用和按需加载,在前面的随便有详细介绍。
import React,  Component  from ‘react‘;
import Input,Button,List from ‘antd‘


class TodoList extends Component
    constructor(props)
        super(props)
        this.state =
            inputValue:‘something‘,
            list:[‘web‘,‘php‘,‘node‘,‘java‘,‘ios‘]


    InputChange=(e)=>
        this.setState(
            inputValue:e.target.value
        )

    addItem=()=>
        if(this.state.inputValue)
            this.setState(
                list:[...this.state.list,this.state.inputValue],
                inputValue:‘‘
            )


    delItem(index)
        let arr=this.state.list;
        arr.splice(index,1);
        this.setState(
            list:arr
        )

    render()
        return (
            <div>
                <div style=margin:‘10px‘>
                    <Input value=this.state.inputValue onChange=this.InputChange style=width:‘240px‘,marginRight:‘10px‘/>
                    <Button type="primary" onClick=this.addItem>增加</Button>
                </div>
                <div style=width:‘320px‘>
                    <List bordered dataSource=this.state.list
                        renderItem=(item,index)=>(<List.Item onClick=this.delItem.bind(this,index)>item</List.Item>)
                    />
                </div>
            </div>
         );


export default TodoList;
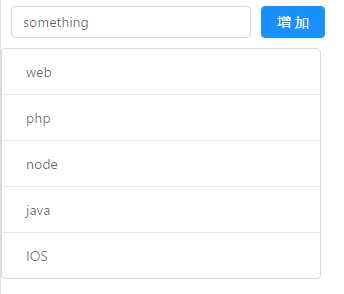
现在,基本实现了添加和删除操作,前期的准备工作完成。
创建store仓库
index.js
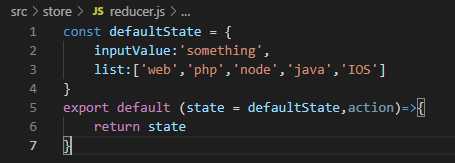
在上面的代码中,我们先是在reducer.js中,添加了一些默认的数据,然后暴露了一个用于修改数据的方法函数。
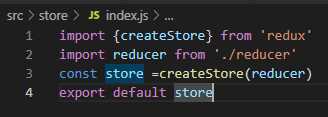
在index.js中,首先引入createStore方法,然后引入reducer后,创建了一个数据存储仓库,最后将这个仓库暴露出去。
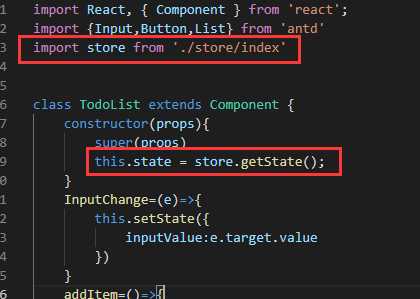
组件获得store中的数据
数据改变
dispatch()方法传递给store。以input框的onChange事件为例: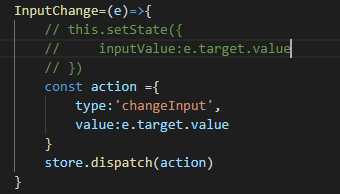
由于store只是一个仓库,所以在接收到action后,会自动转发给reducer,在reducer中有两个参数:state和action,其中state指的是原仓库的状态,二action指的是新传递的状态。在reducer中拿到新旧数据后,就可以根据action的type进行相应的改变了。但是,由于reducer只能接收state,不能改变state,所以需要声明一个新变量,然后用return返回回去。
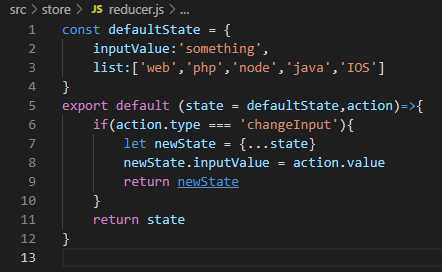
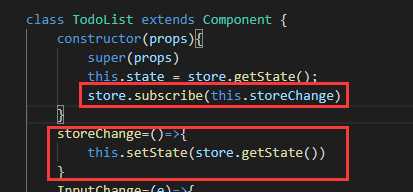
现在,store里面的数据已经更新了,但是组件还没有更新,我们需要在组件的constructor里面订阅redux的状态,才能实时更新组件数据:
以上是关于redux简单使用的主要内容,如果未能解决你的问题,请参考以下文章