vue之手把手教你写日历组件
Posted 兔子爱吃胡萝贝
tags:
篇首语:本文由小常识网(cha138.com)小编为大家整理,主要介绍了vue之手把手教你写日历组件相关的知识,希望对你有一定的参考价值。
---恢复内容开始---
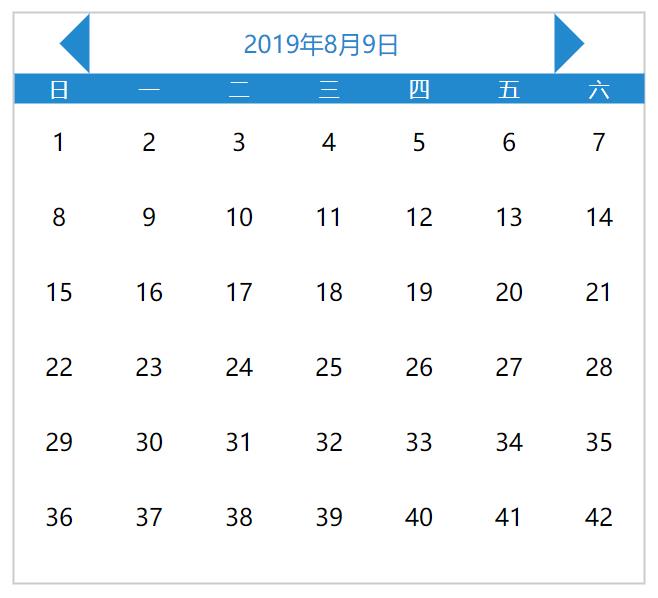
1.分析功能:日历基本功能,点击事件改变日期,样式的改变
1.结构分析:html
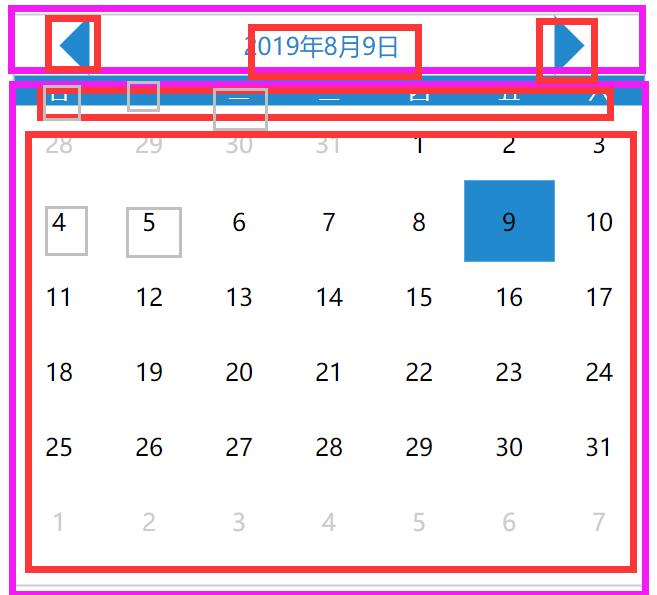
1.分为上下两个部分
2.上面分为左按钮,中间内容展示,右按钮
下面分为周几展示和日期展示
3.基本结构页面html书写
<template>
    <div class="calender2">
        <div class="date-header">
            <div class="pre-month"></div>
            <div class="show-date">2019年8月9日</div>
            <div class="next-month"></div>
        </div>
        <div class="date-content">
            <div class="week-header">
                <div
                v-for="item in [\'日\',\'一\',\'二\',\'三\',\'四\',\'五\',\'六\']"
                :key= item
                >{{ item }}</div>
            </div>
            <div class="week-day">
                <div
                class="every-day"
                v-for="item in 42"
                :key="item"
                >{{ item }}</div>
            </div>
        </div>
    </div>
</template>
*{
    margin: 0px;
    border: 0px;
    list-style: none;
}
.calender2{
    position: absolute;
    top: 50%;
    left: 50%;
    transform: translate(-50%,-50%);
    height:380px;
    width:420px;
    border: 1px solid #ccc;
}
.date-header{
    margin-left: 10px;
    height: 40px;
    width: 350px;
    line-height: 40px;
    text-align: center;
}
.pre-month{
    position: absolute;
    display: inline-block;
    height: 0px;
    width:0px;
    border:20px solid ;
    border-color: transparent rgb(35, 137, 206) transparent transparent;
}
.next-month{
    position: absolute;
    display: inline-block;
    height: 0px;
    width:0px;
    border:20px solid ;
    border-color: transparent transparent transparent  rgb(35, 137, 206);
}
.show-date{
    margin-left: 40px;
    margin-top: 0px;
    display: inline-block;
    line-height: 40px;
    text-align: center;
    width: 310px;
    color: rgb(35, 137, 206);
}
.week-header{
    background: rgb(35, 137, 206);
    color: #fff;
    font-size: 14px;
    text-align: center;
    line-height: 20px;
}
.week-header div{
    margin: 0;
    padding: 0;
    display: inline-block;
    height: 20px;
    width: 60px;
}
.every-day{
    display: inline-block;
    height: 50px;
    width: 60px;
    text-align: center;
    line-height: 50px;
}
.other-day{
    color: #ccc;
}
.now-day{
    background: rgb(35, 137, 206);
}
.active-day{
    /* padding: 2px */
    /* border-sizing:content-box; */
    border: 2px solid rgb(35, 137, 206);
}
</style>

4.一些事件以及逻辑
1.使得当前的日期为今天的日期
<div class="show-date">{{ year }}年{{ month }}月{{ day }}日</div>
data(){
        return{
            year:null,
            month:null,
            day:null
        }
    },
    created(){
        this.getInitDate();
    },
    methods:{
        getInitDate(){
            const date = new Date();
            this.year = date.getFullYear();
            this.month = date.getUTCMonth() + 1;
            this.day = date.getDate();
        }
    }
2.设置该月日期起始值(找到一号是在哪里)
beginDay(){
    return new Date(this.year, this.mounth - 1, 1).getDay();
}
3.当月天数字体正常显示
<div
v-if="item - beginDay >= 0 && item - beginDay <= curDays"
>{{ item - beginDay }}</div>
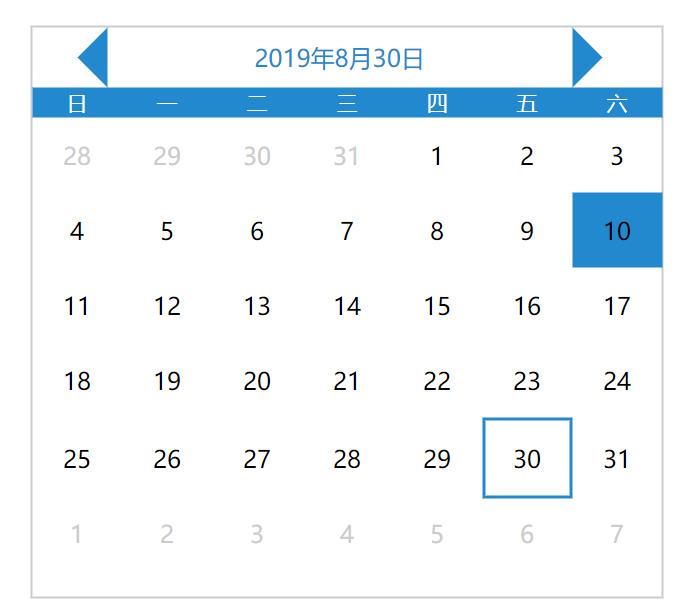
4.当月天数之前的部分变灰,外加正常显示日期
注意几个数学问题:
1.当前月天数日期
2.上月剩余天数
3.此月显示的下月天数
<div
     v-if="item - beginDay > 0 && item - beginDay <= curDays"
     >{{ item - beginDay }}</div>
<div
     class="other-day"
     v-else-if="item - beginDay <= 0"
     >{{ item - beginDay + prevDays }}</div>
<div
     class="other-day"
     v-else>{{ item - beginDay -curDays }}</div>
5.能知道当前日期,能点击其他日期,并且会有相应的变化
知道当前日期:
this.curDate = `${this.year}-${this.month}-${this.day}`
判断今天是不是当前日期,并且给一个样式:
\'now-day\':`${year}-${month}-${item - beginDays}` == curDate
当点击当月有的日期的时候会根据你的点击显示的日期发生变化
判断是点击的那一天:
\'active-day\':`${year}-${month}-${item - beginDay}` === `${year}-${month}-${day}`
点击这一天,绑定点击事件
@click="handleClickDay(item - beginDay)"
handleClickDay(day){
    this.day = day
}
6.前后两个按钮的功能
            <div class="pre-month" @click="handlePrev"></div>
            <div class="next-month" @click="handleNext"></div>
handlePrev(){
            if(this.month == 1){
                this.month = 12
                this.year--
            }else{
                this.month--
            }
        },
        handleNext(){
            if(this.month == 12){
                this.month = 1
                this.year++
            }else{
                this.month++
            }
        }
7.判断点击的是否为当月的最后一天
computedDay(){
            const allDay = new Date(this.year, this.month, 0).getDate();
            if(this.day > allDay){
                this.day = allDay;
            }
        }
将这个函数分别在handlePrev(),handleNext()里面执行-------注意是this.computedDay();

完成
---恢复内容结束---
1.分析功能:日历基本功能,点击事件改变日期,样式的改变
1.结构分析:html
1.分为上下两个部分
2.上面分为左按钮,中间内容展示,右按钮
下面分为周几展示和日期展示
3.基本结构页面html书写
<template>
    <div class="calender2">
        <div class="date-header">
            <div class="pre-month"></div>
            <div class="show-date">2019年8月9日</div>
            <div class="next-month"></div>
        </div>
        <div class="date-content">
            <div class="week-header">
                <div
                v-for="item in [\'日\',\'一\',\'二\',\'三\',\'四\',\'五\',\'六\']"
                :key= item
                >{{ item }}</div>
            </div>
            <div class="week-day">
                <div
                class="every-day"
                v-for="item in 42"
                :key="item"
                >{{ item }}</div>
            </div>
        </div>
    </div>
</template>
*{
    margin: 0px;
    border: 0px;
    list-style: none;
}
.calender2{
    position: absolute;
    top: 50%;
    left: 50%;
    transform: translate(-50%,-50%);
    height:380px;
    width:420px;
    border: 1px solid #ccc;
}
.date-header{
    margin-left: 10px;
    height: 40px;
    width: 350px;
    line-height: 40px;
    text-align: center;
}
.pre-month{
    position: absolute;
    display: inline-block;
    height: 0px;
    width:0px;
    border:20px solid ;
    border-color: transparent rgb(35, 137, 206) transparent transparent;
}
.next-month{
    position: absolute;
    display: inline-block;
    height: 0px;
    width:0px;
    border:20px solid ;
    border-color: transparent transparent transparent  rgb(35, 137, 206);
}
.show-date{
    margin-left: 40px;
    margin-top: 0px;
    display: inline-block;
    line-height: 40px;
    text-align: center;
    width: 310px;
    color: rgb(35, 137, 206);
}
.week-header{
    background: rgb(35, 137, 206);
    color: #fff;
    font-size: 14px;
    text-align: center;
    line-height: 20px;
}
.week-header div{
    margin: 0;
    padding: 0;
    display: inline-block;
    height: 20px;
    width: 60px;
}
.every-day{
    display: inline-block;
    height: 50px;
    width: 60px;
    text-align: center;
    line-height: 50px;
}
.other-day{
    color: #ccc;
}
.now-day{
    background: rgb(35, 137, 206);
}
.active-day{
    /* padding: 2px */
    /* border-sizing:content-box; */
    border: 2px solid rgb(35, 137, 206);
}
</style>

4.一些事件以及逻辑
1.使得当前的日期为今天的日期
<div class="show-date">{{ year }}年{{ month }}月{{ day }}日</div>
data(){
        return{
            year:null,
            month:null,
            day:null
        }
    },
    created(){
        this.getInitDate();
    },
    methods:{
        getInitDate(){
            const date = new Date();
            this.year = date.getFullYear();
            this.month = date.getUTCMonth() + 1;
            this.day = date.getDate();
        }
    }
2.设置该月日期起始值(找到一号是在哪里)
beginDay(){
    return new Date(this.year, this.mounth - 1, 1).getDay();
}
3.当月天数字体正常显示
<div
v-if="item - beginDay >= 0 && item - beginDay <= curDays"
>{{ item - beginDay }}</div>
4.当月天数之前的部分变灰,外加正常显示日期
注意几个数学问题:
1.当前月天数日期
2.上月剩余天数
3.此月显示的下月天数
<div
     v-if="item - beginDay > 0 && item - beginDay <= curDays"
     >{{ item - beginDay }}</div>
<div
     class="other-day"
     v-else-if="item - beginDay <= 0"
     >{{ item - beginDay + prevDays }}</div>
<div
     class="other-day"
     v-else>{{ item - beginDay -curDays }}</div>
5.能知道当前日期,能点击其他日期,并且会有相应的变化
知道当前日期:
this.curDate = `${this.year}-${this.month}-${this.day}`
判断今天是不是当前日期,并且给一个样式:
\'now-day\':`${year}-${month}-${item - beginDays}` == curDate
当点击当月有的日期的时候会根据你的点击显示的日期发生变化
判断是点击的那一天:
\'active-day\':`${year}-${month}-${item - beginDay}` === `${year}-${month}-${day}`
点击这一天,绑定点击事件
@click="handleClickDay(item - beginDay)"
handleClickDay(day){
    this.day = day
}
6.前后两个按钮的功能
            <div class="pre-month" @click="handlePrev"></div>
            <div class="next-month" @click="handleNext"></div>
handlePrev(){
            if(this.month == 1){
                this.month = 12
                this.year--
            }else{
                this.month--
            }
        },
        handleNext(){
            if(this.month == 12){
                this.month = 1
                this.year++
            }else{
                this.month++
            }
        }
7.判断点击的是否为当月的最后一天
computedDay(){
            const allDay = new Date(this.year, this.month, 0).getDate();
            if(this.day > allDay){
                this.day = allDay;
            }
        }
将这个函数分别在handlePrev(),handleNext()里面执行-------注意是this.computedDay();

完成
以上是关于vue之手把手教你写日历组件的主要内容,如果未能解决你的问题,请参考以下文章
