H5页面导航跟随页面滚动而联动
Posted caofeng11
tags:
篇首语:本文由小常识网(cha138.com)小编为大家整理,主要介绍了H5页面导航跟随页面滚动而联动相关的知识,希望对你有一定的参考价值。
项目开发过程中遇到一个主页,实现功能:
- 需要页面在滚动到导航时导航吸顶;
- 导航随页面滚动高亮选中;点击导航页面滚动到固定位置;
- 在导航项过多时导航横向滚动;
- 最后一个面板底部补白且兼容iphoneX。
页面区域划分:
- 头部数字显示(在页面上拉后隐藏)
- 导航部分
- 面板部分(所有的面板放在一个大div里)
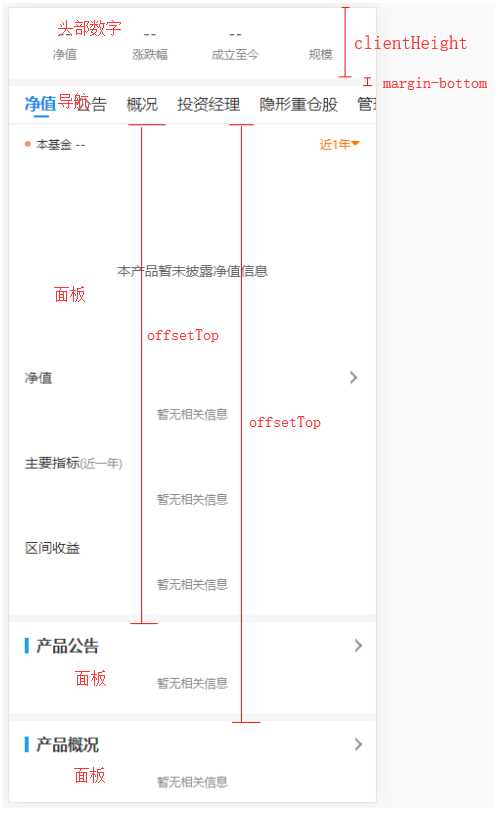
效果如下图:


一:页面在滚动到导航时导航吸顶(sticky粘性布局)
<!--头部数字-->
<div class="head-number"></div>
<!--导航-->
<div id="Tab" class="tab">
       <span v-for="(v,i) in tabOption"  :class="‘cur‘:i ===activeTab" @click="changeTab(i)">v.v</span>
</div>
<!--面板区域-->
<div class="main-box">
        <div class="pannel" v-for="(v,i) in tabOption"></div>
</div>
export default
   data()
       return
           activeTab: 0,//当前活动的tab项
           tabOption: [k:‘netValue‘,v:‘净值‘,k:‘notice‘,v:‘公告‘,k:‘product‘,v:‘概况‘,k:‘manager‘,v:‘投资经理‘,
                          k:‘heavyStock‘,v:‘隐形重仓股‘k:‘relatedSecurities‘,v:‘管理人管理的产品‘,
<style scoped lang="less">
    .tab
         position:sticky;
         position:-webkit-sticky;
         top:0;
         z-index:1;
         white-space:nowrap;
         overflow-x:scroll;
         -webkit-overflow-scrolling:touch;

</style>
sticky使用需要注意:1.父元素不能设置overflow:auto/hidden/scroll;
2.必须指定top、left、right、bottom其中一个,否则只会处于相对定位;
3.父元素的高度不能低于sticky元素的高度;
4.sticky仅在其父元素内有效;
二:导航随页面滚动高亮选中;点击导航页面滚动到固定位置(通过scrollTop和offsetTop判断)
//钩子函数获取页面DOM
mounted()
    const pannel = document.querySelectorAll(‘.pannel‘);
    window.addEventListener(‘scroll‘, throttle(() =>
           let head_num = document.querySelector(‘.head-number‘),
               head_num_height = parseFloat(getComputedStyle(head_num)[‘margin-bottom‘]) + head_num.clientHeight;
           let top = document.body.scrollTop || document.documentElement.scrollTop;
                    for (let i = this.tabOption.length; i > 0; i--)
                        //倒叙缩减循环次数
                        //js会对小数部分自动四舍五入,导致计算出现偏差,故+1解决
                        if (top + 1 >= pannel[i - 1].offsetTop + head_num_height)
                            this.activeTab = i-1;
                            break;


    , 0));

//使用activeTab绑定class来控制导航高亮;点击导航只要改变body的scrollTop即可触发window.scroll事件便会重新计算activeTab
changeTab(i)
     const head_num = document.querySelector(‘.head-number‘),
            head_num_height = parseFloat(getComputedStyle(head_num)[‘margin-bottom‘]) + head_num.clientHeight,
            s_top = document.querySelectorALL(‘.pannel‘)[i].offsetTop + head_num_height;
     document.body.scrollTop = document.documentElement.scrollTop = s_top;
计算原理见上图二中标注,注:div.offsetTop是div的上边款与带有定位元素(absolute、relative、fixed)的父元素(如果父元素不是定位元素,则继续上溯所有祖先直到body)的上边框之间的距离(只读属性)
三、在导航项过多时导航横向滚动

Tab导航由最外层padding(绿色)与span的margin(橘色)组成;
offsetWidth为width + padding + border(span的各自蓝色部分,tab的整个图部分);
offsetLeft为当前元素边框到定位父元素边框的距离(红线部分)
 //监听activeTab来改变tab的scrollLeft值
 watch:
            activeTab(v)
                let $tab = $(‘#Tab‘),
                    tabWidth = $tab[0].offsetWidth,
                    tabPaddingLeft = parseFloat(getComputedStyle($tab[0])[‘paddingLeft‘]),
                    scrollLeft = $tab[0].scrollLeft;

                let node = $tab.find(‘span‘)[v],
                    nodeOffsetLeft = node.offsetLeft,
                    marginLeft = parseFloat(getComputedStyle(node)[‘marginLeft‘]),
                    spanPlaceWidth = node.offsetWidth + marginLeft;

                if(scrollLeft > nodeOffsetLeft) //从左往右移动
                    $tab.scrollLeft(nodeOffsetLeft - marginLeft - tabPaddingLeft);
                else if(scrollLeft + tabWidth < nodeOffsetLeft + spanPlaceWidth) //从右往左移动
                    $tab.scrollLeft(nodeOffsetLeft - tabWidth + spanPlaceWidth + tabPaddingLeft);

            ,
        ,
四、最后一个面板底部补白且兼容iphoneX
为了使最后一个面板能够被拉起来,那它的高度需要等于页面高度减去导航高度(此时只有导航没有头部数字部分),考虑到iphoneX底部小黑条的原因,故再需要加上34px
//自动撑开底部
autoFillFoot()
    const headHeight = document.getElementById(‘Tab‘).offsetHeight;//头部固定高度
    let pannel = document.getElementsByClassName(‘pannel‘);//滚动块
    const windowHeight = common.getWindowHeight(),
        lastPanelHeight = pannel[pannel.length - 1].clientHeight;
    let needPatchBottom = false;
    if (navigator.userAgent.match(/\\(i[^;]+;( U;)? CPU.+Mac OS X/))  //iPhone;iPad;iPad Pro;
        if ((screen.height === 812 && screen.width === 375 && window.devicePixelRatio === 3) || //X;XS;
            ((screen.height === 896 && screen.width === 414) && (window.devicePixelRatio === 2 || window.devicePixelRatio === 3 )))//2:XR;3:XS Max
            needPatchBottom = true;


    //safe-area-inset-bottom:34px;safe-area-inset-top:88px;
    if (lastPanelHeight < windowHeight)
        const paddingBottom = parseFloat(getComputedStyle(pannel[pannel.length-1])[‘padding-bottom‘]);
        pannel[pannel.length - 1].style.height = `$windowHeight - headHeight  - paddingBottom + (needPatchBottom ? 34 : 0)px`;

,
同样页面样式也需要兼容iphoneX
@media only screen and (device-width: 375px) and (device-height: 812px) and (-webkit-device-pixel-ratio: 3),/* X,XS */
    only screen and (device-width: 414px) and (device-height: 896px) and (-webkit-device-pixel-ratio: 2),/* XR */
    only screen and (device-width: 414px) and (device-height: 896px) and (-webkit-device-pixel-ratio: 3) /* XS Max */
        :root /* +-px是为了防止编译把100%变为1 */
            height: calc(100% - 1px + constant(safe-area-inset-bottom) + 1px);/* 兼容 ios < 11.2 */
            height: calc(100% - 1px + env(safe-area-inset-bottom) + 1px);/* 兼容 iOS >= 11.2 */
关于页面兼容iphone刘海、小黑条等可参考
https://www.cnblogs.com/lolDragon/p/7795174.html
https://objcer.com/2017/09/21/Understanding-the-WebView-Viewport-in-iOS-11-iPhone-X/
以上是关于H5页面导航跟随页面滚动而联动的主要内容,如果未能解决你的问题,请参考以下文章