CentOS7 一键部署LAMP环境
Posted
tags:
篇首语:本文由小常识网(cha138.com)小编为大家整理,主要介绍了CentOS7 一键部署LAMP环境相关的知识,希望对你有一定的参考价值。
一、准备工作:1)所需素材网盘链接:https://pan.baidu.com/s/17bQNJJ1-FwNzvtJI4rP5cw
提取码:m0hi
2)编写脚本,脚本内容如下:
[root@localhost ~]# vim lamp.sh
#!/bin/bash
#安装Apache
mount /dev/cdrom /mnt
cd /mnt
rpm -ivh apr-1.4.8-3.el7.x86_64.rpm
rpm -ivh apr-devel-1.4.8-3.el7.x86_64.rpm
rpm -ivh cyrus-sasl-devel-2.1.26-20.el7_2.x86_64.rpm
rpm -ivh expat-devel-2.1.0-8.el7.x86_64.rpm
rpm -ivh libdb-devel-5.3.21-19.el7.x86_64.rpm
rpm -ivh openldap-devel-2.4.40-13.el7.x86_64.rpm
rpm -ivh apr-util-1.5.2-6.el7.x86_64.rpm
rpm -ivh apr-util-devel-1.5.2-6.el7.x86_64.rpm
rpm -ivh pcre-devel-8.32-15.el7_2.1.x86_64.rpm
rpm -ivh pcre-8.32-15.el7_2.1.x86_64.rpm
tar zxf httpd-2.4.25.tar.gz -C /usr/src
cd /usr/src/httpd-2.4.25/
./configure --prefix=/usr/local/httpd --enable-so --enable-rewrite --enable-charset-lite --enable-cgi
make && make install
ln -s /usr/local/httpd/bin/* /usr/local/bin
cp /usr/local/httpd//bin/apachectl /etc/init.d/httpd
sed -i ‘1d‘ /etc/init.d/httpd
sed -i ‘1i #!/bin/bash‘ /etc/init.d/httpd
sed -i ‘1a # chkconfig: 35 85 21‘ /etc/init.d/httpd
chkconfig --add httpd
systemctl start httpd
#安装mysql数据库
cd /mnt
rpm -ivh ncurses-devel-5.9-13.20130511.el7.x86_64.rpm
tar zxf cmake-2.8.6.tar.gz -C /usr/src
cd /usr/src/cmake-2.8.6/
./configure && gmake && gmake install
groupadd mysql
useradd -M -s /sbin/nologin mysql -g mysql
cd /mnt
tar zxf mysql-5.6.36.tar.gz -C /usr/src
cd /usr/src/mysql-5.6.36/
 cmake  -DCMAKE_INSTALL_PREFIX=/usr/local/mysql  -DSYSCONFDIR=/etc/ -DDEFAULT_CHARSET=utf8  -DDEFAULT_COLLATION=utf8_general_ci  -DWITH_EXTRA_CHARSETS=all
make && make install
chown -R mysql:mysql /usr/local/mysql
rm -rf /etc/my.cnf
cp /usr/src/mysql-5.6.36/support-files/my-default.cnf /etc/my.cnf
/usr/local/mysql/scripts/mysql_install_db --user=mysql --basedir=/usr/local/mysql   --datadir=/usr/local/mysql/data/
echo "PATH=$PATH:/usr/local/mysql/bin" >> /etc/profile
. /etc/profile
cp /usr/src/mysql-5.6.36/support-files/mysql.server /usr/local/mysql/bin/mysqld.sh
chmod +x /usr/local/mysql/bin/mysqld.sh
cp /usr/local/mysql/bin/mysqld.sh /etc/init.d/mysqld
sed -i ‘1d‘ /etc/init.d/mysqld
sed -i ‘1i #!/bin/bash‘ /etc/init.d/mysqld
sed -i ‘1a # chkconfig: 2345 86 36‘ /etc/init.d/mysqld
chkconfig --add mysqld
systemctl start mysqld
mysqladmin -u root password ‘123456‘
systemctl restart mysqld
#安装php
cd /mnt
rpm -e php php-cli php-ldap php-common php-mysql --nodeps
rpm -ivh zlib-devel-1.2.7-17.el7.x86_64.rpm
rpm -ivh xz-devel-5.2.2-1.el7.x86_64.rpm
rpm -ivh libxml2-devel-2.9.1-6.el7_2.3.x86_64.rpm
tar zxf libmcrypt-2.5.8.tar.gz -C /usr/src
cd /usr/src/libmcrypt-2.5.8/
./configure && make && make install
ln -s /usr/local/lib/libmcrypt.* /usr/lib
cd /mnt
tar zxf mhash-0.9.9.9.tar.gz -C /usr/src
cd /usr/src/mhash-0.9.9.9/
./configure && make && make install
ln -s /usr/local/lib/libmhash* /usr/lib
cd /mnt
tar zxf mcrypt-2.6.8.tar.gz -C /usr/src
cd /usr/src/mcrypt-2.6.8/
export LD_LIBRARY_PATH=/usr/local/lib:$LD_LIBRARY_PATH
./configure && make && make install
cd /mnt
tar zxf php-5.5.38.tar.gz -C /usr/src
cd /usr/src/php-5.5.38/
./configure --prefix=/usr/local/php5 --with-mcrypt --with-apxs2=/usr/local/httpd/bin/apxs --with-mysql=/usr/local/mysql --with-mysqli=/usr/local/mysql/bin/mysql_config --with-config-file-path=/usr/local/php5 --enable-mbstring
make && make install
cp /usr/src/php-5.5.38/php.ini-development /usr/local/php5/php.ini
sed -i ‘680s/;default_charset = "UTF-8"/default_charset = "UTF-8"/g‘ /usr/local/php5/php.ini
sed -i ‘202s/Off/On/g‘ /usr/local/php5/php.ini
sed -i ‘873s/;extension=php_mysqli.dll/extension=php_mysqli.dll/g‘ /usr/local/php5/php.ini
cd /mnt
tar zxf zend-loader-php5.5-linux-x86_64_update1.tar.gz -C /usr/src
cd /usr/src/zend-loader-php5.5-linux-x86_64/
cp ZendGuardLoader.so /usr/local/php5/lib/php
sed -i ‘$a zned_extension=/usr/local/php5/lib/php/ZendGuardLoader.so‘ /usr/local/php5/php.ini
sed -i ‘$a zend_loader.enable=1‘ /usr/local/php5/php.ini
sed -i ‘259d‘ /usr/local/httpd/conf/httpd.conf
sed -i ‘258a DirectoryIndex index.html  index.php ‘ /usr/local/httpd/conf/httpd.conf
sed -i ‘259a AddType application/x-httpd-php .php ‘ /usr/local/httpd/conf/httpd.conf
systemctl restart httpd
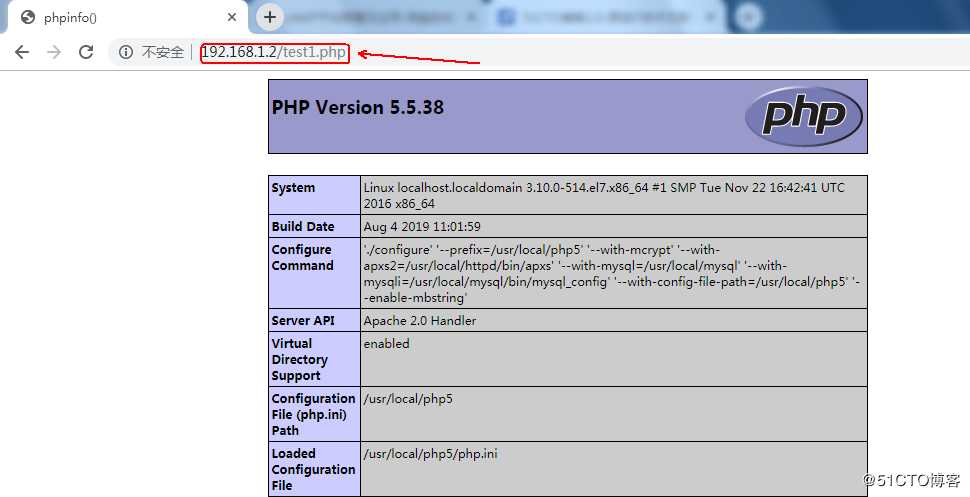
#测试PHP是否安装成功,编写测试文件,客户机并且测试
echo "<?php" >> /usr/local/httpd/htdocs/test1.php
echo "phpinfo();" >> /usr/local/httpd/htdocs/test1.php
echo "?>" >> /usr/local/httpd/htdocs/test1.php
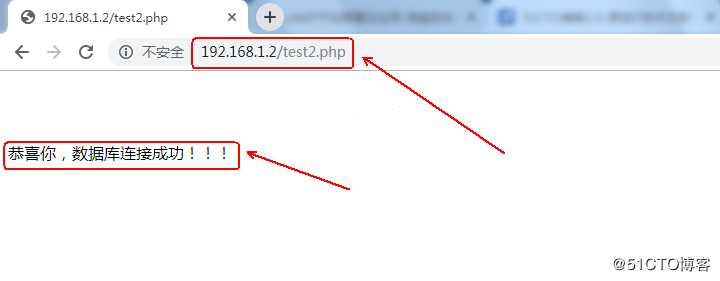
#测试能否访问MySQL数据库
echo "<?php" >> /usr/local/httpd/htdocs/test2.php
echo "\$link=mysqli_connect(‘localhost‘,‘root‘,‘123456‘);" >> /usr/local/httpd/htdocs/test2.php
echo "if(\$link) echo "恭喜你,数据库连接成功!!!";" >> /usr/local/httpd/htdocs/test2.php
echo "mysqli_close(\$link);  " >> /usr/local/httpd/htdocs/test2.php
echo "?>" >> /usr/local/httpd/htdocs/test2.php
#由于“$”是特殊符号,所以需要使用“\”转义符由于内容较多,脚本中并没有太多的注释信息,如果有什么不明白的可以参考博文:LAMP平台部署及应用
二、客户机测试访问


以上是关于CentOS7 一键部署LAMP环境的主要内容,如果未能解决你的问题,请参考以下文章