Mybatis-plus:入门
Posted wozibi
tags:
篇首语:本文由小常识网(cha138.com)小编为大家整理,主要介绍了Mybatis-plus:入门相关的知识,希望对你有一定的参考价值。
1. Mybatis-Plus简介
1.1. 什么是Mybatis-Plus
MyBatis-Plus(简称 MP)是一个 MyBatis 的增强工具,在 MyBatis 的基础上只做增强不做改变,为简化开发、提高效率而生。
1.2. 为什么要学习Mybatis-Plus
我们已经学习过Mybatis这个框架,我们只需要在dao层定义抽象接口,基于Mybatis零实现的特性,就可以实现对数据库的crud操作。
如下两个接口:
UserMapper接口
public interface UserMapper int deleteByPrimaryKey(Long id); int insert(User user); List<User> selectList(); User selectByPrimaryKey(Long id); |
OrderMapper接口
public interface OrderMapper int deleteByPrimaryKey(Long id); int insert(Order order); List<Order> selectList(); User selectByPrimaryKey(Long id); |
在上面两个业务接口中,我们发现:它们定义了一组类似的crud方法。
在业务类型比较多的时候,我们需要重复的定义这组功能类似的接口方法。
如何解决这个问题呢?
使用Mybatis-plus工具,我们只需要将我们定义的抽象接口,继承一个公用的BaseMapper<T>接口,就可以获得一组通用的crud方法,来操作数据库!!!
使用Mybatis-plus时,甚至都不需要任何的xml映射文件或者接口方法注解,真正的dao层零实现。
public interface OrderMapper extends BaseMapper<User> //BaseMapper已经实现了通用的curd的方法了。如果有需要非通用的操作,才在这里自定义 |
1.3. Mybatis-Plus小结
Mybatis-Plus只是在Mybatis的基础上,实现了功能增强,让开发更加简洁高效。
Mybatis-Plus并没有修改Mybatis的任何特性!!!
2. 入门示例
2.1. 需求
使用Mybatis-Plus实现对用户的crud操作。
2.2. 配置步骤说明
(1)搭建环境(创建项目、导入包)
(2)配置Mybaits-Plus(基于Spring实现)
(3)编写测试代码
2.3. 配置步骤
2.3.1. 第一部分:搭建环境
2.3.1.1. 前提
已经创建好了数据库环境:
CREATE TABLE `tb_user` ( `id` bigint(20) NOT NULL COMMENT ‘主键ID‘, `name` varchar(30) DEFAULT NULL COMMENT ‘姓名‘, `age` int(11) DEFAULT NULL COMMENT ‘年龄‘, `email` varchar(50) DEFAULT NULL COMMENT ‘邮箱‘, PRIMARY KEY (`id`) ) |
2.3.1.2. 说明
(1)Mybatis-Plus并没有提供单独的jar包,而是通过Maven(或者gradle)来管理jar依赖。本教程需要使用Maven构建项目。
(2)Mybatis-Plus是基于Spring框架实现的,因此使用Mybatis-Plus,必须导入Spring相关依赖。
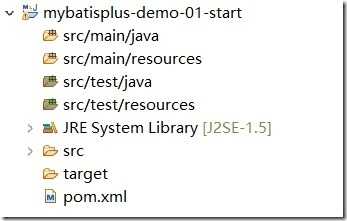
2.3.1.3. 第一步:创建一个Maven项目
因为我们只是测试MybatisPlus框架,所以创建一个jar项目就可以了
2.3.1.4. 第二步:配置pom.xml构建文件
--需要导入依赖,并且配置项目的编码,JDK版本等构建信息
<project xmlns="http://maven.apache.org/POM/4.0.0" xmlns:xsi="http://www.w3.org/2001/XMLSchema-instance" xsi:schemaLocation="http://maven.apache.org/POM/4.0.0 http://maven.apache.org/xsd/maven-4.0.0.xsd"> <modelVersion>4.0.0</modelVersion> <groupId>org.chu.mybatisplus</groupId> <artifactId>mybatisplus-demo-01-start</artifactId> <version>1.0</version> <!-- 依赖 --> <dependencies> <!-- spring依赖 --> <dependency> <groupId>org.springframework</groupId> <artifactId>spring-jdbc</artifactId> <version>4.3.24.RELEASE</version> </dependency> <dependency> <groupId>org.springframework</groupId> <artifactId>spring-context</artifactId> <version>4.3.24.RELEASE</version> </dependency> <!-- mybatis plus --> <dependency> <groupId>com.baomidou</groupId> <artifactId>mybatis-plus</artifactId> <version>2.3.3</version> </dependency> <!-- mysql driver --> <dependency> <groupId>mysql</groupId> <artifactId>mysql-connector-java</artifactId> <version>5.1.47</version> </dependency> <!-- druid连接池 --> <dependency> <groupId>com.alibaba</groupId> <artifactId>druid</artifactId> <version>1.1.10</version> </dependency> <!-- 测试包 --> <dependency> <groupId>junit</groupId> <artifactId>junit</artifactId> <version>4.12</version> <scope>test</scope> </dependency> <dependency> <groupId>org.springframework</groupId> <artifactId>spring-test</artifactId> <version>4.3.24.RELEASE</version> <scope>test</scope> </dependency> </dependencies> <!-- 只有配置了build标签里面的内容,配置后都需要强制更新项目 --> <build> <plugins> <plugin> <groupId>org.apache.maven.plugins</groupId> <artifactId>maven-compiler-plugin</artifactId> <version>3.8.1</version> <configuration> <!-- 设置编码 --> <encoding>UTF-8</encoding> <!-- JDK版本 --> <source>1.8</source> <target>1.8</target> </configuration> </plugin> <!-- 安装install命令的时候跳过单元测试 --> <plugin> <groupId>org.apache.maven.plugins</groupId> <artifactId>maven-surefire-plugin</artifactId> <version>2.22.2</version> <configuration> <skipTests>true</skipTests> </configuration> </plugin> </plugins> </build> </project> |
2.3.2. 第二部分:配置整合部分
整合MybatisPlus与Spring的配置。创建一个spirng-data.xml配置
<?xml version="1.0" encoding="UTF-8"?> <beans xmlns="http://www.springframework.org/schema/beans" xmlns:xsi="http://www.w3.org/2001/XMLSchema-instance" xmlns:context="http://www.springframework.org/schema/context" xmlns:tx="http://www.springframework.org/schema/tx" xsi:schemaLocation="http://www.springframework.org/schema/beans http://www.springframework.org/schema/beans/spring-beans.xsd http://www.springframework.org/schema/context http://www.springframework.org/schema/context/spring-context-4.3.xsd http://www.springframework.org/schema/tx http://www.springframework.org/schema/tx/spring-tx-4.3.xsd"> <!-- 配置注解扫描,如注解:@Respository,@Service,@controller等 --> <context:component-scan base-package="org.chu.mybatisplus"></context:component-scan> <!-- 第一步:配置数据源 --> <bean name="dataSource" class="com.alibaba.druid.pool.DruidDataSource"> <property name="driverClassName" value="com.mysql.jdbc.Driver"></property> <property name="url" value="jdbc:mysql://localhost:3306/mybatis-plus"></property> <property name="username" value="root"></property> <property name="password" value="123456"></property> <!-- 最大激活的连接数 --> <property name="maxActive" value="10"></property> <!-- 最大空闲连接数据 --> <!-- <property name="maxIdle" value="5"></property> --> <!-- 超时毫秒数 --> <property name="maxWait" value="30000"></property> </bean> <!-- 第二步:获得会话工厂 --> <bean name="sqlSessionFactory" class="com.baomidou.mybatisplus.spring.MybatisSqlSessionFactoryBean"> <!-- 指定数据源 --> <property name="dataSource" ref="dataSource"></property> </bean> <!-- 第三步:扫描动态映射对象到Spring容器,从mapper包中扫描出mapper接口,自动创建代理对象并且在spring容器中注册 --> <bean class="org.mybatis.spring.mapper.MapperScannerConfigurer"> <!-- 指定会话工厂 --> <property name="sqlSessionFactoryBeanName" value="sqlSessionFactory"></property> <!-- 指定扫描的映射包 --> <property name="basePackage" value="org.chu.mybatisplus.mapper"></property> </bean> <!-- 第四步:配置事务代理 --> <bean name="tx" class="org.springframework.jdbc.datasource.DataSourceTransactionManager"> <property name="dataSource" ref="dataSource"></property> </bean> <tx:annotation-driven transaction-manager="tx"/> </beans> |
2.3.3. 第三部分:实现操作功能
说明:完成实验MybatisPlus对数据库增删改查。
2.3.3.1. 第一步:编写POJO
说明:使用Mybatis-Plus不使用xml文件,而是基于一组注解来解决实体类和数据库表的映射问题。
@TableName(value="tb_user") | 指定对应的表,表名和类名一致时,可以省略value属性。 |
@TableId | 指定表的主键。Value属性指定表的主键字段,和属性名一致时,可以省略。Type指定主键的增长策略。 |
@TableField | 指定类的属性映射的表字段,名称一致时可以省略该注解。 |
package org.chu.mybatisplus.pojo; import com.baomidou.mybatisplus.annotations.TableField; import com.baomidou.mybatisplus.annotations.TableId; import com.baomidou.mybatisplus.annotations.TableName; import com.baomidou.mybatisplus.enums.IdType; @TableName(value="tb_user") public class User /*-- AUTO->`0`("数据库ID自增") INPUT->`1`(用户输入ID") ID_WORKER->`2`("全局唯一ID") UUID->`3`("全局唯一ID") NONE-> 4 ("不需要ID") --*/ @TableId(value="id",type=IdType.AUTO) private Long id;//BIGINT(20) NOT NULL AUTO_INCREMENT COMMENT ‘主键ID‘, //如果属性名与数据库表的字段名相同可以不写 @TableField(value="name") private String name;//VARCHAR(30) NULL DEFAULT NULL COMMENT ‘姓名‘, @TableField(value="age") private Integer age;//INT(11) NULL DEFAULT NULL COMMENT ‘年龄‘, @TableField(value="email") private String email;//VARCHAR(50) NULL DEFAULT NULL COMMENT ‘邮箱‘, //补全get/set方法 |
2.3.3.2. 第二步:编写Mapper接口
package org.chu.mybatisplus.mapper; import org.chu.mybatisplus.pojo.User; import com.baomidou.mybatisplus.mapper.BaseMapper; public interface UserMapper extends BaseMapper<User> |
2.3.3.3. 第三步:测试增删改查
package org.chu.test.mapper; import java.util.List; import org.chu.mybatisplus.mapper.UserMapper; import org.chu.mybatisplus.pojo.User; import org.junit.Test; import org.junit.runner.RunWith; import org.springframework.beans.factory.annotation.Autowired; import org.springframework.test.context.ContextConfiguration; import org.springframework.test.context.junit4.SpringJUnit4ClassRunner; import com.baomidou.mybatisplus.mapper.EntityWrapper; import com.baomidou.mybatisplus.mapper.Wrapper; //注意事项:Maven的单元测试包必须放置测试源码包里面 @RunWith(SpringJUnit4ClassRunner.class) @ContextConfiguration(locations="classpath:spring-data.xml") public class UserMapperTest @Autowired private UserMapper userMapper; @Test public void insert() try User user=new User(); user.setName("wangwu"); user.setAge(20); user.setEmail("wangwu@163.com"); Integer insert = userMapper.insert(user); System.out.println(insert); catch (Exception e) // TODO Auto-generated catch block e.printStackTrace(); @Test public void deleteById() try Integer count = userMapper.deleteById(1L); System.out.println(count); catch (Exception e) // TODO Auto-generated catch block e.printStackTrace(); @Test public void deleteByCondition() try //设置条件 EntityWrapper<User> wrapper = new EntityWrapper<>(); //相当于where age=11 or age=12 // wrapper.where("age=0 or age=1",11,12); //相当于where age=13 and email like ‘%3@163.com%‘ //value中无需前后% wrapper.where("age=13").like("email", "3@163.com"); Integer num = userMapper.delete(wrapper); System.out.println(num); catch (Exception e) e.printStackTrace(); @Test public void update() User user=new User(); user.setName("wangwu"); user.setEmail("wangwu@163.com"); user.setId(2L); userMapper.updateById(user); @Test public void findAll() List<User> users = userMapper.selectList(null); for (User user : users) System.out.println(user.getName()); |
2.3.4. 第四部分:实现Service层
2.3.4.1. 第一步:编写UserService接口
service接口继承IService<T>接口
//继承IService接口就可以不用写常见的方法 public interface UserService extends IService<User> |
2.3.4.2. 第二步:编写UserServiceImpl实现类
@Service public class UserServiceImpl extends ServiceImpl<UserMapper, User> implements UserService |
2.3.4.3. 第三步:测试
@RunWith(SpringJUnit4ClassRunner.class) @ContextConfiguration("classpath:spring-data.xml") public class UserServiceTest @Autowired private UserService userService; @Test public void Insert() throws Exception User user = new User(); user.setName("lisi"); user.setAge(12); user.setEmail("12312@1231.com"); boolean insert = userService.insert(user); System.out.println(insert); |
3. 常用配置
3.1. 实体类全局配置
如果在配置文件指定实体类的全局配置,那么可以不需要再配置实体类的关联注解。
--配置文件spring-data.xml的修改
<!-- 第二步:获得会话工厂 --> <bean name="sqlSessionFactory" class="com.baomidou.mybatisplus.spring.MybatisSqlSessionFactoryBean"> <!-- 指定数据源 --> <property name="dataSource" ref="dataSource"></property> <!-- 全局实体类配置 --> <property name="globalConfig" > <bean class="com.baomidou.mybatisplus.entity.GlobalConfiguration"> <!-- AUTO->`0`("数据库ID自增") INPUT->`1`(用户输入ID") ID_WORKER->`2`("全局唯一ID") UUID->`3`("全局唯一ID") --> <property name="idType" value="0"></property> <!-- 实体类名与表名的关联规则是,忽略前缀 --> <property name="tablePrefix" value="tb_"></property> </bean> </property> </bean> |
--实体类就可以去掉关联的注解了
package org.chu.mybatisplus.pojo; public class User private Long id; private String name; private Integer age; private String email; //补全get、set方法 |
3.2. 插件配置
Mybatis默认情况下,是不支持物理分页的。默认提供的RowBounds这个分页是逻辑分页来的。
所谓的逻辑分页,就是将数据库里面的数据全部查询出来后,在根据设置的参数返回对应的记录。(分页是在程序的内存中完成)。【表数据过多时,会溢出】
所谓的物理分页,就是根据条件限制,返回指定的记录。(分页在数据库里面已经完成)
MybatisPlus是默认使用RowBounds对象是支持物理分页的。但是需要通过配置Mybatis插件来开启。
配置代码
<!-- 第二步:获得会话工厂 --> <bean name="sqlSessionFactory" class="com.baomidou.mybatisplus.spring.MybatisSqlSessionFactoryBean"> <!-- 指定数据源 --> <property name="dataSource" ref="dataSource"></property> <!-- 全局实体类配置 --> <property name="globalConfig" > <bean class="com.baomidou.mybatisplus.entity.GlobalConfiguration"> <!-- AUTO->`0`("数据库ID自增") INPUT->`1`(用户输入ID") ID_WORKER->`2`("全局唯一ID") UUID->`3`("全局唯一ID") --> <property name="idType" value="0"></property> <!-- 实体类名与表名的关联规则是,忽略前缀 --> <property name="tablePrefix" value="tb_"></property> </bean> </property> <!-- 配置插件 --> <property name="plugins"> <list> <!-- 分页的支持 --> <bean class="com.baomidou.mybatisplus.plugins.PaginationInterceptor"> <!-- 方言 --> <!-- 我们使用的是MySQL数据库,所以需要配置MySQL的方言 --> <property name="dialectClazz" value="com.baomidou.mybatisplus.plugins.pagination.dialects.MySqlDialect"></property> </bean> <!-- 配置支持SQL输出 --> <!-- 性能分析拦截器,用于输出每条 SQL 语句及其执行时间 --> <bean class="com.baomidou.mybatisplus.plugins.PerformanceInterceptor"> <property name="format" value="true"></property> </bean> </list> </property> </bean> |
3.3. 自定义SQL语句支持
--实现代码
package org.chu.mybatisplus.mapper; import java.util.List; import org.apache.ibatis.annotations.Select; import org.chu.mybatisplus.pojo.User; import com.baomidou.mybatisplus.mapper.BaseMapper; public interface UserMapper extends BaseMapper<User> @Select(value="select * from tb_user") List<User> findAll(); |
--测试代码
package org.chu.test.mapper; import java.util.List; import org.chu.mybatisplus.mapper.UserMapper; import org.chu.mybatisplus.pojo.User; import org.junit.Test; import org.junit.runner.RunWith; import org.springframework.beans.factory.annotation.Autowired; import org.springframework.test.context.ContextConfiguration; import org.springframework.test.context.junit4.SpringJUnit4ClassRunner; //注意事项:Maven的单元测试包必须放置测试源码包里面 @RunWith(SpringJUnit4ClassRunner.class) @ContextConfiguration(locations="classpath:spring-data.xml") public class UserMapperTest @Autowired private UserMapper userMapper; @Test public void findAll() try List<User> users = userMapper.findAll(); for (User user : users) System.out.println(user.getName()); catch (Exception e) e.printStackTrace(); |
以上是关于Mybatis-plus:入门的主要内容,如果未能解决你的问题,请参考以下文章
