从零开始搭建vue项目
Posted vikki7
tags:
篇首语:本文由小常识网(cha138.com)小编为大家整理,主要介绍了从零开始搭建vue项目相关的知识,希望对你有一定的参考价值。
一、使用vue-cli搭建项目
$ npm install -g vue-cli
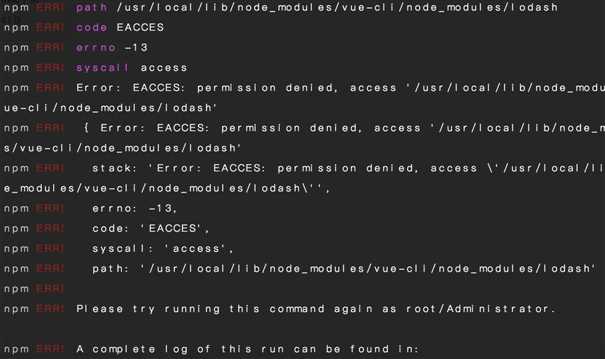
注意:在mac执行该命令会报错

改用管理员权限执行以下命令即可
$ sudo npm install -g vue-cli
$ vue init webpack tcloud
$ cd tcloud
$ npm run dev
完成了利用脚手架创建并启动一个vue的项目,可访问http://localhost:8080 看到下图界面说明项目启动成功。

二、引入vuex并实现数据持久化
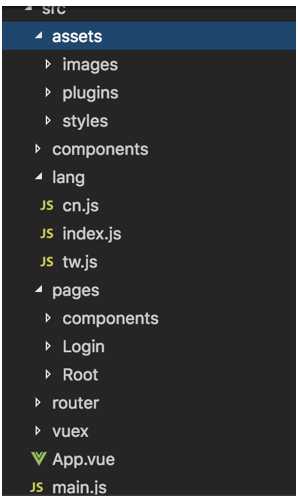
1.首先对目录结构调整后如下:

- assets 前端静态资源 包括图片、样式、和js插件
- components 可复用的组件
- lang 国际化/多语言环境配置文件 cn.js 业务相关文本翻译-简体 tw.js 业务相关文本翻译-繁体
- pages 业务组件
- router 路由配置文件
- vuex store相关配置
- App.vue 根组件
- main.js 入口文件
2.安装vuex
$ npm install vuex --save
3.创建store文件
import Vue from ‘vue‘
import Vuex from ‘vuex‘
Vue.use(Vuex)
const state =
  test: 1,
  lang: ‘cn‘

const mutations =
  add: (state, data) =>
    state.selectGoods.push(data)
    state.test++


const actions =
  addTest: ( commit , data) =>
    commit(‘add‘, data)


export default new Vuex.Store(
  state,
  mutations,
  actions
)
4.在入口文件main.js中引入store
import store from ‘./store/store‘

// 并挂载到根实例中
new Vue(
  el: ‘#app‘,
  store,
  router,
  components:  App ,
  template: ‘<App/>‘
)
5.vuex-persistedstate实现数据持久化
vuex可以进行全局的状态管理,但刷新后刷新后数据会消失
- 安装
$ npm install vuex-persistedstate --save
- 在store.js中引入及配置
import createPersistedState from "vuex-persistedstate"
const store = new Vuex.Store(
  // ...
  plugins: [createPersistedState(
      storage: window.sessionStorage, // 不设置默认存储到localStorage
      reducer(val)
          return
          // 指定需要持久化的state
          lang: val.lang


  )]
- 生效后在浏览器Storage中展示效果

三、实现多语言环境-简繁体转换
1.安装vue-i18n
$ npm install vue-i18n --save
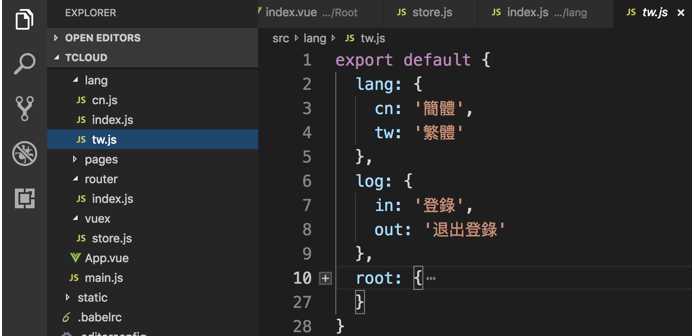
2.准备业务相关文本的翻译文件


3.创建VueI18n 实例

代码如下
import Vue from ‘vue‘
import VueI18n from ‘vue-i18n‘
import cnlocale from ‘./cn‘
import twlocale from ‘./tw‘
import store from ‘@/vuex/store‘
Vue.use(VueI18n)
const i18n = new VueI18n(
  locale: store.state.lang || ‘cn‘,
  messages:
    cn:  ...cnlocale ,
    tw:  ...twlocale

)
export default i18n
4.在main.js中引入vue-i18n
import i18n from ‘./lang/index‘
// 把 i18n 挂载到 vue 根实例上
new Vue(
  el: ‘#app‘,
  i18n,
  axios,
  store,
  router,
  components:  App ,
  template: ‘<App/>‘
)
5.引用
// 在html模板中引用
<van-button @click="logout" type="default">$t(‘log.out‘)</van-button>
// 在 js 模板中使用
this.$t(‘log.in‘)
6.解决切换语言后刷新界面时出现一瞬间白屏的问题
利用在app.vue的<router-view></router-view>加上v-if属性和provide/inject,具体代码实现如下:
// App.vue文件
<template>
  <div id="app">
    <router-view v-if="isAlive" />
  </div>
</template>

<script>
export default
  name: ‘App‘,
  provide ()
    return
      reload: this.reload

  ,
  data ()
    return
      isAlive: true

  ,
  methods:
    reload ()
      this.isAlive = false
      this.$nextTick(function ()
        this.isAlive = true
      )


</script>
接下来在需要刷新的组件中注入reload函数
<template>
    <button @click="refresh"></button>
</template>
<script>
    export default
        name: ‘refresh‘,
        inject: [‘reload‘],
        methods:
              refresh ()
                  this.reload()


</script>
四、实现登录拦截
1.路由拦截
首先在定义路由的时候就需要多添加一个自定义字段requireAuth,用于判断该路由的访问是否需要登录。如果用户已经登录(token存在),则顺利进入路由, 否则就进入登录页面。
const routes = [

        path: ‘/‘,
        name: ‘/‘,
        component: Index
    ,

        path: ‘/repository‘,
        name: ‘repository‘,
        meta:
            requireAuth: true,  // 添加该字段,表示进入这个路由是需要登录的
        ,
        component: Repository
    ,

        path: ‘/login‘,
        name: ‘login‘,
        component: Login

];
定义完路由后,我们主要是利用vue-router提供的钩子函数beforeEach()对路由进行判断
router.beforeEach((to, from, next) =>
    if (to.meta.requireAuth)   // 判断该路由是否需要登录权限
        if (store.state.token)   // 通过vuex state获取当前的token是否存在
            next();

        else
            next(
                path: ‘/login‘,
                query: redirect: to.fullPath  // 将跳转的路由path作为参数,登录成功后跳转到该路由
            )


    else
        next();

)
每个钩子方法接收三个参数:
- to: Route: 即将要进入的目标 路由对象
- from: Route: 当前导航正要离开的路由
- next: Function: 一定要调用该方法来 resolve 这个钩子。执行效果依赖 next 方法的调用参数。
- next(): 进行管道中的下一个钩子。如果全部钩子执行完了,则导航的状态就是 confirmed (确认的)。
- next(false): 中断当前的导航。如果浏览器的 URL 改变了(可能是用户手动或者浏览器后退按钮),那么 URL 地址会重置到 from 路由对应的地址。
- next(‘/‘) 或者 next( path: ‘/‘ ): 跳转到一个不同的地址。当前的导航被中断,然后进行一个新的导航
2.axios拦截器
当前token失效了,但是token依然保存在本地,这时候你去访问需要登录权限的路由时,实际上应该让用户重新登录。 这时候就需要结合 http 拦截器 + 后端接口返回的http 状态码来判断
// http request 拦截器
axios.interceptors.request.use(
    config =>
        if (store.state.token)   // 判断是否存在token,如果存在的话,则每个http header都加上token
            config.headers.Authorization = `token $store.state.token`;

        return config;
    ,
    err =>
        return Promise.reject(err);
    );

// http response 拦截器
axios.interceptors.response.use(
    response =>
        return response;
    ,
    error =>
        if (error.response)
            switch (error.response.status)
                case 401:
                    // 返回 401 清除token信息并跳转到登录页面
                    store.commit(types.LOGOUT);
                        path: ‘login‘,
                        query: redirect: router.currentRoute.fullPath
                    )


        return Promise.reject(error.response.data)   // 返回接口返回的错误信息
    );
以上是关于从零开始搭建vue项目的主要内容,如果未能解决你的问题,请参考以下文章