ElasticSearch partial update+mget+bulk
Posted transkai
tags:
篇首语:本文由小常识网(cha138.com)小编为大家整理,主要介绍了ElasticSearch partial update+mget+bulk相关的知识,希望对你有一定的参考价值。
一.partial update
1、什么是partial update?
PUT /index/type/id,创建文档&替换文档,就是一样的语法
一般对应到应用程序中,每次的执行流程基本是这样的:
(1)应用程序先发起一个get请求,获取到document,展示到前台界面,供用户查看和修改
(2)用户在前台界面修改数据,发送到后台
(3)后台代码,会将用户修改的数据在内存中进行执行,然后封装好修改后的全量数据
(4)然后发送PUT请求,到es中,进行全量替换
(5)es将老的document标记为deleted,然后重新创建一个新的document
partial update
post /index/type/id/_update
"doc":
"要修改的少数几个field即可,不需要全量的数据"
看起来,好像就比较方便了,每次就传递少数几个发生修改的field即可,不需要将全量的document数据发送过去
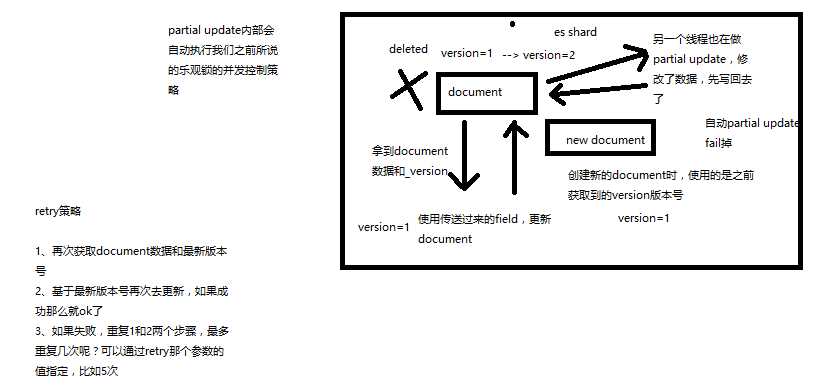
2、图解partial update实现原理以及其优点
partial update,看起来很方便的操作,实际内部的原理是什么样子的,然后它的优点是什么

3、上机动手实战演练partial update
PUT /test_index/test_type/10
"test_field1": "test1",
"test_field2": "test2"
POST /test_index/test_type/10/_update
"doc":
"test_field2": "updated test2"
二.mget
1、批量查询的好处
就是一条一条的查询,比如说要查询100条数据,那么就要发送100次网络请求,这个开销还是很大的
如果进行批量查询的话,查询100条数据,就只要发送1次网络请求,网络请求的性能开销缩减100倍
2、mget的语法
(1)一条一条的查询
GET /test_index/test_type/1
GET /test_index/test_type/2
(2)mget批量查询
GET /_mget
"docs" : [
"_index" : "test_index",
"_type" : "test_type",
"_id" : 1
,
"_index" : "test_index",
"_type" : "test_type",
"_id" : 2
]
"docs": [
"_index": "test_index",
"_type": "test_type",
"_id": "1",
"_version": 2,
"found": true,
"_source":
"test_field1": "test field1",
"test_field2": "test field2"
,
"_index": "test_index",
"_type": "test_type",
"_id": "2",
"_version": 1,
"found": true,
"_source":
"test_content": "my test"
]
(3)如果查询的document是一个index下的不同type种的话
GET /test_index/_mget
"docs" : [
"_type" : "test_type",
"_id" : 1
,
"_type" : "test_type",
"_id" : 2
]
(4)如果查询的数据都在同一个index下的同一个type下,最简单了
GET /test_index/test_type/_mget
"ids": [1, 2]
3、mget的重要性
可以说mget是很重要的,一般来说,在进行查询的时候,如果一次性要查询多条数据的话,那么一定要用batch批量操作的api
尽可能减少网络开销次数,可能可以将性能提升数倍,甚至数十倍,非常非常之重要
三.bulk
1、bulk语法
POST /_bulk
"delete": "_index": "test_index", "_type": "test_type", "_id": "3"
"create": "_index": "test_index", "_type": "test_type", "_id": "12"
"test_field": "test12"
"index": "_index": "test_index", "_type": "test_type", "_id": "2"
"test_field": "replaced test2"
"update": "_index": "test_index", "_type": "test_type", "_id": "1", "_retry_on_conflict" : 3
"doc" : "test_field2" : "bulk test1"
每一个操作要两个json串,语法如下:
"action": "metadata"
"data"
举例,比如你现在要创建一个文档,放bulk里面,看起来会是这样子的:
"index": "_index": "test_index", "_type", "test_type", "_id": "1"
"test_field1": "test1", "test_field2": "test2"
有哪些类型的操作可以执行呢?
(1)delete:删除一个文档,只要1个json串就可以了
(2)create:PUT /index/type/id/_create,强制创建
(3)index:普通的put操作,可以是创建文档,也可以是全量替换文档
(4)update:执行的partial update操作
bulk api对json的语法,有严格的要求,每个json串不能换行,只能放一行,同时一个json串和一个json串之间,必须有一个换行
"error":
"root_cause": [
"type": "json_e_o_f_exception",
"reason": "Unexpected end-of-input: expected close marker for Object (start marker at [Source: org.elasticsearch.transport.netty4.ByteBufStreamInput@5a5932cd; line: 1, column: 1])\\n at [Source: org.elasticsearch.transport.netty4.ByteBufStreamInput@5a5932cd; line: 1, column: 3]"
],
"type": "json_e_o_f_exception",
"reason": "Unexpected end-of-input: expected close marker for Object (start marker at [Source: org.elasticsearch.transport.netty4.ByteBufStreamInput@5a5932cd; line: 1, column: 1])\\n at [Source: org.elasticsearch.transport.netty4.ByteBufStreamInput@5a5932cd; line: 1, column: 3]"
,
"status": 500
"took": 41,
"errors": true,
"items": [
"delete":
"found": true,
"_index": "test_index",
"_type": "test_type",
"_id": "10",
"_version": 3,
"result": "deleted",
"_shards":
"total": 2,
"successful": 1,
"failed": 0
,
"status": 200
,
"create":
"_index": "test_index",
"_type": "test_type",
"_id": "3",
"_version": 1,
"result": "created",
"_shards":
"total": 2,
"successful": 1,
"failed": 0
,
"created": true,
"status": 201
,
"create":
"_index": "test_index",
"_type": "test_type",
"_id": "2",
"status": 409,
"error":
"type": "version_conflict_engine_exception",
"reason": "[test_type][2]: version conflict, document already exists (current version [1])",
"index_uuid": "6m0G7yx7R1KECWWGnfH1sw",
"shard": "2",
"index": "test_index"
,
"index":
"_index": "test_index",
"_type": "test_type",
"_id": "4",
"_version": 1,
"result": "created",
"_shards":
"total": 2,
"successful": 1,
"failed": 0
,
"created": true,
"status": 201
,
"index":
"_index": "test_index",
"_type": "test_type",
"_id": "2",
"_version": 2,
"result": "updated",
"_shards":
"total": 2,
"successful": 1,
"failed": 0
,
"created": false,
"status": 200
,
"update":
"_index": "test_index",
"_type": "test_type",
"_id": "1",
"_version": 3,
"result": "updated",
"_shards":
"total": 2,
"successful": 1,
"failed": 0
,
"status": 200
]
bulk操作中,任意一个操作失败,是不会影响其他的操作的,但是在返回结果里,会告诉你异常日志
POST /test_index/_bulk
"delete": "_type": "test_type", "_id": "3"
"create": "_type": "test_type", "_id": "12"
"test_field": "test12"
"index": "_type": "test_type"
"test_field": "auto-generate id test"
"index": "_type": "test_type", "_id": "2"
"test_field": "replaced test2"
"update": "_type": "test_type", "_id": "1", "_retry_on_conflict" : 3
"doc" : "test_field2" : "bulk test1"
POST /test_index/test_type/_bulk
"delete": "_id": "3"
"create": "_id": "12"
"test_field": "test12"
"index":
"test_field": "auto-generate id test"
"index": "_id": "2"
"test_field": "replaced test2"
"update": "_id": "1", "_retry_on_conflict" : 3
"doc" : "test_field2" : "bulk test1"
2、bulk size最佳大小
bulk request会加载到内存里,如果太大的话,性能反而会下降,因此需要反复尝试一个最佳的bulk size。一般从1000~5000条数据开始,尝试逐渐增加。另外,如果看大小的话,最好是在5~15MB之间。
以上是关于ElasticSearch partial update+mget+bulk的主要内容,如果未能解决你的问题,请参考以下文章