spring全注解项目
Posted
tags:
篇首语:本文由小常识网(cha138.com)小编为大家整理,主要介绍了spring全注解项目相关的知识,希望对你有一定的参考价值。
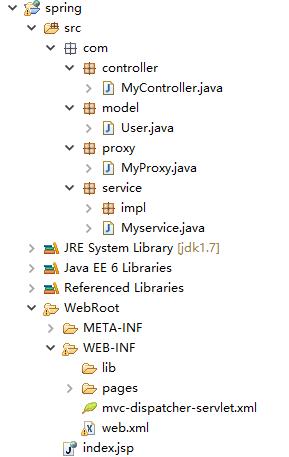
项目结构如下:
spring配置
<?xml version="1.0" encoding="UTF-8"?>
<beans xmlns="http://www.springframework.org/schema/beans"
    xmlns:xsi="http://www.w3.org/2001/XMLSchema-instance"
    xmlns:context="http://www.springframework.org/schema/context"
    xmlns:mvc="http://www.springframework.org/schema/mvc"  xmlns:p="http://www.springframework.org/schema/p"  xsi:schemaLocation="http://www.springframework.org/schema/beans  http://www.springframework.org/schema/beans/spring-beans.xsd  http://www.springframework.org/schema/mvc  http://www.springframework.org/schema/mvc/spring-mvc.xsd  http://www.springframework.org/schema/context http://www.springframework.org/schema/context/spring-context.xsd"  >

  <context:component-scan base-package="com.*" /><!-- 最好建一个父包,以便于扫描 -->
	<bean class="org.springframework.web.servlet.view.InternalResourceViewResolver">
		<property name="prefix"><value>/WEB-INF/pages/</value></property>
		<property name="suffix"><value>.jsp</value></property>
	</bean>
</beans>
web.xml配置
<web-app>

    <display-name>Spring MVC Application</display-name>

    <servlet>
        <servlet-name>mvc-dispatcher</servlet-name>
        <servlet-class>org.springframework.web.servlet.DispatcherServlet</servlet-class>
        <load-on-startup>1</load-on-startup>
    </servlet>

    <servlet-mapping>
        <servlet-name>mvc-dispatcher</servlet-name>
        <url-pattern>/</url-pattern>
    </servlet-mapping>

    <context-param>
        <param-name>contextConfigLocation</param-name>
        <param-value>classpath*:mvc-dispatcher-servlet.xml</param-value>
    </context-param>

    <listener>
        <listener-class>org.springframework.web.context.ContextLoaderListener</listener-class>
    </listener>

</web-app>
spring里面有个类是读取properties文件的(这个和本工程无关,提一下)
<bean class="org.springframework.beans.factory.config.PropertyPlaceholderConfigurer">
		<property name="locations">
			<list>
				<value>classpath:config.properties</value>
			</list>
		</property>
	</bean>
page下的hello.jsp:
<%@ page language="java" import="java.util.*" pageEncoding="utf-8"%>
<%
String path = request.getContextPath();
String basePath = request.getScheme()+"://"+request.getServerName()+":"+request.getServerPort()+path+"/";
%>

<!DOCTYPE html PUBLIC "-//W3C//DTD HTML 4.01 Transitional//EN">
<html>
  <head>
    <base href="<%=basePath%>">

    <title>My JSP \'index.jsp\' starting page</title>
	<meta http-equiv="pragma" content="no-cache">
	<meta http-equiv="cache-control" content="no-cache">
	<meta http-equiv="expires" content="0">
	<meta http-equiv="keywords" content="keyword1,keyword2,keyword3">
	<meta http-equiv="description" content="This is my page">
	<!--
	<link rel="stylesheet" type="text/css" href="styles.css">
	-->
  </head>

  <body>
    This is my JSP page. <br>
      本次调用方法是<b>${message }</b>
  </body>
</html>
controller类:
package com.controller;

import javax.servlet.http.HttpServletRequest;
import javax.servlet.http.HttpServletResponse;

import org.springframework.beans.factory.annotation.Autowired;
import org.springframework.stereotype.Controller;
import org.springframework.web.bind.annotation.RequestMapping;
import org.springframework.web.servlet.ModelAndView;

import com.service.Myservice;

@Controller
@RequestMapping("/spring")
public class MyController{
	@Autowired
	private Myservice my;
	@RequestMapping("/add")
	public ModelAndView add(HttpServletRequest request,
            HttpServletResponse response) {
        System.out.println("----add----");

        String xx=request.getParameter("name");
        System.out.println(xx);
        String name="123";
        my.add(name);
        return new ModelAndView("/hello", "message", "add");
    }
	@RequestMapping("/del")
	public ModelAndView del(HttpServletRequest request,
            HttpServletResponse response) {
        System.out.println("----del----");
        return new ModelAndView("/hello", "message", "del");
    }
}
User类:
package com.model;

import org.springframework.context.annotation.Scope;
import org.springframework.stereotype.Component;

@Component
@Scope("prototype") //设置成多例
public class User {
	private int id=20;
	private String name="liming";
	public int getId() {
		return id;
	}
	public void setId(int id) {
		this.id = id;
	}
	public String getName() {
		return name;
	}
	public void setName(String name) {
		this.name = name;
	}
}
proxy类:
package com.proxy;

import org.springframework.stereotype.Component;

@Component
public class MyProxy {
	public void add(){
		System.out.println("MyProxy");
	}

}
service接口:
package com.service;

public interface Myservice {
	public void add(String name);

}
service实现类:
package com.service.impl;

import com.model.User;

import org.springframework.beans.factory.annotation.Autowired;
import org.springframework.stereotype.Service;

import com.proxy.MyProxy;

import com.service.Myservice;

@Service
public class MyServiceImpl implements Myservice{
	@Autowired
	private MyProxy myProxy;
	@Autowired
	private User user;

	@Override
	public void add(String name) {
		System.out.println("这是serviceImpl:"+name);
		System.out.println(user.getName()+"今年"+user.getId()+"岁了");
		myProxy.add();
	}

}
用tomcat运行后,输入http://localhost:8080/spring/spring/add?name="xx"
控制台结果为:
----add----
"xx"
这是serviceImpl:123
liming今年20岁了
MyProxy
并且页面上显示
This is my JSP page.
本次调用方法是add
用到的基本包

以上是关于spring全注解项目的主要内容,如果未能解决你的问题,请参考以下文章
还怕不记得Spring Boot注解吗?5类注解全在这里了(建议收藏)
SSM(StringMvc+Spring+MyBatis)全注解整合