Spring----内bean和集合属性注入和properties属性注入
Posted xjs1874704478
tags:
篇首语:本文由小常识网(cha138.com)小编为大家整理,主要介绍了Spring----内bean和集合属性注入和properties属性注入相关的知识,希望对你有一定的参考价值。
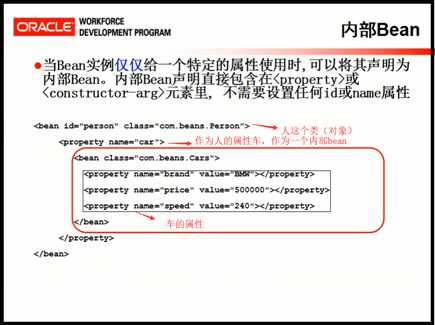
内部bean
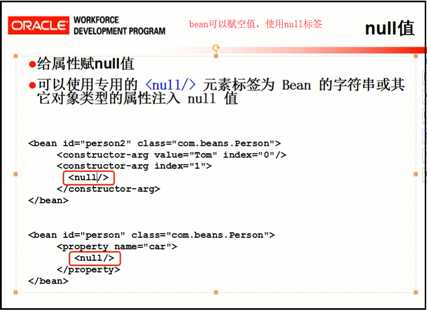
bean里的属性可以赋空值
先初始化三个Car的bean
    <!-- 定义若干辆车 -->
    <bean id="car1" class="com.entity.Car">
        <property name="brand" value="宝马"/>
        <property name="color" value="白色"/>
    </bean>
    <bean id="car2" class="com.entity.Car">
        <property name="brand" value="奔驰"/>
        <property name="color" value="黑色"/>
    </bean>
    <bean id="car3" class="com.entity.Car">
        <property name="brand" value="路虎"/>
        <property name="color" value="卡其色"/>
    </bean>
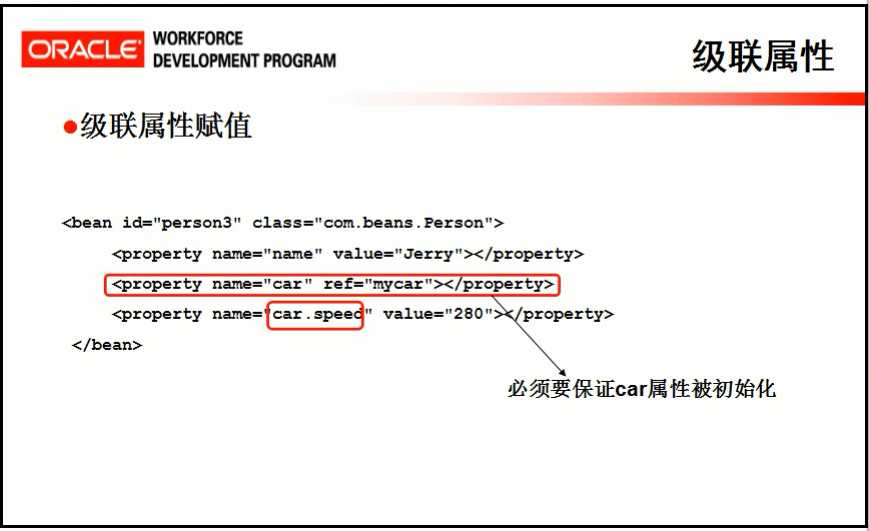
级联属性
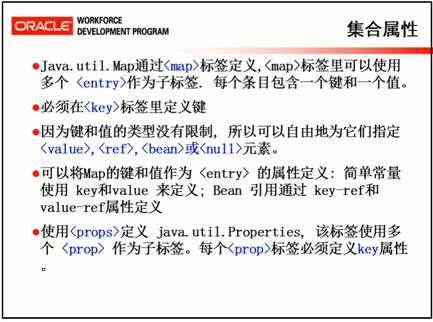
集合属性
数组
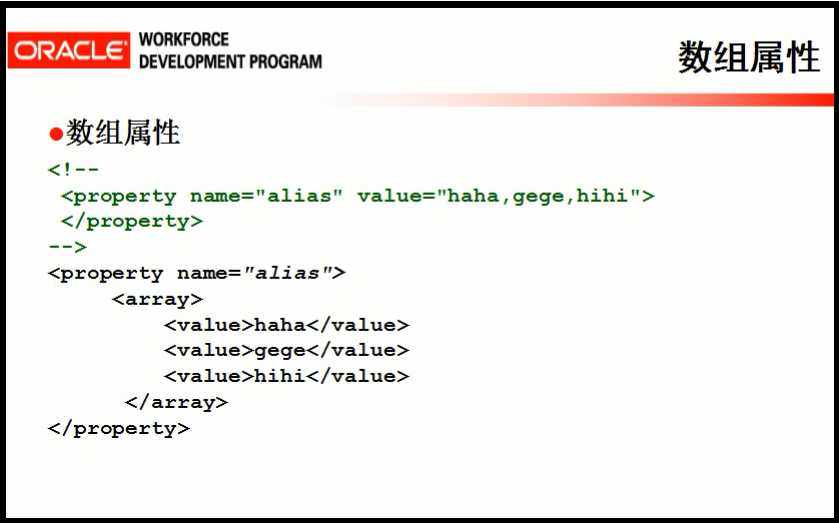
<array>标签中 不应该是<value>,而是<ref bean="xxx"/>
        <property name="cars">
            <!-- 注入数组类型的属性 -->
            <!-- <array>
                <ref bean="car1"/>
                <ref bean="car2"/>
                <ref bean="car3"/>
            </array> -->
        </property>
list类型
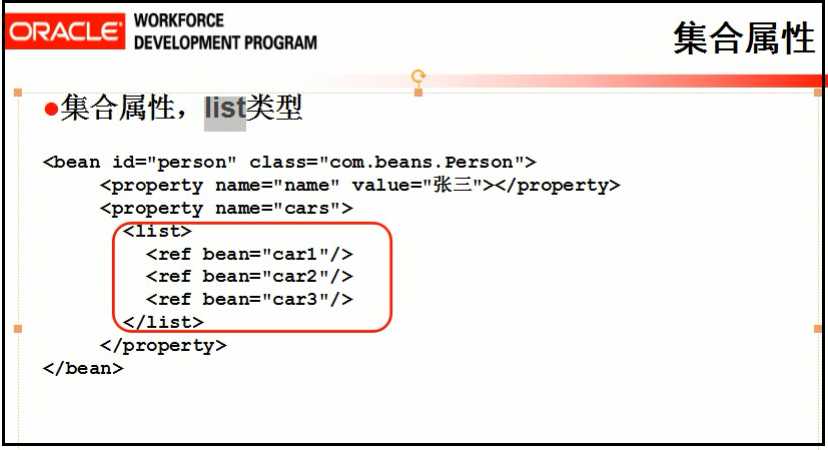
        <property name="cars">
            <!-- 注入List集合类型的属性 -->
            <list>
                <ref bean="car1"/>
                <ref bean="car2"/>
                <ref bean="car3"/>
            </list>
        </property>
set集合
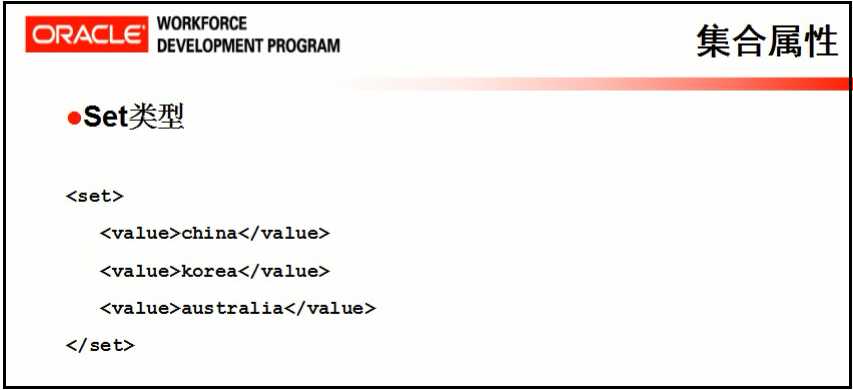
也不是value,而是<ref bean="XXX"/>
        <property name="cars">
            <!-- 注入Set集合类型的属性 -->
            <set>
                <ref bean="car1"/>
                <ref bean="car2"/>
                <ref bean="car3"/>
            </set>
        </property>
Map类型
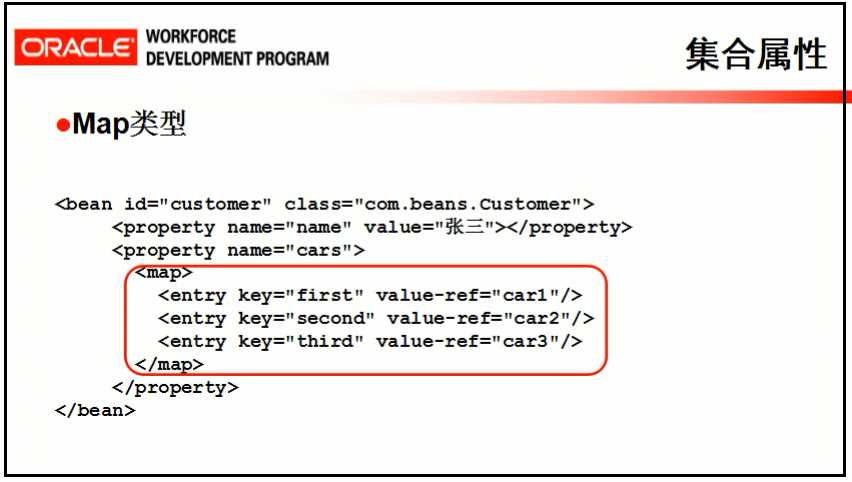
        <property name="cars">
            <!-- map -->
            <map>
                <entry key="c0001" value-ref="car1"/>
                <entry key="c0002" value-ref="car2"/>
                <entry key="c0003" value-ref="car3"/>
            </map>
        </property>
对上面各例 的实现代码:
pom.xml文件:
<project xmlns="http://maven.apache.org/POM/4.0.0" xmlns:xsi="http://www.w3.org/2001/XMLSchema-instance" xsi:schemaLocation="http://maven.apache.org/POM/4.0.0 http://maven.apache.org/xsd/maven-4.0.0.xsd">
  <modelVersion>4.0.0</modelVersion>
  <groupId>com.oracle.dwp</groupId>
  <artifactId>Spring_innerbean</artifactId>
  <version>1.0.0</version>

  <dependencies>
      <!-- aop -->
    <dependency>
        <groupId>org.springframework</groupId>
        <artifactId>spring-aop</artifactId>
        <version>4.0.0.RELEASE</version>
    </dependency>

    <!-- 上下文 -->
    <dependency>
        <groupId>org.springframework</groupId>
        <artifactId>spring-context</artifactId>
        <version>4.0.0.RELEASE</version>
    </dependency>

    <!-- junit单元测试 -->
    <dependency>
        <groupId>junit</groupId>
        <artifactId>junit</artifactId>
        <version>4.10</version>
        <scope>test</scope>
    </dependency>

  </dependencies>
</project>
Students.java:
package com.entity;

import java.io.Serializable;
import java.text.ParseException;
import java.text.SimpleDateFormat;
import java.util.Arrays;
import java.util.Date;
import java.util.List;
import java.util.Map;
import java.util.Set;

import javax.annotation.PostConstruct;
import javax.annotation.Resource;

import org.springframework.beans.factory.annotation.Value;
import org.springframework.context.annotation.Bean;
import org.springframework.stereotype.Component;

//加注解注入,起一个别名s1
//@Component("haha")
public class Students implements Serializable
    private String sid;// 学号
    private String name;// 姓名
    private String gender;// 性别
    private Date birthday;// 生日
    private String address;// 住址

//    private Car[] cars;// 学生拥有很多辆车
//    private List<Car> cars;//集合
//    private Set<Car> cars;//set集合

    private Map<String,Car> cars;//c0001--->BMW   c0002--->BENZ

    public Students(String sid, String name, String gender, Date birthday,
            String address, Map<String,Car> cars)
        super();
        this.sid = sid;
        this.name = name;
        this.gender = gender;
        this.birthday = birthday;
        this.address = address;
        this.cars = cars;


    public Students(String sid, String name, String gender, Date birthday,
            String address)
        super();
        this.sid = sid;
        this.name = name;
        this.gender = gender;
        this.birthday = birthday;
        this.address = address;


    public Students(String sid, String name, String gender, String address)
        this.sid = sid;
        this.name = name;
        this.gender = gender;
        this.address = address;


    /*
     * //解决方法1: //在构造方法之后执行一些初始化的操作
     *
     * @PostConstruct public void init() //在调用完构造函数之后,birthday还为null,然后使用这个直接赋值
     * try  this.setBirthday(new
     * SimpleDateFormat("yyyy-MM-dd").parse("2000-05-17"));  catch
     * (ParseException e)  // TODO Auto-generated catch block
     * e.printStackTrace();
     */

    public Students()


    public String getSid()
        return sid;


    // @Value("s0006")
    public void setSid(String sid)
        this.sid = sid;


    public String getName()
        return name;


    // @Value("IU")
    public void setName(String name)
        this.name = name;


    public String getGender()
        return gender;


    // @Value("女")
    public void setGender(String gender)
        this.gender = gender;


    public Date getBirthday()
        return birthday;


    // @Value("1998-07-15")
    public void setBirthday(Date birthday)
        this.birthday = birthday;


    public String getAddress()
        return address;


    // @Value("韩国首尔")
    public void setAddress(String address)
        this.address = address;


    public Map<String,Car> getCars()
        return cars;


    public void setCars(Map<String,Car> cars)
        this.cars = cars;


    @Override
    public String toString()
        return "Students [sid=" + sid + ", name=" + name + ", gender=" + gender
                + ", birthday=" + birthday + ", address=" + address + ", cars="
                + cars + "]";
applicationContext.xml文件:
<?xml version="1.0" encoding="UTF-8"?>
<beans xmlns="http://www.springframework.org/schema/beans"
    xmlns:xsi="http://www.w3.org/2001/XMLSchema-instance"
    xmlns:context="http://www.springframework.org/schema/context"
    xmlns:aop="http://www.springframework.org/schema/aop"
    xmlns:tx="http://www.springframework.org/schema/tx"
    xmlns:cache="http://www.springframework.org/schema/cache"
    xmlns:p="http://www.springframework.org/schema/p"
    xsi:schemaLocation="http://www.springframework.org/schema/beans
                      http://www.springframework.org/schema/beans/spring-beans-4.0.xsd
                      http://www.springframework.org/schema/aop
                      http://www.springframework.org/schema/aop/spring-aop-4.0.xsd
                      http://www.springframework.org/schema/context
                      http://www.springframework.org/schema/context/spring-context-4.0.xsd
                      http://www.springframework.org/schema/tx
                      http://www.springframework.org/schema/tx/spring-tx-4.0.xsd
                      http://www.springframework.org/schema/cache
                      http://www.springframework.org/schema/cache/spring-cache-4.0.xsd">

    <!-- 表示使用注解 -->
    <!-- <context:annotation-config/> -->
    <!-- 扫描带注解的包 -->
    <!-- <context:component-scan base-package="com.entity"/> -->


    <!-- 实现类型转换的bean -->
    <!-- id的名字必须是这个 -->
    <bean id="customEditorConfigurer" class="org.springframework.beans.factory.config.CustomEditorConfigurer">
        <property name="propertyEditorRegistrars">
            <list>
                <bean class="com.convert.MyCustomDateEditorRegister">
                    <property name="format" value="yyyy-MM-dd"></property>
                </bean>
            </list>
        </property>
    </bean>


    <bean id="mydevice" class="com.entity.MoveDisk">

    </bean>

    <bean id="dateFormat" class="java.text.SimpleDateFormat">
        <constructor-arg value="yyyy-MM-dd"/>
    </bean>

    <!-- 定义若干辆车 -->
    <bean id="car1" class="com.entity.Car">
        <property name="brand" value="宝马"/>
        <property name="color" value="白色"/>
    </bean>
    <bean id="car2" class="com.entity.Car">
        <property name="brand" value="奔驰"/>
        <property name="color" value="黑色"/>
    </bean>
    <bean id="car3" class="com.entity.Car">
        <property name="brand" value="路虎"/>
        <property name="color" value="卡其色"/>
    </bean>

    <!-- 1. 使用property注入属性的值 -->
    <bean name="stu,s1,s2" class="com.entity.Students">
        <property name="sid" value="s001"/>
        <property name="name" value="茜茜"/>
        <property name="birthday">
            <!-- 工厂bean,,,的parse方法将字符串转换成Date类型 -->
            <bean factory-bean="dateFormat" factory-method="parse">
                <constructor-arg value="1996-06-06"/>
            </bean>
        </property>
        <!-- 人为给属性赋值为null,,标签===如果不写的话,也会默认为null -->
        <property name="address">
            <!-- 向这个属性赋空值 -->
            <null></null>
        </property>
        <!-- 使用内部bean注入属性值 -->
        <!-- <property name="car">
            <bean id="car" class="com.entity.Car">
                <property name="brand" value="BENZ"/>
                <property name="color" value="红色"/>
            </bean>
        </property> -->
        <!-- <property name="car" ref="car"/> -->
        <!-- 级联属性:要求car必须初始化 -->
        <!-- <property name="car.brand" value="路虎"/> -->

        <property name="cars">
            <!-- 注入数组类型的属性 -->
            <!-- <array>
                <ref bean="car1"/>
                <ref bean="car2"/>
                <ref bean="car3"/>
            </array> -->

            <!-- 注入List集合类型的属性 -->
            <!-- <list>
                <ref bean="car1"/>
                <ref bean="car2"/>
                <ref bean="car3"/>
            </list> -->

            <!-- 注入Set集合类型的属性 -->
            <!-- <set>
                <ref bean="car1"/>
                <ref bean="car2"/>
                <ref bean="car3"/>
            </set> -->

            <!-- map -->
            <map>
                <entry key="c0001" value-ref="car1"/>
                <entry key="c0002" value-ref="car2"/>
                <entry key="c0003" value-ref="car3"/>
            </map>
        </property>

    </bean>

    <!-- 2. 使用构造方法注入:根据类型和名字匹配,根据次序(下标)匹配 --><!-- 会自动调用Students类的带参数的构造方法,完成实例化 -->
    <!--
    <bean name="stu2" class="com.entity.Students">
        <constructor-arg name="sid" type="java.lang.String" value="s004"/>
        <constructor-arg name="name" type="java.lang.String" value="金泰妍"/>
        <constructor-arg name="gender" type="java.lang.String" value="女"/>
        <constructor-arg name="birthday" type="java.util.Date">
            <bean factory-bean="dateFormat" factory-method="parse">
                <constructor-arg value="1989-03-09"/>
            </bean>
        </constructor-arg>
        <constructor-arg name="address" type="java.lang.String" value="韩国首尔"/>
    </bean>
     -->
     <!-- 不用写name,依次按顺序 -->
     <!-- 或用下标index,从0开始 -->
    <bean name="stu2" class="com.entity.Students">
        <constructor-arg index="0" type="java.lang.String" value="s004"/>
        <constructor-arg index="1" type="java.lang.String" value="金泰妍"/>
        <constructor-arg type="java.lang.String" value="女"/>
        <constructor-arg type="java.util.Date">
            <bean factory-bean="dateFormat" factory-method="parse">
                <constructor-arg value="1989-03-09"/>
            </bean>
        </constructor-arg>
        <constructor-arg type="java.lang.String" value="韩国釜山"/>
    </bean>

</beans>
测试:
package com.entity;

import org.junit.Test;
import org.springframework.context.ApplicationContext;
import org.springframework.context.support.AbstractXmlApplicationContext;
import org.springframework.context.support.ClassPathXmlApplicationContext;
import org.springframework.context.support.FileSystemXmlApplicationContext;

public class StudentsTest

    @Test
    public void fun1()
        //获得上下文对象----类路径下
        //获取磁盘上的文件
        //ApplicationContext ctx=new FileSystemXmlApplicationContext("F:\\\\haha\\\\test.xml");
        ApplicationContext ctx=new ClassPathXmlApplicationContext("applicationContext.xml");
        //1.getBean(String id|name);要求id和name都不能重复。
        //Students s = (Students) ctx.getBean("stu2");

        //2.getBean(Class clazz);通过类型来加载bean,要求类型必须是唯一的***
        //Students s=ctx.getBean(Students.class);//注意:这里无需类型转换。

        //3.getBean(String id|name,Class clazz);
        Students s=ctx.getBean("stu", Students.class);

        //4.getBean(String id|name, Object ...) ==>getBean(String id|name, Object[] )
        //调用指定id的指定的构造方法来获得对象。


        System.out.println(s);

        ((AbstractXmlApplicationContext)ctx).close();//类似流,用完关闭。
注入properties配置文件中的数据
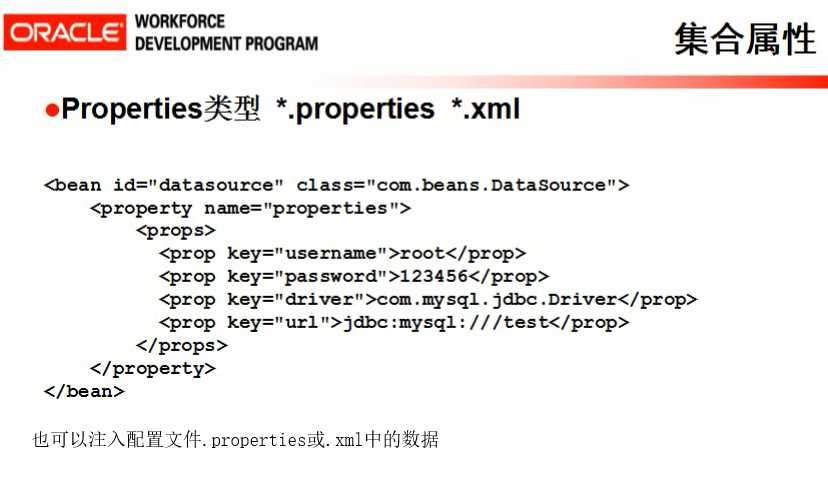
1.不使用properties文件,在applicationContext.xml文件中。
这里使用了c3p0,所以要在pom.xml文件中加入其依赖。
      <!-- c3p0 -->
      <dependency>
          <groupId>com.mchange</groupId>
          <artifactId>c3p0</artifactId>
          <version>0.9.5.2</version>
      </dependency>
applicationContext.xml文件中的
    <!-- 自己写入的数据,注入到定义的MyDBUtils类中的DataSource对象中 -->
    <bean id="dbTools1" class="com.db.MyDBUtils">
        <property name="properties">
            <props>
                <prop key="username">root</prop>
                <prop key="password">root</prop>
                <prop key="driver">com.mysql.jdbc.Driver</prop>
                <prop key="url">jdbc:mysql:///oa</prop>
            </props>
        </property>
    </bean>
编写一个与之对应的Java类,完成prop标签向datasource对象的赋值,然后得到Connection对象,返回它。
package com.db;

import java.beans.PropertyVetoException;
import java.sql.Connection;
import java.sql.SQLException;
import java.util.Properties;

import javax.sql.DataSource;

import com.mchange.v2.c3p0.ComboPooledDataSource;

public class MyDBUtils
    private Properties properties;

    private ComboPooledDataSource ds=new ComboPooledDataSource();//数据源

    public ComboPooledDataSource getDs()
        return ds;


    public void setDs(ComboPooledDataSource ds)
        this.ds = ds;


    public Properties getProperties()
        return properties;


    public void setProperties(Properties properties)
        this.properties = properties;
        try
            ds.setDriverClass(this.properties.getProperty("driver"));
         catch (PropertyVetoException e)
            e.printStackTrace();

        ds.setJdbcUrl(this.properties.getProperty("url"));
        ds.setUser(this.properties.getProperty("username"));
        ds.setPassword(this.properties.getProperty("password"));


    public Connection getConnection() throws SQLException
        return ds.getConnection();
测试:
package com.db;

import java.sql.Connection;
import java.sql.SQLException;

import org.junit.Test;
import org.springframework.context.ApplicationContext;
import org.springframework.context.support.ClassPathXmlApplicationContext;

public class DBTest

    @Test
    public void fun1() throws SQLException
        ApplicationContext ctx=new ClassPathXmlApplicationContext("applicationContext.xml");
        MyDBUtils dbTools=(MyDBUtils) ctx.getBean("dbTools1");//已经被赋过值
        Connection conn=dbTools.getConnection();
        System.out.println(conn);
2.使用dbconfig.properties文件
dbconfig.properties:
driver=com.mysql.jdbc.Driver
url=jdbc:mysql://localhost:3306/oa?rewriteBatchedStatements=true
username=root
password=root
applicationContext.xml:
直接取配置文件中的值向自定义的MyDBUtils2类中的DataSource对象中的各值赋值
    <!-- 数据源配置文件 -->
    <bean id="propertyConfigurer" class="org.springframework.beans.factory.config.PropertyPlaceholderConfigurer">
        <property name="locations">
            <list>
                <value>classpath*:dbconfig.properties</value>
            </list>
        </property>
    </bean>


    <bean id="dbTools2" class="com.db.MyDBUtils2">
        <property name="ds.driverClass" value="$driver"/>
        <property name="ds.jdbcUrl" value="$url"/>
        <property name="ds.user" value="$username"/>
        <property name="ds.password" value="$password"/>
    </bean>
MyDBUtils2.java:
package com.db;

import java.sql.Connection;
import java.sql.SQLException;

import com.mchange.v2.c3p0.ComboPooledDataSource;

public class MyDBUtils2

    private ComboPooledDataSource ds=new ComboPooledDataSource();//数据源

    public ComboPooledDataSource getDs()
        return ds;


    public void setDs(ComboPooledDataSource ds)
        this.ds = ds;


    public Connection getConnection() throws SQLException
        return ds.getConnection();
测试:
package com.db;

import java.sql.Connection;
import java.sql.SQLException;

import org.junit.Test;
import org.springframework.context.ApplicationContext;
import org.springframework.context.support.ClassPathXmlApplicationContext;

public class DBTest

    @Test
    public void fun1() throws SQLException
        ApplicationContext ctx=new ClassPathXmlApplicationContext("applicationContext.xml");
        MyDBUtils2 dbTools=(MyDBUtils2) ctx.getBean("dbTools2");
        Connection conn=dbTools.getConnection();
        System.out.println(conn);
以上是关于Spring----内bean和集合属性注入和properties属性注入的主要内容,如果未能解决你的问题,请参考以下文章
Spring企业级程序设计 • 第2章 Spring Bean管理进阶