8天入门docker系列 —— 第七天 让你的container实现跨主机访问
Posted huangxincheng
tags:
篇首语:本文由小常识网(cha138.com)小编为大家整理,主要介绍了8天入门docker系列 —— 第七天 让你的container实现跨主机访问相关的知识,希望对你有一定的参考价值。
当你有若干个容器之后,你可能就希望实现容器的跨机部署访问了,比如aspnetcore在一台host上,mysql在另外一个host上,如果要实现这样的功能,需要你
借助docker自带的overlay网络模型了。
一: overlay网络模型
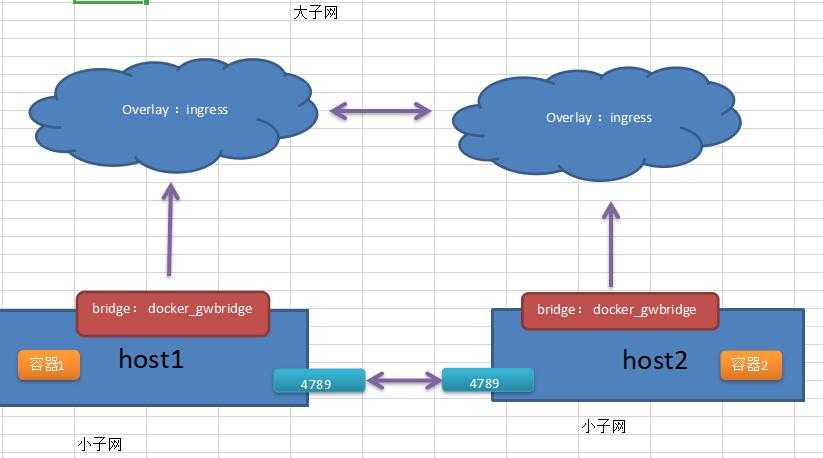
要想快速的搭建overlay网络,你可以通过docker默认的swarm集群给你默认生成的名ingress的overlay网络,这样会默认开放一些端口供底层机器内的访问,比如:
UDP 4789 是用于overlay network 流量传输的,作为开发角度,你只需要知道这是一个基于底层物理网络构建出的一个上层虚拟网络,而你的程序都是跑在这个虚拟网
络上,如果要画图,大概就是这样吧!

二:通过docker swarm构建overlay网络
为了构建overlay网络,需要备有两台机器(使用虚拟机即可):
192.168.23.146  manager
192.168.23.147  worker
使用起来很简单,在 146机器上执行 docker swarm init 初始化一个集群,同时默认了该机作为 cluster 的manager节点。
[[email protected] ~]# docker swarm init
Swarm initialized: current node (g0o8vkgzruv63hsx4pkjs0yfk) is now a manager.

To add a worker to this swarm, run the following command:

    docker swarm join --token SWMTKN-1-0oxo6qrxwvl8xlneq0jqz2zd87nkj7c0vyf1h9m8kcj3qbzd4v-3eu9zb5athq0s2n79rncbejb1 192.168.23.146:2377

To add a manager to this swarm, run ‘docker swarm join-token manager‘ and follow the instructions.

[[email protected] ~]# docker node ls
ID                            HOSTNAME            STATUS              AVAILABILITY        MANAGER STATUS      ENGINE VERSION
g0o8vkgzruv63hsx4pkjs0yfk *   manager             Ready               Active              Leader              18.09.6
[[email protected] ~]#
当执行完init之后,通过node ls 可以看到,当前cluster集群中只有一个node节点,而且还是Leader,同时docker还告诉我们怎么将其他node加入到集群中作为
worker节点,验证方式是token,好了,那我可以将这段output copy到 147 的 shell上。
[[email protected] ~]#  docker swarm join --token SWMTKN-1-0oxo6qrxwvl8xlneq0jqz2zd87nkj7c0vyf1h9m8kcj3qbzd4v-3eu9zb5athq0s2n79rncbejb1 192.168.23.146:2377
This node joined a swarm as a worker.
最后通过在 146 上执行 docker node ls 看一下集群信息,可以看到146,147都在一个集群了。
[[email protected] ~]# docker node ls
ID                            HOSTNAME            STATUS              AVAILABILITY        MANAGER STATUS      ENGINE VERSION
g0o8vkgzruv63hsx4pkjs0yfk *   manager             Ready               Active              Leader              18.09.6
ojjngean30orjzswh72o25rsr     worker              Ready               Active                                  18.09.6
接下来再看一下,4789端口是否开放了,同时看一下ingress的overlay是否开启了,如下:
[[email protected] ~]# docker network ls
NETWORK ID          NAME                DRIVER              SCOPE
f5fbe8d71b5a        bridge              bridge              local
91cfc77a3c7f        docker_gwbridge     bridge              local
ac4a48a43517        host                host                local
5eux1lz4yom7        ingress             overlay             swarm
02f9bfe179ca        none                null                local
[[email protected] ~]# netstat -tlnpu
Active Internet connections (only servers)
Proto Recv-Q Send-Q Local Address           Foreign Address         State       PID/Program name
tcp        0      0 0.0.0.0:22              0.0.0.0:*               LISTEN      4854/sshd
tcp        0      0 127.0.0.1:25            0.0.0.0:*               LISTEN      5523/master
tcp6       0      0 :::2377                 :::*                    LISTEN      6349/dockerd
tcp6       0      0 :::7946                 :::*                    LISTEN      6349/dockerd
tcp6       0      0 :::22                   :::*                    LISTEN      4854/sshd
tcp6       0      0 ::1:25                  :::*                    LISTEN      5523/master
udp        0      0 0.0.0.0:47160           0.0.0.0:*                           4549/avahi-daemon:
udp        0      0 0.0.0.0:68              0.0.0.0:*                           4649/dhclient
udp        0      0 0.0.0.0:123             0.0.0.0:*                           4555/chronyd
udp        0      0 127.0.0.1:323           0.0.0.0:*                           4555/chronyd
udp        0      0 0.0.0.0:4789            0.0.0.0:*                           -
udp        0      0 0.0.0.0:5353            0.0.0.0:*                           4549/avahi-daemon:
udp        0      0 0.0.0.0:26134           0.0.0.0:*                           4649/dhclient
udp6       0      0 :::123                  :::*                                4555/chronyd
udp6       0      0 ::1:323                 :::*                                4555/chronyd
udp6       0      0 :::47743                :::*                                4649/dhclient
udp6       0      0 :::7946                 :::*                                6349/dockerd
默认名为ingress 的overlay driver是默认是不支持standalone容器加入的,所以我需要重新new一个overlay,并设置一下允许standalone容器加入此网络,好了,
说干就干,new了一个 test-net的overlay网络,通过--attachable 开启附加功能。
[[email protected] ~]# docker network create --driver=overlay --attachable test-net
dajh2glpfattdnq2ahqchlhur
[[email protected] ~]# docker network ls
NETWORK ID          NAME                DRIVER              SCOPE
f5fbe8d71b5a        bridge              bridge              local
91cfc77a3c7f        docker_gwbridge     bridge              local
ac4a48a43517        host                host                local
5eux1lz4yom7        ingress             overlay             swarm
02f9bfe179ca        none                null                local
dajh2glpfatt        test-net            overlay             swarm
三:python 跨机连接 redis
我准备把redis放在147机器上, python application 放在 146上,python 通过 对方的容器名(some-redis) 进行连接,如下图所示:

1. 在147上执行docker run时附加 network 为指定的 test-net 网络
[[email protected] ~]# docker run --network test-net --name some-redis -d redis
eca08e67e35160661e090ca42a61dacaee5dd8ca99f8e9c25e59ae6927d66328
2. python应用程序
主要有三个部分,app.py, Dockerfile, requirements.txt。

《1》 app.py
下面要注意的是,在redis的构造函数中指定了host= some-redis ,也就是 147启动容器名。
from flask import Flask
from redis import Redis, RedisError
import os
import socket

# Connect to Redis
redis = Redis(host="some-redis", db=0, socket_connect_timeout=2, socket_timeout=2)

app = Flask(__name__)

@app.route("/")
def hello():
    try:
        visits = redis.incr("counter")
    except RedisError:
        visits = "<i>cannot connect to Redis, counter disabled</i>"

    html = "<b>Hostname:</b> hostname<br/>"            "<b>Visits:</b> visits"
    return html.format(hostname=socket.gethostname(), visits=visits)

if __name__ == "__main__":
    app.run(host=‘0.0.0.0‘, port=80)
《2》 Flask 和 Redis 依赖包 (requirements.txt)
Flask
Redis
《3》 最后就是dockerfile
FROM python:2.7-slim

WORKDIR /app

COPY . .

EXPOSE 80

RUN pip install --trusted-host pypi.python.org -r requirements.txt

VOLUME [ "/app" ]

CMD [ "python", "app.py" ]
有了这三个,接下来就可以构建image了。
[[email protected] app]# docker build -t pyweb:v1 .
Sending build context to Docker daemon  4.608kB
Step 1/7 : FROM python:2.7-slim
2.7-slim: Pulling from library/python
fc7181108d40: Already exists
8c60b810a35a: Pull complete
d207b275197c: Pull complete
63184f224d60: Pull complete
Digest: sha256:1405fa2f8e9a232e2f60cafbb2b06ca2f1e0f577f4b4c397c361d6dba59fd24e
Status: Downloaded newer image for python:2.7-slim
 ---> ca96bab3e2aa
Step 2/7 : WORKDIR /app
 ---> Running in 6b8324c10dc0
Removing intermediate container 6b8324c10dc0
 ---> a85fb403c57b
Step 3/7 : COPY . .
 ---> f13015df5bf7
Step 4/7 : EXPOSE 80
 ---> Running in 408a718df2b4
Removing intermediate container 408a718df2b4
 ---> 39d30c3a092d
Step 5/7 : RUN pip install --trusted-host pypi.python.org -r requirements.txt
 ---> Running in 0ee0982739d5
DEPRECATION: Python 2.7 will reach the end of its life on January 1st, 2020. Please upgrade your Python as Python 2.7 won‘t be maintained after that date. A future version of pip will drop support for Python 2.7.
Collecting Flask (from -r requirements.txt (line 1))
  Downloading https://files.pythonhosted.org/packages/c3/31/6904ac846fc65a7fa6cac8b4ddc392ce96ca08ee67b0f97854e9575bbb26/Flask-1.1.0-py2.py3-none-any.whl (94kB)
Collecting Redis (from -r requirements.txt (line 2))
  Downloading https://files.pythonhosted.org/packages/ac/a7/cff10cc5f1180834a3ed564d148fb4329c989cbb1f2e196fc9a10fa07072/redis-3.2.1-py2.py3-none-any.whl (65kB)
Collecting Jinja2>=2.10.1 (from Flask->-r requirements.txt (line 1))
  Downloading https://files.pythonhosted.org/packages/1d/e7/fd8b501e7a6dfe492a433deb7b9d833d39ca74916fa8bc63dd1a4947a671/Jinja2-2.10.1-py2.py3-none-any.whl (124kB)
Collecting click>=5.1 (from Flask->-r requirements.txt (line 1))
  Downloading https://files.pythonhosted.org/packages/fa/37/45185cb5abbc30d7257104c434fe0b07e5a195a6847506c074527aa599ec/Click-7.0-py2.py3-none-any.whl (81kB)
Collecting Werkzeug>=0.15 (from Flask->-r requirements.txt (line 1))
  Downloading https://files.pythonhosted.org/packages/9f/57/92a497e38161ce40606c27a86759c6b92dd34fcdb33f64171ec559257c02/Werkzeug-0.15.4-py2.py3-none-any.whl (327kB)
Collecting itsdangerous>=0.24 (from Flask->-r requirements.txt (line 1))
  Downloading https://files.pythonhosted.org/packages/76/ae/44b03b253d6fade317f32c24d100b3b35c2239807046a4c953c7b89fa49e/itsdangerous-1.1.0-py2.py3-none-any.whl
Collecting MarkupSafe>=0.23 (from Jinja2>=2.10.1->Flask->-r requirements.txt (line 1))
  Downloading https://files.pythonhosted.org/packages/fb/40/f3adb7cf24a8012813c5edb20329eb22d5d8e2a0ecf73d21d6b85865da11/MarkupSafe-1.1.1-cp27-cp27mu-manylinux1_x86_64.whl
Installing collected packages: MarkupSafe, Jinja2, click, Werkzeug, itsdangerous, Flask, Redis
Successfully installed Flask-1.1.0 Jinja2-2.10.1 MarkupSafe-1.1.1 Redis-3.2.1 Werkzeug-0.15.4 click-7.0 itsdangerous-1.1.0
Removing intermediate container 0ee0982739d5
 ---> 704e7d655494
Step 6/7 : VOLUME [ "/app" ]
 ---> Running in 0c4ad68db249
Removing intermediate container 0c4ad68db249
 ---> 5b0ce6eef187
Step 7/7 : CMD [ "python", "app.py" ]
 ---> Running in 388d972cbd6d
Removing intermediate container 388d972cbd6d
 ---> fd7a0ffca7fc
Successfully built fd7a0ffca7fc
Successfully tagged pyweb:v1
[[email protected] app]# docker run -d --network test-net -p 80:80 -v /app:/app --name pyapp pyweb:v1
9d419507b00adddd003f8e45580ec1ee48d4a0347091b65da1bc183a8bbe1dc2
[[email protected] app]# docker ps
CONTAINER ID        IMAGE               COMMAND             CREATED             STATUS              PORTS                NAMES
9d419507b00a        pyweb:v1            "python app.py"     4 seconds ago       Up 2 seconds        0.0.0.0:80->80/tcp   pyapp
[[email protected] app]#
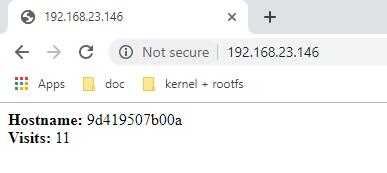
然后访问一下 http://192.168.23.146,每刷新一下page,都会执行一次redis.incr操作。,这样就实现了多容器之间的跨机器访问,大家也可以把这些放到
docker-compose文件中哦。

好了,本篇就说到这里,希望对你有帮助。
以上是关于8天入门docker系列 —— 第七天 让你的container实现跨主机访问的主要内容,如果未能解决你的问题,请参考以下文章