MySQL主从复制方法
Posted pandawm
tags:
篇首语:本文由小常识网(cha138.com)小编为大家整理,主要介绍了MySQL主从复制方法相关的知识,希望对你有一定的参考价值。
MySQL主从复制
环境准备
软件及系统: CentOS7、mysql5.7
系统环境准备: yum安装 或 源码安装 MySQL 5.7
??需要修改MySQL的安装仓库的设置, 开启5.7的安装源, 关闭8.0的安装源, 若不采用yum安装可使用源码部署
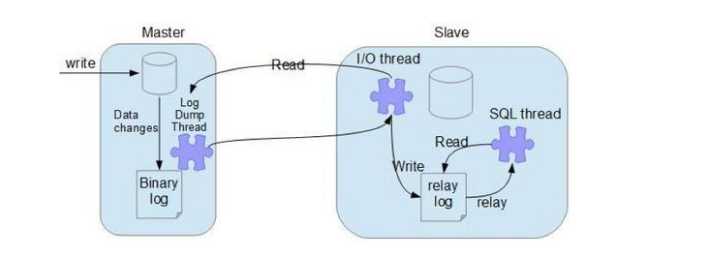
#####原理图: relay log = 中继日志

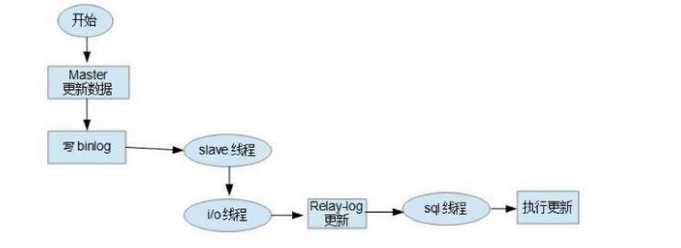
流程图:

#####Master-Slave架构
##------------------------------------主库设置------------------------------------##
[[email protected] ~]# vi /etc/my.cnf //开启二进制日志并设置服务ID
[mysqld]
server_id=21
log-bin=mysql-bin
?
[[email protected] ~]# systemctl start mysqld && systemctl enable mysqld
[[email protected] ~]# grep ‘password‘ /var/log/mysqld.log ##”!!!修改密码!!!“
2018-09-28[Note] A temporary password is generated for [email protected]: ied,1qj(y/gH
?
[[email protected] ~]# mysql -uroot -p‘(BavDu..0928)‘
mysql> CREATE USER ‘replication‘@‘192.168.13.22‘ IDENTIFIED BY "#BavDu..0928#";
Query OK, 0 rows affected (0.01 sec)
?
mysql> GRANT REPLICATION SLAVE ON *.* TO ‘replication‘@‘192.168.13.22‘;
Query OK, 0 rows affected (0.00 sec)
?
mysql> SHOW MASTER STATUS;
+------------------+----------+--------------+------------------+-------------------+
| File | Position | Binlog_Do_DB | Binlog_Ignore_DB | Executed_Gtid_Set |
+------------------+----------+--------------+------------------+-------------------+
| mysql-bin.000002 | 877 | | | |
+------------------+----------+--------------+------------------+-------------------+
1 row in set (0.00 sec)
?
##------------------------------------主库设置------------------------------------##
?
##------------------------------------从库设置------------------------------------##
[[email protected] ~]# vi /etc/my.cnf
[mysqld]
server_id=22
?
[[email protected] ~]# systemctl start mysqld && systemctl enable mysqld
[[email protected] ~]# grep ‘password‘ /var/log/mysqld.log
2018-09-28[Note] A temporary password is generated for [email protected]: dFS:z5DQ/<h5
[[email protected] ~]# mysql -uroot -p‘(BavDu..0928)‘
mysql> CHANGE MASTER TO
-> MASTER_HOST=‘192.168.13.21‘,
-> MASTER_USER=‘replication‘,
-> MASTER_PASSWORD=‘#BavDu..0928#‘,
-> MASTER_LOG_FILE=‘mysql-bin.000001‘,
-> MASTER_LOG_POS=877;
?
mysql> start slave;
mysql> show slave status\\G;
************************** 1. row ***************************
Slave_IO_State: Waiting for master to send event
Master_Host: 192.168.13.21
Master_User: replication
Master_Port: 3306
Connect_Retry: 60
Master_Log_File: mysql-bin.000001
Read_Master_Log_Pos: 1206
Relay_Log_File: slave-relay-bin.000002
Relay_Log_Pos: 649
Relay_Master_Log_File: mysql-bin.000001
Slave_IO_Running: Yes
Slave_SQL_Running: Yes
##------------------------------------从库设置------------------------------------##
错误:
1.IO线程No,是因为本机网络问题导致或内存不足(可尝试增加虚拟内存)
2.IO线程Connecting,是因为master机器的防火墙未关闭,或对方网络问题或内存不足(可尝试增加虚拟内存)
3.SQL线程No,是因为SELinux未关闭或内存不足(可尝试增加虚拟内存)
4.SQL线程Connecting,是因为本机防火墙未关闭,或内存不足(可尝试虚拟内存)
练习题:
使用三台机器搭建一主两从的mysql架构并能够实现数据同步,部tar署形式不限<脚本、手动都可>
MySQL多源复制(Gtid方式)
##------------------------------------Master01------------------------------------##
[[email protected]_master_01 ~]# vim /etc/my.cnf
server_id = 3
log_bin = master01-bin
binlog-format = ROW
gtid-mode = ON
enforce-gtid-consistency = ON
[[email protected]_master_01 ~]# mysql.service restart
?
##登录数据库授权用户
mysql> grant replication slave on *.* to ‘rep‘@‘%‘ identified by "(Rep..0419)";
Query OK, 0 rows affected, 1 warning (0.03 sec)
?
mysql> exit
Bye
##------------------------------------Master01------------------------------------##
##------------------------------------Master02------------------------------------##
[[email protected]_master_02 ~]# vim /etc/my.cnf
server_id = 4
log_bin = master02-bin
binlog-format = ROW
gtid-mode = ON
enforce-gtid-consistency = ON
[[email protected]_master_02 ~]# mysql.service restart
?
##登录数据库授权用户
mysql> grant replication slave on *.* to ‘rep‘@‘%‘ identified by "(Rep..0419)";
Query OK, 0 rows affected, 1 warning (0.03 sec)
?
mysql> exit
Bye
##------------------------------------Master02------------------------------------##
##------------------------------------Slave01------------------------------------##
[[email protected]_slave_01 ~]# vim /etc/my.cnf
server_id = 5
relay_log = /usr/local/mysqld/log/relay-bin.log
gtid-mode = ON
enforce-gtid-consistency = ON
master_info_repository=TABLE
relay_log_info_repository=TABLE
[[email protected]_slave_01 ~]# mysql.service restart
##登录数据库授权用户
mysql> reset master;
Query OK, 0 rows affected (0.00 sec)
?
mysql> CHANGE MASTER TO MASTER_HOST=‘192.168.161.3‘, MASTER_USER=‘bavduer‘, MASTER_PORT=3306, MASTER_PASSWORD=‘(Qf..0422)‘, MASTER_AUTO_POSITION = 1 FOR CHANNEL ‘master-1‘;
Query OK, 0 rows affected, 2 warnings (0.01 sec)
?
mysql> CHANGE MASTER TO MASTER_HOST=‘192.168.161.4‘, MASTER_USER=‘bavduer‘, MASTER_PORT=3306, MASTER_PASSWORD=‘(bavduer..0422)‘, MASTER_AUTO_POSITION = 1 FOR CHANNEL ‘master-2‘;
Query OK, 0 rows affected, 2 warnings (0.01 sec)
?
mysql> start slave;
Query OK, 0 rows affected (0.01 sec)
?
mysql> show slave status\\G;
*************************** 1. row ***************************
Slave_IO_State: Waiting for master to send event
Master_Host: 192.168.161.3
Master_User: bavduer
Master_Port: 3306
Connect_Retry: 60
Master_Log_File: master01-bin.000001
Read_Master_Log_Pos: 452
Relay_Log_File: [email protected]
Relay_Log_Pos: 671
Relay_Master_Log_File: master01-bin.000001
Slave_IO_Running: Yes
Slave_SQL_Running: Yes
......
*************************** 2. row ***************************
Slave_IO_State: Waiting for master to send event
Master_Host: 192.168.161.4
Master_User: bavduer
Master_Port: 3306
Connect_Retry: 60
Master_Log_File: master02-bin.000001
Read_Master_Log_Pos: 452
Relay_Log_File: [email protected]
Relay_Log_Pos: 671
Relay_Master_Log_File: master02-bin.000001
Slave_IO_Running: Yes
Slave_SQL_Running: Yes
......
?
mysql> exit
Bye
##------------------------------------Slave01------------------------------------##
练习题:
使用四台机器,部署mysql的双主双从(M-M-S-S)架构实现数据同步,部署形式不限<脚本、手动都可>
读写分离
##构建Java环境
[[email protected] ~]# tar xf jdk-8u181-linux-x64.tar -C /usr/local/
[[email protected] ~]# mv /usr/local/jdk1.8.0_181 /usr/local/java
?
[[email protected] ~]# vim /etc/profile
export JAVA_HOME=/usr/local/java
export PATH=$JAVA_HOME/bin:$PATH
export CLASSPATH=.:$JAVA_HOME/lib/dt.jar:$JAVA_HOME/lib/tools.jar
#source /etc/profile
[[email protected] ~]# java -version
java version "1.8.0_181"ls
?
Java(TM) SE Runtime Environment (build 1.8.0_181-b13)
Java HotSpot(TM) 64-Bit Server VM (build 25.181-b13, mixed mode)
?
##安装MyCat服务
[[email protected] ~]# wget http://dl.mycat.io/1.6.5/Mycat-server-1.6.5-release-20180122220033-linux.tar.gz
[[email protected] ~]# tar xf Mycat-server-1.6.5-release-20180122220033-linux.tar.gz -C /usr/local/
?
[[email protected] mycat]# vim /etc/profile
export MYCAT_HOME=/usr/local/mycat
[[email protected] mycat]# source /etc/profile
[[email protected] mycat]# ln -s /usr/local/mycat/bin/mycat /usr/bin/mycat
?
##配置MyCat服务
[[email protected] ~]# vim /usr/local/mycat/conf/server.xml
<user name="root" defaultAccount="true">
<property name="password">(BavDu..0928)</property>
<property name="schemas">TEST_DB</property>
</user>
?
<user name="user">
<property name="password">(BavDu..0928)</property>
<property name="schemas">TEST_DB</property>
<property name="readOnly">true</property>
</user>
?
[[email protected] ~]# vim /usr/local/mycat/conf/schema.xml
<schema name="TEST_DB" checkSQLschema="false" sqlMaxLimit="100" dataNode="dn1">
</schema>
?
<dataNode name="dn1" dataHost="localhost1" database="TEST_DB" />
?
<dataHost name="localhost1" maxCon="1000" minCon="10" balance="1" writeType="0" dbType="mysql" dbDriver="native">
<heartbeat>select user()</heartbeat>
<writeHost host="hostM1" url="192.168.13.21:3306" user="root" password="(BavDu..0928)">
<readHost host="hostS1" url="192.168.13.22:3306" user="root" password="(Bavdu..0928)"/>
</writeHost>
</dataHost>
?
[[email protected] ~]# vim /usr/local/mycat/conf/wrapper.conf
wrapper.java.command=%JAVA_HOME%/bin/java
[[email protected] ~]# /usr/local/mycat/bin/mycat start
?
##读写分离测试
[[email protected] mycat]# mysql -uroot -p‘(BavDu..0928)‘ -h192.168.13.20 -P8066 -DTEST_DB
Welcome to the MariaDB monitor. Commands end with ; or \\g.
Your MySQL connection id is 5
Server version: 5.6.29-mycat-1.6.5-release-20180122220033 MyCat Server (OpenCloundDB)
?
Copyright (c) 2000, 2018, Oracle, MariaDB Corporation Ab and others.
?
Type ‘help;‘ or ‘\\h‘ for help. Type ‘\\c‘ to clear the current input statement.
?
MySQL [TEST_DB]> show databases;
+----------+
| DATABASE |
+----------+
| TEST_DB |
+----------+
1 row in set (0.00 sec)
?
MySQL [TEST_DB]> use TEST_DB
Database changed
MySQL [TEST_DB]> create table testtest (id bigint not null primary key, user_id varchar(100), travel_date date, fee decimal, days int);
Query OK, 0 rows affected (0.13 sec)
?
MySQL [TEST_DB]> insert into testtest (id,user_id,travel_date,fee,days) values (1,‘100‘, 20160816, 2000, 5);
Query OK, 1 row affected (0.49 sec)
?
MySQL [TEST_DB]> insert into testtest (id,user_id,travel_date,fee,days) values (2,‘300‘, 20160916, 5000, 3);
Query OK, 1 row affected (0.05 sec)
?
MySQL [TEST_DB]>
以上是关于MySQL主从复制方法的主要内容,如果未能解决你的问题,请参考以下文章