vue+uwsgi+nginx部署前后端分离项目
Posted quantum-world
tags:
篇首语:本文由小常识网(cha138.com)小编为大家整理,主要介绍了vue+uwsgi+nginx部署前后端分离项目相关的知识,希望对你有一定的参考价值。
一:vue+uwsgi+nginx部署
1.1:准备代码:
# 路飞学城django代码
https://files.cnblogs.com/files/pyyu/luffy_boy.zip
# vue代码
https://files.cnblogs.com/files/pyyu/07-luffy_project_01.zip
1.2:部署准备
1. 部署环境准备

⑴ . 准备python3和虚拟环境解释器,python3,virtualenvwrapper.

  pip3 install -i https://pypi.douban.com/simple virtualenvwrapper


⑵ . 修改python3的环境变量,写入/etc/profile中

PATH=/opt/python36/bin:/usr/local/sbin:/usr/local/bin:/usr/sbin:/usr/bin:/opt/ruby/bin/:/root/bin

source
⑶ . 修改 ~/.bashrc

写入变量


2.新建虚拟环境

[[email protected] ~]# mkvirtualenv  vue1


3.准备前后端代码


[[email protected] opt ]# wget https://files.cnblogs.com/files/pyyu/luffy_boy.zip      # 后端
[[email protected] opt ]# wget https://files.cnblogs.com/files/pyyu/07-luffy_project_01.zip   #前端

# 如果代码在本地,传到服务器 使用 lrzsz 和xftp工具
复制代码

4.解压缩代码

因为下载的格式是 zip格式的,所以不能用 tar 解压,可以使用 unzip 进行解压

# 如果没有,就退出虚拟机下载unzip命令    yum install unzip
[[email protected] opt ]#unzip luffy_boy.zip
[[email protected] opt ]#unzip 07-luffy_project_01.zip
二:部署前端代码
⑴ . 准备node打包环境
[[email protected] opt ]# wget https://nodejs.org/download/release/v8.6.0/node-v8.6.0-linux-x64.tar.gz⑵ . 解压缩node包,配置环境变量
[[email protected] ]# tar -zxf node-v8.6.0-linux-x64.tar.gz
[[email protected] bin]# vim /etc/profile     # 添加环境
[[email protected] bin]# source profile       # 一定要读一下*******


vim /etc/profile

PATH="/opt/python36/bin:/usr/local/sbin:/usr/local/bin:/usr/sbin:/usr/bin:/root/bin:/opt/node-v8.6.0-linux-x64/bin"
⑶ . 检测node 和 npm
[[email protected] node-v8.6.0-linux-x64]# node -v
v8.6.0
[[email protected] node-v8.6.0-linux-x64]# npm -v
5.3.0
⑷ . src/restful/api.js 修改ip
# 修改vue的请求发送路径,vue得像服务器发起请求,修改127.0.0.1为linux的ip地址

进入虚拟机 workon django1

(django1) [[email protected] ~]# cd /opt/07-luffy_project_01

# 进入到 src/restful/api.js 修改ip
# 注意 : 修改ip为自己的ip
# 快速整体修改ip :
(django1) [[email protected] 07-luffy_project_01]# vim src/restful/api.js
(django1) [[email protected] 07-luffy_project_01]# sed -i "s/127.0.0.1/192.168.190.11/g" src/restful/api.js
(5) . 开始编译vue的代码
# 输入npm install  进行打包
(django1)  [[email protected] 07-luffy_project_01]# npm install
(django1)  [[email protected] 07-luffy_project_01]# echo $?     #查看命令是否成功 返回0
(django1)  [[email protected] 07-luffy_project_01]# npm run build
# 这两条都正确配置之后,就会生成一个 dist 静态文件目录,整个项目的前端内容和index.html都在这里了
[[email protected] 07-luffy_project_01]# ls
build   dist        node_modules  package-lock.json  src
config  index.html  package.json  README.md          static

# 得到一个dist文件夹  进行前后端的部署

# 建议采取以下的方式
由于网速问题,下载包可能超级慢
#修改npm的下载源,如同pip 更改豆瓣源一样

npm config set registry https://registry.npm.taobao.org

npm install  #找到package.json然后安装模块,如同pip install

npm run build   #这一步会生成dist静态文件夹,路飞首页在这index.html
(6).配置nginx.conf,此步重要!内容如下
#第一个server虚拟主机是为了找到vue的dist文件, 找到路飞的index.html
server
       listen       80;
       server_name  192.168.190.11;
       #只需要找到第一个虚拟主机,配置dist的静态文件夹即可
       #第一个虚拟主机的配置
       location /
       root /opt/07-luffy_project_01/dist;
       index index.html;
       #确保刷新不出现404
       #这一条参数确保vue页面刷新时候,不会出现404页面
       try_files $uri $uri/ /index.html;

       error_page   500 502 503 504  /50x.html;
       location = /50x.html
          root   html;


#第二个虚拟主机的配置,用作反向代理

  server
       listen     9000    ;
       server_name  localhost;
       location /
       include uwsgi_params;
       uwsgi_pass 127.0.0.1:9999;
       #  include /opt/tngx231/conf/uwsgi_params;
       #  include  uwsgi_params;

         # location /static
           # alias /opt/static;
          #
(django1) [[email protected] luffy_boy]# vim /opt/tngx231/conf/nginx.conf

(django1) [[email protected] luffy_boy]# nginx -t
nginx: the configuration file /opt/tngx231//conf/nginx.conf syntax is ok
nginx: configuration file /opt/tngx231//conf/nginx.conf test is successful

(django1) [[email protected] luffy_boy]# nginx
(django1) [[email protected] luffy_boy]# nginx -s reload
# 如果nginx没有启动 nginx -s reload会出错
三:后端uwsgi+django的部署
⑴ . 激活虚拟环境
[[email protected] ~]# cd /opt/luffy_boy
[[email protected] luffy_boy]# workon s15vuedrf
(django1) [[email protected] luffy_boy]

# worken   命令是直接进入虚拟环境

进入虚拟机 workon django1
⑵ . 导出依赖包
注意 : 这是导出的后端代码所需要的依赖包,比如Django.....
要在物理环境中,退出虚拟环境
(django1) [[email protected] luffy_boy]# deactivate   # 退出虚拟环境
[[email protected] 07-luffy_project_01]# pip3 freeze >  requirements.txt
[[email protected] 07-luffy_project_01]# vim requirements.txt

# 复制下面的模块到 requirements.txt
certifi==2018.11.29
chardet==3.0.4
crypto==1.4.1
Django==2.1.4
django-redis==4.10.0
django-rest-framework==0.1.0
djangorestframework==3.9.0
idna==2.8
Naked==0.1.31
pycrypto==2.6.1
pytz==2018.7
PyYAML==3.13
redis==3.0.1
requests==2.21.0
shellescape==3.4.1
urllib3==1.24.1方式2:手动解决依赖关系
1089 pip3 install -i https://pypi.douban.com/simple django==2.0
1091 pip3 install -i https://pypi.douban.com/simple django-rest-framework
1093 pip3 install -i https://pypi.douban.com/simple requests
1095 pip3 install -i https://pypi.douban.com/simple django-redis
1097 pip3 install -i https://pypi.douban.com/simple crypto==1.4.1
1099 pip3 install -i https://pypi.douban.com/simple pycrypto==2.6.1⑶ . 将依赖上传到服务器并安装
将 requirements.txt 文件上传到服务器,在服务器的虚拟环境中,安装这个文件,就可以安装所需要的依赖包.
(django1) [[email protected] luffy_boy]# pip3 install -r requirements.txt ⑷ . 准备 uwsgi
uwsgi 支持高并发启动的项目,
注意 : uwsgi 不支持静态文件的解析,必须用 nginx 去处理静态文件
# 安装 uwsgi
(django1) [[email protected] luffy_boy]#  pip3 install -i https://pypi.douban.com/simple uwsgi
⑸ . 配置 uwsgi 文件
创建 uwsgi.ini 文件
(django1) [[email protected] luffy_boy]# touch uwsgi.ini写入参数
[uwsgi]
# Django-related settings
# the base directory (full path)
#指定项目的绝对路径的第一层路径!!!!!!!!!!!!!!
chdir           = /opt/luffy_boy

# Django's wsgi file
#  指定项目的 wsgi.py文件!!!!!!!!!
#  (luffy_boy 与上面的 luffy_boy 不是一个,在上面的luffy_boy的下一层)
#  写入相对路径即可,这个参数是以  chdir参数为相对路径 (/opt/s15vuedrf/luffy_boy/luffy_boy/wsgi.py)
module          = luffy_boy.wsgi


# the virtualenv (full path)
# 写入虚拟环境解释器的 绝对路径!!!!!!
home            = /root/Envs/django1

# process-related settings
# master
master          = true
# maximum number of worker processes
#指定uwsgi启动的进程个数
processes       = 1

#这个参数及其重要!!!!!!
# the socket (use the full path to be safe
#socket指的是,uwsgi启动一个socket连接,当你使用nginx+uwsgi的时候,使用socket参数
socket          = 0.0.0.0:9999

#这个参数是uwsgi启动一个http连接,当你不用nginx只用uwsgi的时候,使用这个参数
#http  =  0.0.0.0:8000

# ... with appropriate permissions - may be needed
# chmod-socket    = 664
# clear environment on exit
vacuum          = true
⑹ . 使用 uwsgi 配置文件启动项目 (后面可以使用 supervisor 去启动)
(django1) [[email protected] luffy_boy]# uwsgi --ini uwsgi.ini (7).还得启动redis,才能添加购物车
复制代码
这个路飞代码数据库用的是sqllite,不需要配置数据库了
购物车用都的是redis,因此要启动服务器的redis-server服务端

最省事的安装
yum install redis -y
systemctl start redis

项目访问
将商品添加到购物车,查看redis中的数据
登录账户密码
alex
alex3714
四: supervisor 进程管理工具
supervisor 是基于 python 的任务管理工具,用来自动运行各种后台任务,当然你也能直接利用 nohup 命令使任务自动后台运行,但如果要重启任务,每次都自己手动 kill 掉任务进程,这样很繁琐,而且一旦程序错误导致进程退出的话,系统也无法自动重载任务。
由于supervisor在python3下无法使用,因此只能用python2去下载!!!!!!
⑴ . 安装 supervisor
使用python2的包管理工具, easy_install ,此时要退出虚拟环境.
[[email protected] luffy_boy]# yum install python-setuptools  # 安装python2的包管理工具

[[email protected] luffy_boy]# easy_install supervisor
⑵ . 生成响应的配置文件
[[email protected] luffy_boy]#echo_supervisord_conf > /etc/supervisor.conf
# 命令生成一个配置文件,这个文件就是写入要管理的进程任务
⑶ . 编辑配置文件
[[email protected] luffy_boy]#vim /etc/supervisor.conf
# 直接到最底行,写入以下配置
        [program:s15luffy]
        command=/root/Envs/s15vuedrf/bin/uwsgi  --ini  /opt/s15vuedrf/luffy_boy/uwsgi.ini
⑷ . 启动supervisord服务端,指定配置文件启动
supervisord -c /etc/supervisor.conf⑸ . 通过supervisorctl管理任务
supervisorctl -c /etc/supervisor.conf ⑹ . supervisor管理django进程的命令如下
supervisorctl直接输入命令会进入交互式的操作界面
>  stop s15luffy
>  start s15luffy
>  status s15luffy
这样以后我们就可以使用 supervisor 去管理Django进程了.
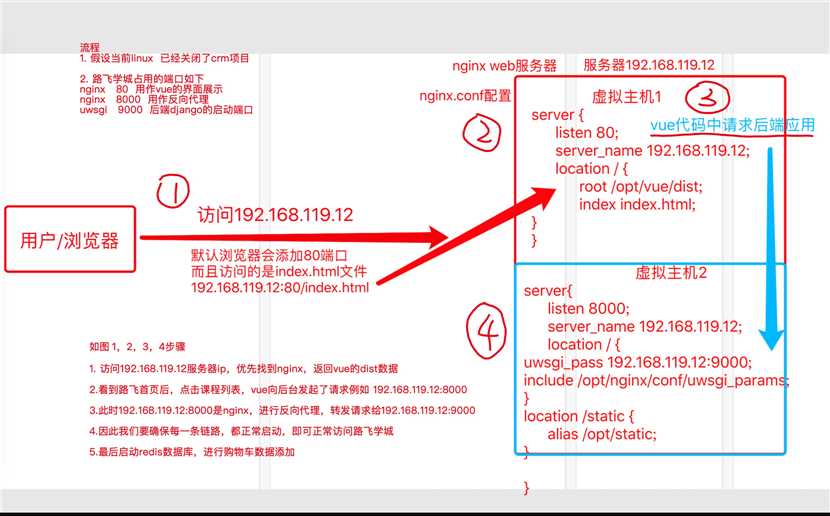
原理图
以上是关于vue+uwsgi+nginx部署前后端分离项目的主要内容,如果未能解决你的问题,请参考以下文章