搭建:LVS+Keepalived高可用Web服务群集环境
Posted
tags:
篇首语:本文由小常识网(cha138.com)小编为大家整理,主要介绍了搭建:LVS+Keepalived高可用Web服务群集环境相关的知识,希望对你有一定的参考价值。
该服务涉及到的技术较多,相关技术文档的具体解释可以参考以下链接:Centos 7基于DR(直接路由)模式的负载均衡配置详解;
Centos 7基于NAT(地址转换)模式的负载均衡配置详解;
上面的博文结合,可以搭建出keepalived+DR/NAT模式的高可用web群集,这篇博文以keepalived+DR的环境来搭建一个高可用的web服务群集。
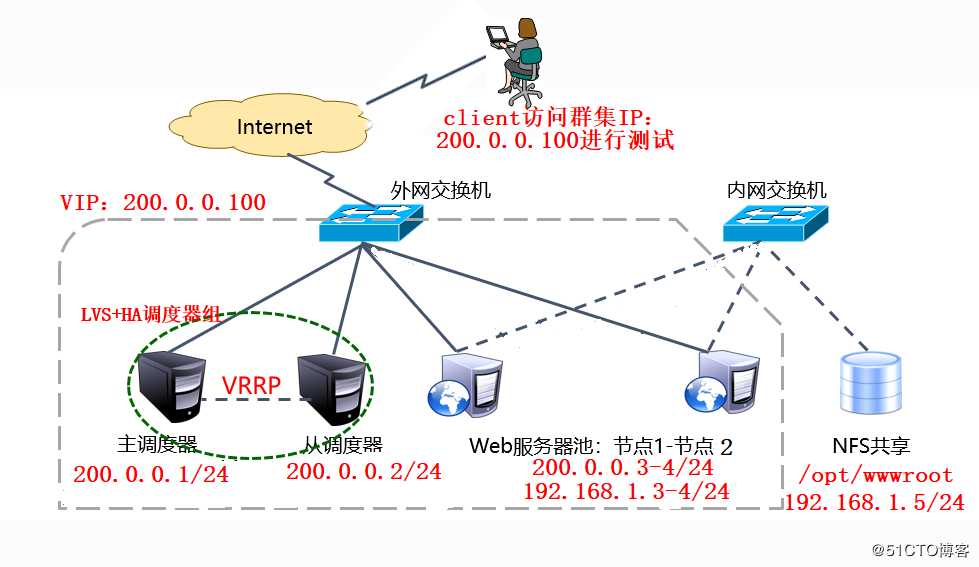
该博文以配置为主,并且按照生产环境来配置,可照搬,环境如下:

一、环境分析:
1、2个调度器和2个web节点使用同一个网段地址,可以直接和外网通信。为了共享存储的
安全性,一般将web节点和存储服务器规划到内网环境,所以web节点必须有两个及以上
网卡的接口。
2、我这里资源有限,也为了配置方便,所以调度器和web节点分别只有两个,在web访问请
求量不大的情况下,足够了,但是若访问请求比较大,那么最少要分别配置三个调度器和
web节点,如果只有两个web节点的话,访问量又比较大,那么一旦有一个宕机了,那剩下
一个独苗必定会因为扛不住激增的访问请求,而被打死。
3、准备系统映像,以便安装相关服务。
4、自行配置防火墙策略和除了VIP之外的IP地址(我这里直接关闭了防火墙)。
5、keepalived会自动调用IP_vs模块,所以无需手动加载。
二、最终效果:
1、 客户端多次访问群集的VIP,得到的是同一个网页。
2、主调度器宕机后,群集的VIP地址将会自动漂移到从(备份)调度器,此时,所有
的调度任务由从调度器进行分配。当主调度器恢复运行后,群集的VIP地址会自动转移回
主调度器,主调度器继续工作,从调度器转回备份状态。
3、web节点宕机后,会被keepalived健康检查功能检测到,从而自动在web节点池中去除
宕机的节点,待web节点恢复运行后,会被自动添加到web节点池中。
三、开始搭建:
1、配置主调度器(LVS1):
[[email protected] ~]# yum -y install keepalived ipvsadm                #安装所需工具
[[email protected] ~]# vim /etc/sysctl.conf              #调整内核参数,写入下面三行
            .....................
net.ipv4.conf.all.send_redirects = 0
net.ipv4.conf.default.send_redirects = 0
net.ipv4.conf.ens33.send_redirects = 0
[[email protected] ~]# sysctl -p                  #刷新一下
net.ipv4.conf.all.send_redirects = 0
net.ipv4.conf.default.send_redirects = 0
net.ipv4.conf.ens33.send_redirects = 0
[[email protected] ~]# cd /etc/keepalived/
[[email protected] keepalived]# cp keepalived.conf keepalived.conf.bak          #备份配置文件
[[email protected] keepalived]# vim keepalived.conf               #编辑keepalived配置文件

! Configuration File for keepalived

global_defs
   notification_email
     [email protected]            #收件人地址(没需要的话可以不做修改)
     [email protected]
     [email protected]

   notification_email_from [email protected]       #发件人姓名、地址(可不做修改)
   smtp_server 192.168.200.1
   smtp_connect_timeout 30
   router_id LVS_DEVEL1       #本服务器的名称改一下,在所有调度器名称里必须唯一。


vrrp_instance VI_1
    state MASTER             #设置为主调度器
    interface ens33            #承载VIP地址的物理网卡接口根据实际情况改一下
    virtual_router_id 51
    priority 100
    advert_int 1
    authentication
        auth_type PASS
        auth_pass 1111

    virtual_ipaddress
        200.0.0.100                  #指定漂移IP地址(VIP),可以有多个。


virtual_server 200.0.0.100 80                        #改为VIP地址及所需端口
    delay_loop 6
    lb_algo rr                             #根据需要改一下负载调度算法,rr表示轮询。
    lb_kind DR                          #设置工作模式为DR(直接路由)模式。
   ! persistence_timeout 50      #为了一会测试看到效果,将连接保持这行前加“ !”将该行注释掉。
    protocol TCP

real_server 200.0.0.4 80        #一个web节点的配置,real_server 200.0.0.4 80   ..... 是复制下面的。复制过来后,更改一下节点IP地址即可。
        weight 1
        TCP_CHECK
            connect_port 80
            connect_timeout 3
            nb_get_retry 3
            delay_before_retry 3


    real_server 200.0.0.3 80              #一个web节点的配置,改动完成后,有几个节点就复制几份real_serve 200.0.0.3 80    ..... 到该行的上方,最好别往下面粘贴,以防大括号丢失。
        weight 1
        TCP_CHECK
            connect_port 80                #添加该行,以配置连接端口
            connect_timeout 3
            nb_get_retry 3
            delay_before_retry 3


 #以下还有很多配置项,我这里有98行,全部删除即可,若不删除时重启服务可能报错。
 [[email protected] ~]# systemctl restart keepalived              #重启服务
 [[email protected] ~]# systemctl enable keepalived              #设置开机自启动
至此,主调度器配置完毕!!!
2、配置从调度器(LVS2):
[[email protected] ~]# yum -y install ipvsadm keepalived           #安装所需工具
[[email protected] ~]# scp [email protected]:/etc/sysctl.conf /etc/
#将主调度器的/proc参数文件复制过来
[email protected]‘s password:            #输入主调度器的用户密码
sysctl.conf                                 100%  566   205.8KB/s   00:00
[[email protected] ~]# sysctl -p               #刷新
net.ipv4.conf.all.send_redirects = 0
net.ipv4.conf.default.send_redirects = 0
net.ipv4.conf.ens33.send_redirects = 0
[[email protected] ~]# scp [email protected]:/etc/keepalived/keepalived.conf /etc/keepalived/
#将主调度器的keepalived配置文件复制过来,稍微改动即可。
[email protected]‘s password:                     #输入主调度器的用户密码
keepalived.conf                             100% 1053     2.5MB/s   00:00
[[email protected] ~]# vim /etc/keepalived/keepalived.conf             #编辑复制过来的配置文件
#若两台服务器都是ens33网卡的话,那么所需该的只有以下三项(其他项保持默认):
router_id LVS_DEVEL2        #将route_id改为不一样的。route_id必须是唯一的。
state BACKUP              #状态改为BACKUP,注意大小写。
priority 90        #优先级要比主调度器小,并且不可与其他备份调度器优先级冲突。
[[email protected] ~]# systemctl restart keepalived           #启动服务
[[email protected] ~]# systemctl enable keepalived          #设置开机自启动
至此,从调度器也配置完成了,若需要部署多个从调度器,按照以上这个从(备份)调度器配置即可。
3、配置web1节点:
[[email protected] ~]# cd /etc/sysconfig/network-scripts/
[[email protected] network-scripts]# cp ifcfg-lo ifcfg-lo:0           #复制一份回环地址的配置文件
[[email protected] network-scripts]# vim ifcfg-lo:0           #编辑回环地址,以承载群集的VIP。
DEVICE=lo:0            #更改网卡名称
IPADDR=200.0.0.100            #配置群集的VIP
NETMASK=255.255.255.255             #子网掩码必须为4个255。
ONBOOT=yes
#保留上面四行配置项即可,多余的删除。
[[email protected] network-scripts]# ifup lo:0          #启动回环接口
[[email protected] ~]# ifconfig lo:0                    #查看VIP配置是否正确
lo:0: flags=73<UP,LOOPBACK,RUNNING>  mtu 65536
        inet 200.0.0.100  netmask 255.255.255.255
        loop  txqueuelen 1  (Local Loopback)
[[email protected] ~]# route add -host 200.0.0.100 dev lo:0              #添加VIP本地访问路由记录
[[email protected] ~]# vim /etc/rc.local               #设置开机自动,添加这条路由记录
                ................................
/sbin/route add -host 200.0.0.100 dev lo:0
[[email protected] ~]# vim /etc/sysctl.conf                  #调整/proc响应参数,写入下面六行
                    ...................
net.ipv4.conf.all.arp_ignore = 1
net.ipv4.conf.all.arp_announce = 2
net.ipv4.conf.default.arp_ignore = 1
net.ipv4.conf.default.arp_announce = 2
net.ipv4.conf.lo.arp_ignore = 1
net.ipv4.conf.lo.arp_announce = 2
[[email protected] ~]# sysctl -p                #刷新一下
net.ipv4.conf.all.arp_ignore = 1
net.ipv4.conf.all.arp_announce = 2
net.ipv4.conf.default.arp_ignore = 1
net.ipv4.conf.default.arp_announce = 2
net.ipv4.conf.lo.arp_ignore = 1
net.ipv4.conf.lo.arp_announce = 2
[[email protected] ~]# yum -y install httpd             #安装http服务
[[email protected] ~]# echo 111111111111 > /var/www/html/index.html           #准备测试网页文件
[[email protected] ~]# systemctl start httpd             #启动http服务
[[email protected] ~]# systemctl enable httpd             #设置开机自启动
至此,第一个web节点已经配置完成。
4、配置web2节点:
[[email protected] ~]# scp [email protected]:/etc/sysconfig/network-scripts/ifcfg-lo:0 /etc/sysconfig/network-scripts/                    #复制web1节点的lo:0配置文件
The authenticity of host ‘200.0.0.3 (200.0.0.3)‘ can‘t be established.
ECDSA key fingerprint is b8:ca:d6:89:a2:42:90:97:02:0a:54:c1:4c:1e:c2:77.
Are you sure you want to continue connecting (yes/no)? yes           #输入yes
Warning: Permanently added ‘200.0.0.3‘ (ECDSA) to the list of known hosts.
[email protected]‘s password:           #输入web1节点用户的密码
ifcfg-lo:0                                  100%   66     0.1KB/s   00:00
[[email protected] ~]# ifup lo:0                  #启用lo:0
[[email protected] ~]# ifconfig lo:0          #确认VIP无误
lo:0: flags=73<UP,LOOPBACK,RUNNING>  mtu 65536
        inet 200.0.0.100  netmask 255.255.255.255
        loop  txqueuelen 1  (Local Loopback)
[[email protected] ~]# scp [email protected]:/etc/sysctl.conf /etc/       #复制内核文件
[email protected]‘s password:                     #输入web1节点用户的密码
sysctl.conf                                 100%  659     0.6KB/s   00:00
[[email protected] ~]# sysctl -p                     #刷新一下
net.ipv4.conf.all.arp_ignore = 1
net.ipv4.conf.all.arp_announce = 2
net.ipv4.conf.default.arp_ignore = 1
net.ipv4.conf.default.arp_announce = 2
net.ipv4.conf.lo.arp_ignore = 1
net.ipv4.conf.lo.arp_announce = 2
[[email protected] ~]# route add -host 200.0.0.100 dev lo:0            #添加VIP本地访问路由记录
[[email protected] ~]# vim /etc/rc.local                  #设置开机自动,添加这条路由记录
[[email protected] ~]# yum -y install httpd             #安装http服务
[[email protected] ~]# echo 22222222222 > /var/www/html/index.html           #准备测试网页文件
[[email protected] ~]# systemctl start httpd             #启动http服务
[[email protected] ~]# systemctl enable httpd             #设置开机自启动
至此,web2也配置完成了,现在使用客户端,以便测试群集是否生效:
5、客户端访问测试:


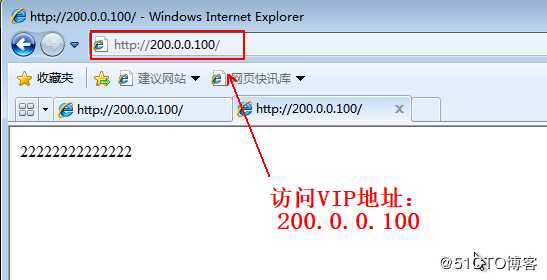
若访问到的是同一页面,在排除配置上错误的情况下,可以打开多个网页,或者稍等一会再刷新,因为它可能有一个保持连接的时间,所以会存在延迟。
为了测试,所以才在每个web节点准备不同的网页文件,以便测试是否有负载均衡的效果,现在效果已经有了,所以要搭建共享存储服务器,所有的web节点都从共享存储服务器读取网页文件向client提供,以便向client提供相同的网页文件。
下面是搭建了一个简易的共享存储服务器,若需要搭建高可用的存储服务器,可以关注我的博客:warrent,我将在以后的博文写出如何去搭建一个高可用的存储服务器。
6、配置NFS共享存储服务器:
[[email protected] /]# yum -y install nfs-utils rpcbind                   #安装相关软件包
[[email protected] /]# systemctl enable nfs               #设置为开机自启动
[[email protected] /]# systemctl enable rpcbind          #设置为开机自启动
[[email protected] /]# mkdir -p /opt/wwwroot               #准备共享目录
[[email protected] /]# echo www.baidu.com > /opt/wwwroot/index.html              #新建网页文件
[[email protected] /]# vim /etc/exports                         #设置共享目录(该文件内容默认为空)
/opt/wwwroot   192.168.1.0/24(rw,sync,no_root_squash)           #写入该行
[[email protected] /]# systemctl restart rpcbind        #重启相关服务,需注意服务启动的先后顺序
[[email protected] /]# systemctl restart nfs
[[email protected] /]# showmount -e               #查看本机共享的目录
Export list for NFS:
/opt/wwwroot 192.168.2.0
7、所有web节点挂载共享存储服务器:
1)Web1节点服务器配置:
[[email protected] ~]# showmount -e 192.168.1.5            #查看存储服务器共享的目录
Export list for 192.168.1.5:
/opt/wwwroot 192.168.1.0/24
[[email protected] ~]# mount 192.168.1.5:/opt/wwwroot /var/www/html/         #挂载至网页根目录
[[email protected] ~]# df -hT /var/www/html/                       #确认挂载成功
文件系统                 类型  容量  已用  可用 已用% 挂载点
192.168.1.5:/opt/wwwroot nfs4   39G  5.5G   33G   15% /var/www/html
[[email protected] ~]# vim /etc/fstab               #设置自动挂载
                   .........................
192.168.1.5:/opt/wwwroot  /var/www/html   nfs   defaults,_netdev 0 0
#写入上面内容
2)Web2节点服务器配置:
[[email protected] ~]# showmount -e 192.168.1.5            #查看存储服务器共享的目录
Export list for 192.168.1.5:
/opt/wwwroot 192.168.1.0/24
[[email protected] ~]# mount 192.168.1.5:/opt/wwwroot /var/www/html/         #挂载至网页根目录
[[email protected] ~]# df -hT /var/www/html/                       #确认挂载成功
文件系统                 类型  容量  已用  可用 已用% 挂载点
192.168.1.5:/opt/wwwroot nfs4   39G  5.5G   33G   15% /var/www/html
[[email protected] ~]# vim /etc/fstab               #设置自动挂载
                   .........................
192.168.1.5:/opt/wwwroot  /var/www/html   nfs   defaults,_netdev 0 0
#写入上面内容
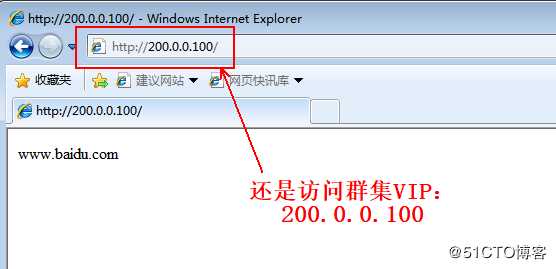
8、客户端再次访问测试:
这次,客户端无论怎么刷新,都将看到相同的网页,如下:

9、附上一些查看命令:
1)VIP在哪个调度器上,查询该调度器承载VIP地址的物理接口,即可看到VIP地址(VIP地址在备份调度器上查不到的):
[[email protected] ~]# ip a show dev ens33              #查询承载VIP地址的物理网卡ens33
2: ens33: <BROADCAST,MULTICAST,UP,LOWER_UP> ate UP groupn 1000
    link/ether 00:0c:29:77:2c:03 brd ff:ff:ff:ff:ff:ff
    inet 200.0.0.1/24 brd 200.0.0.255 scope global noprefixroute ens33
       valid_lft forever preferred_lft forever
    inet 200.0.0.100/32 scope global ens33                   #VIP地址。
       valid_lft forever preferred_lft forever
    inet6 fe80::95f8:eeb7:2ed2:d13c/64 scope link noprefixroute
       valid_lft forever preferred_lft forever
2)查询有哪些web节点:
[[email protected] ~]# ipvsadm -ln                  #查询web节点池及VIP
IP Virtual Server version 1.2.1 (size=4096)
Prot LocalAddress:Port Scheduler Flags
   RemoteAddress:Port           Forward Weight ActiveConn InActConn
TCP  200.0.0.100:80 rr
  200.0.0.3:80                 Route   1      0          0
  200.0.0.4:80                 Route   1      0          0
3)模拟Web2节点和主调度器宕机,并在备份调度器上再次查询VIP以及web节点:
[[email protected] ~]# ip a show dev ens33       #可以看到VIP地址已经转移到了备份调度器上
2: ens33: <BROADCAST,MULTICAST,UP,LOWER_UP>
    link/ether 00:0c:29:9a:09:98 brd ff:ff:ff:ff:ff:ff
    inet 200.0.0.2/24 brd 200.0.0.255 scope global noprefixroute ens33
       valid_lft forever preferred_lft forever
    inet 200.0.0.100/32 scope global ens33                      #VIP地址。
       valid_lft forever preferred_lft forever
    inet6 fe80::3050:1a9b:5956:5297/64 scope link noprefixroute
       valid_lft forever preferred_lft forever
[[email protected] ~]# ipvsadm -ln                   #Web2节点宕机后,就查不到了。
IP Virtual Server version 1.2.1 (size=4096)
Prot LocalAddress:Port Scheduler Flags
  -> RemoteAddress:Port           Forward Weight ActiveConn InActConn
TCP  200.0.0.100:80 rr
  -> 200.0.0.3:80                 Route   1      0          0

    #当主调度器或Web2节点恢复正常后,将会自动添加到群集中,并且正常运行。
4)查看调度器故障切换时的日志消息:
[[email protected] ~]# tail -30 /var/log/messages齐活.....................
以上是关于搭建:LVS+Keepalived高可用Web服务群集环境的主要内容,如果未能解决你的问题,请参考以下文章