SpringBoot2.0 基础案例(17):自定义启动页,项目打包和指定运行环境
Posted cicada-smile
tags:
篇首语:本文由小常识网(cha138.com)小编为大家整理,主要介绍了SpringBoot2.0 基础案例(17):自定义启动页,项目打包和指定运行环境相关的知识,希望对你有一定的参考价值。
本文源码
GitHub地址:知了一笑
https://github.com/cicadasmile/spring-boot-base
一、打包简介
springboot的打包方式有很多种。可以打war包,可以打jar包,可以使用jekins进行打包部署的。不推荐用war包,SpringBoot适合前后端分离,打成jar进行部署更加方便快捷。
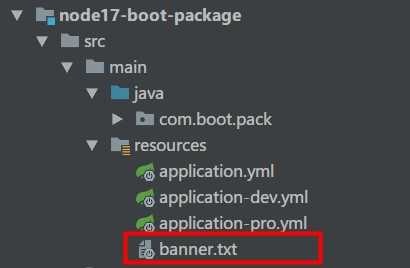
二、自定义启动页

banner.txt内容
=======================
        No BUG
=======================
这样就替换了原先SpringBoot的启动样式。
三、打包配置
1、打包pom配置
<!-- 项目构建 -->
<build>
    <finalName>$project.artifactId</finalName>
    <resources>
        <resource>
            <directory>src/main/resources</directory>
            <filtering>true</filtering>
        </resource>
    </resources>
    <plugins>
        <!-- SpringBoot插件:JDK编译插件 -->
        <plugin>
            <groupId>org.apache.maven.plugins</groupId>
            <artifactId>maven-compiler-plugin</artifactId>
            <version>2.3.2</version>
            <configuration>
                <source>1.8</source>
                <target>1.8</target>
            </configuration>
        </plugin>
        <!-- SpringBoot插件:打包 -->
        <plugin>
            <groupId>org.springframework.boot</groupId>
            <artifactId>spring-boot-maven-plugin</artifactId>
            <configuration>
                <jvmArguments>-Dfile.encoding=UTF-8</jvmArguments>
                <executable>true</executable>
            </configuration>
            <executions>
                <execution>
                    <goals>
                        <goal>repackage</goal>
                    </goals>
                </execution>
            </executions>
        </plugin>
        <!-- 跳过单元测试 -->
        <plugin>
            <groupId>org.apache.maven.plugins</groupId>
            <artifactId>maven-surefire-plugin</artifactId>
            <configuration>
                <skipTests>true</skipTests>
            </configuration>
        </plugin>
    </plugins>
</build>
2、多环境配置
1)application.yml配置
server:
  port: 8017
spring:
  application:
    name: node17-boot-package
  profiles:
    active: dev
2)application-dev.yml配置
project:
  sign: develop
3)application-pro.yml配置
project:
  sign: product
3、环境测试接口
package com.boot.pack.controller;
import org.springframework.beans.factory.annotation.Value;
import org.springframework.web.bind.annotation.RequestMapping;
import org.springframework.web.bind.annotation.RestController;
@RestController
public class PackController
    @Value("$project.sign")
    private String sign ;
    @RequestMapping("/getSign")
    public String getSign ()
        return sign ;
四、打包执行
1、指定模块打包
mvn clean install -pl node17-boot-package -am -Dmaven.test.skip=true
生成Jar包:node17-boot-package.jar
2、运行Jar包
运行dev环境
java -jar node17-boot-package.jar --spring.profiles.active=dev
运行pro环境
java -jar node17-boot-package.jar --spring.profiles.active=pro
http://localhost:8017/getSign
dev环境打印:develop
pro环境打印:product
五、源代码地址
GitHub地址:知了一笑
https://github.com/cicadasmile/spring-boot-base
码云地址:知了一笑
https://gitee.com/cicadasmile/spring-boot-base

以上是关于SpringBoot2.0 基础案例(17):自定义启动页,项目打包和指定运行环境的主要内容,如果未能解决你的问题,请参考以下文章