pytorch实现yolov3 实现forward
Posted sdu20112013
tags:
篇首语:本文由小常识网(cha138.com)小编为大家整理,主要介绍了pytorch实现yolov3 实现forward相关的知识,希望对你有一定的参考价值。
之前的文章里https://www.cnblogs.com/sdu20112013/p/11099244.html实现了网络的各个layer.
本篇来实现网络的forward的过程.
定义网络
class Darknet(nn.Module):
    def __init__(self, cfgfile):
        super(Darknet, self).__init__()
        self.blocks = parse_cfg(cfgfile)
        self.net_info, self.module_list = create_modules(self.blocks)
实现网络的forward过程
forward函数继承自nn.Module
Convolutional and Upsample Layers
if module_type == "convolutional" or module_type == "upsample":
            x = self.module_list[i](x)
Route Layer / Shortcut Layer
在上一篇里讲过了,route layer的输出是之前某一层或某两层在depth方向的连接.即
output[current_layer] = output[previous_layer]
或者
map1 = outputs[i + layers[0]]
map2 = outputs[i + layers[1]]
output[current layer]=torch.cat((map1, map2), 1)
所以route layer代码如下:
        elif module_type == "route":
            layers = module["layers"]
            layers = [int(a) for a in layers]

            if (layers[0]) > 0:
                layers[0] = layers[0] - i

            if len(layers) == 1:
                x = outputs[i + (layers[0])]

            else:
                if (layers[1]) > 0:
                    layers[1] = layers[1] - i

                map1 = outputs[i + layers[0]]
                map2 = outputs[i + layers[1]]

                x = torch.cat((map1, map2), 1)
shortcut layer的输出为前一层及前xx层(配置文件中配置)的输出之和
        elif  module_type == "shortcut":
            from_ = int(module["from"])
            x = outputs[i-1] + outputs[i+from_]
YOLO layer
yolo层的输出是一个n*n*depth的feature map矩阵.假设你想访问第(5,6)个cell的第2个boundingbox的话你需要map[5,6,(5+C):2*(5+C)]这样访问,这种形式操作起来有点麻烦,所以我们引入一个predict_transform函数来改变一下输出的形式.
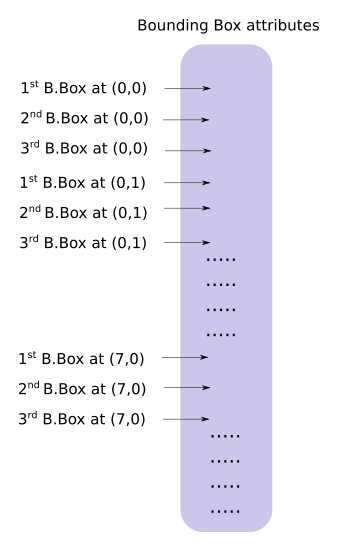
简而言之我们希望把一个batch_size*grid_size*grid_size*(B*(5+C))的4-D矩阵转换为batch_size*(grid_size*grid_size*B)*(5+C)的矩阵.
2-D矩阵的每一行的排列如下:

    batch_size = prediction.size(0)
    stride =  inp_dim // prediction.size(2)
    grid_size = inp_dim // stride
    bbox_attrs = 5 + num_classes
    num_anchors = len(anchors)

    prediction = prediction.view(batch_size, bbox_attrs*num_anchors, grid_size*grid_size)
    prediction = prediction.transpose(1,2).contiguous()
    prediction = prediction.view(batch_size, grid_size*grid_size*num_anchors, bbox_attrs)
上述代码涉及到pytorch中view的用法,和numpy中resize类似.contiguous一般与transpose,permute,view搭配使用,维度变换后tensor在内存中不再是连续存储的,而view操作要求连续存储,所以需要contiguous.最终我们得到一个batch_size*(grid_size*grid_size*num_anchors)*bbox_attrs的矩阵.
接下来要对预测boundingbox的坐标.


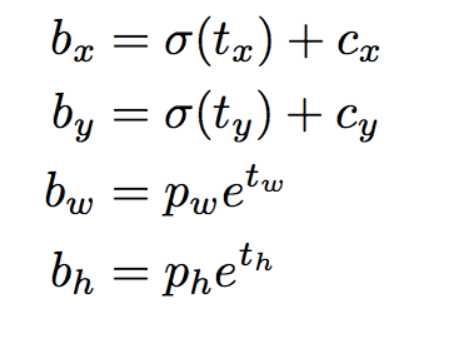
注意此时prediction[:,:,0],prediction[:,:,1],prediction[:,:,2],prediction[:,:,3]prediction[:,:,4]即相应的tx,ty,tw,th,obj score.
接下来是预测相对当前cell左上角的offset
    #sigmoid转换为0-1范围内
    #Sigmoid the  centre_X, centre_Y. and object confidencce
    prediction[:,:,0] = torch.sigmoid(prediction[:,:,0])
    prediction[:,:,1] = torch.sigmoid(prediction[:,:,1])
    prediction[:,:,4] = torch.sigmoid(prediction[:,:,4])

    #Add the center offsets
    grid = np.arange(grid_size)
    a,b = np.meshgrid(grid, grid)

    x_offset = torch.FloatTensor(a).view(-1,1)
    y_offset = torch.FloatTensor(b).view(-1,1)

    if CUDA:
        x_offset = x_offset.cuda()
        y_offset = y_offset.cuda()

    x_y_offset = torch.cat((x_offset, y_offset), 1).repeat(1,num_anchors).view(-1,2).unsqueeze(0)

    #prediction[:,:,:0],prediction[:,:,:1]修改为相对于当前cell偏移
    prediction[:,:,:2] += x_y_offset
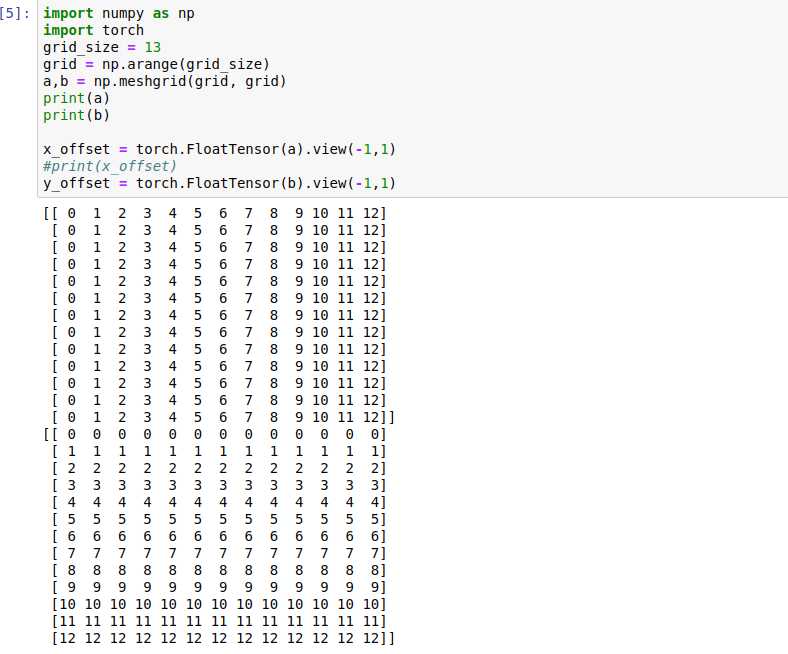
有关meshgrid用法效果如下:
import numpy as np
import torch
grid_size = 13
grid = np.arange(grid_size)
a,b = np.meshgrid(grid, grid)
print(a)
print(b)

x_offset = torch.FloatTensor(a).view(-1,1)
#print(x_offset)
y_offset = torch.FloatTensor(b).view(-1,1)
这段代码输出如下:

预测boundingbox的width,height.注意anchors的大小要转换为适配当前feature map的大小.配置文件中配置的是相对于模型输入的大小.
    anchors = [(a[0]/stride, a[1]/stride) for a in anchors]  #适配到feature map上的尺寸

    #log space transform height and the width
    anchors = torch.FloatTensor(anchors)

    if CUDA:
        anchors = anchors.cuda()

    anchors = anchors.repeat(grid_size*grid_size, 1).unsqueeze(0)
    prediction[:,:,2:4] = torch.exp(prediction[:,:,2:4])*anchors

    ##还原为原始图片上对应的坐标
    prediction[:,:,:4] *= stride
预测class probability
prediction[:,:,5: 5 + num_classes] = torch.sigmoid((prediction[:,:, 5 : 5 + num_classes]))predict_transform完整代码如下
#yolo经过不断地卷积得到的feature map size= batch_size*(B*(5+C))*grid_size*grid_size
def predict_transform(prediction, inp_dim, anchors, num_classes, CUDA = True):
    if CUDA:
        prediction = prediction.to(torch.device("cuda")) #使用gpu torch0.4不需要 torch1.0需要

    batch_size = prediction.size(0)
    stride =  inp_dim // prediction.size(2)
    grid_size = inp_dim // stride
    bbox_attrs = 5 + num_classes
    num_anchors = len(anchors)

    print("prediction.shape=",prediction.shape)
    print("batch_size=",batch_size)
    print("inp_dim=",inp_dim)
    #print("anchors=",anchors)
    #print("num_classes=",num_classes)

    print("grid_size=",grid_size)
    print("bbox_attrs=",bbox_attrs)


    prediction = prediction.view(batch_size, bbox_attrs*num_anchors, grid_size*grid_size)
    prediction = prediction.transpose(1,2).contiguous()
    prediction = prediction.view(batch_size, grid_size*grid_size*num_anchors, bbox_attrs)

    #Sigmoid the  centre_X, centre_Y. and object confidencce
    prediction[:,:,0] = torch.sigmoid(prediction[:,:,0])
    prediction[:,:,1] = torch.sigmoid(prediction[:,:,1])
    prediction[:,:,4] = torch.sigmoid(prediction[:,:,4])

    #Add the center offsets
    grid = np.arange(grid_size).astype(np.float32)
    a,b = np.meshgrid(grid, grid)

    x_offset = torch.FloatTensor(a).view(-1,1)
    y_offset = torch.FloatTensor(b).view(-1,1)

    if CUDA:
        x_offset = x_offset.cuda()
        y_offset = y_offset.cuda()

    x_y_offset = torch.cat((x_offset, y_offset), 1).repeat(1,num_anchors).view(-1,2).unsqueeze(0)

    print(type(x_y_offset),type(prediction[:,:,:2]))
    prediction[:,:,:2] += x_y_offset

    anchors = [(a[0]/stride, a[1]/stride) for a in anchors]  #适配到和feature map大小匹配
    #log space transform height and the width
    anchors = torch.FloatTensor(anchors)

    if CUDA:
        anchors = anchors.cuda()

    anchors = anchors.repeat(grid_size*grid_size, 1).unsqueeze(0)
    prediction[:,:,2:4] = torch.exp(prediction[:,:,2:4])*anchors

    prediction[:,:,5: 5 + num_classes] = torch.sigmoid((prediction[:,:, 5 : 5 + num_classes]))

    prediction[:,:,:4] *= stride #恢复到原始图片上的相应坐标,width,height等

    return prediction
助手函数写好了,现在来继续实现Darknet类的forward方法
            elif module_type == "yolo":
                anchors = self.module_list[i][0].anchors
                inp_dim = int(self.net_info["height"])
                num_classes = int (module["classes"])
                x = x.data
                x = predict_transform(x, inp_dim, anchors, num_classes, CUDA)
                if not write:              #if no collector has been intialised.
                    detections = x
                    write = 1
                else:
                    detections = torch.cat((detections, x), 1)
在没有写predict_transform之前,不同的feature map矩阵,比如13*13*N1,26*26*N2,52*52*N3是没法直接连接成一个tensor的,现在都变成了xx*(5+C)则可以了.
上面代码里的write flag主要是为了区别detections是否为空,为空则说明是第一个yolo layer做的预测,将yolo层的输出赋值给predictions,不为空则连接当前yolo layer的输出至detections.
测试
下载测试图片wget https://github.com/ayooshkathuria/pytorch-yolo-v3/raw/master/dog-cycle-car.png
def get_test_input():
    img = cv2.imread("dog-cycle-car.png")
    img = cv2.resize(img, (608,608))          #Resize to the input dimension
    img_ =  img[:,:,::-1].transpose((2,0,1))  # BGR -> RGB | H X W C -> C X H X W
    img_ = img_[np.newaxis,:,:,:]/255.0       #Add a channel at 0 (for batch) | Normalise
    img_ = torch.from_numpy(img_).float()     #Convert to float
    img_ = Variable(img_)                     # Convert to Variable
    return img_

model = Darknet("cfg/yolov3.cfg")
inp = get_test_input()
pred = model(inp, torch.cuda.is_available())
print (pred)
cv2.imread()导入图片时是BGR通道顺序,并且是h*w*c,比如416*416*3这种格式,我们要转换为3*416*416这种格式.如果有
- RuntimeError: expected type torch.FloatTensor but got torch.cuda.FloatTensor
在predict_transform开头添加prediction = prediction.to(torch.device("cuda")) #使用gpu - RuntimeError: shape ‘[1, 255, 3025]‘ is invalid for input of size 689520
注意检查你的input的img的大小和你模型的输入大小是否匹配. 比如模型是608*608的
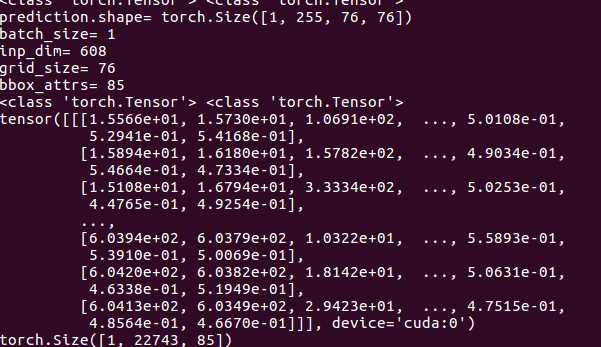
最终测试结果如下:

预测出22743个boundingbox,一共3种feature map,分别为19*19,38*38,76*76 每种尺度下预测出3个box,一共3*(19*19 + 38*38 + 76*76) = 22743个box.
以上是关于pytorch实现yolov3 实现forward的主要内容,如果未能解决你的问题,请参考以下文章