2.系统目录介绍
Posted
tags:
篇首语:本文由小常识网(cha138.com)小编为大家整理,主要介绍了2.系统目录介绍相关的知识,希望对你有一定的参考价值。
1.变量与PS1[[email protected] ~]# echo $PS1
[\[email protected]\h \W]\$
\u用户名 \h主机名 \W 当前路径,相对路径
[[email protected] ~]# PS1=‘[\[email protected]\h \W \t]\$‘2.linux的优化
1.添加普通用户
2.关闭selinux
3.关闭iptables
4.防止中文乱码
2.1添加普通用户
root用户
普通用户
[[email protected] ~ 22:02:30]#useradd oldboy
查看用户是否存在
[[email protected] ~ 22:08:36]#id oldboy
uid=500(oldboy) gid=500(oldboy) groups=500(oldboy)
[[email protected] ~ 22:08:45]#id llll
id: llll: No such user
[[email protected] ~ 22:09:58]#passwd oldboy
Changing password for user oldboy.
New password:
BAD PASSWORD: it is too simplistic/systematic
BAD PASSWORD: is too simple
Retype new password:
passwd: all authentication tokens updated successfully.
切换用户
[[email protected] ~]# su - oldboy
[[email protected] ~]$ who am i
root     pts/1        2019-02-19 22:12 (10.0.0.1)
[[email protected] ~]$ whoami
oldboy
退出当前用户
ctrl +d
[[email protected] ~]$ logout
[[email protected] ~]#
2.2关闭selinux
1.临时关闭
[[email protected] data]# getenforce
Enforcing
#setenforce Disabled是不可以的
[[email protected] data]# setenforce Disabled
usage:  setenforce [ Enforcing | Permissive | 1 | 0 ]
[[email protected] data]# setenforce 0
[[email protected] data]#

2.永久关闭
重启之后,配置才会生效
[[email protected] data]# cat /etc/selinux/config

# This file controls the state of SELinux on the system.
# SELINUX= can take one of these three values:
#     enforcing - SELinux security policy is enforced.
#     permissive - SELinux prints warnings instead of enforcing.
#     disabled - No SELinux policy is loaded.
SELINUX=disabled
# SELINUXTYPE= can take one of these two values:
#     targeted - Targeted processes are protected,
#     mls - Multi Level Security protection.
SELINUXTYPE=targeted
2.3关闭防火墙
1.查看iptables状态
[[email protected] ~]# service iptables status
Table: filter
Chain INPUT (policy ACCEPT)
num  target     prot opt source               destination
1    ACCEPT     all  --  0.0.0.0/0            0.0.0.0/0           state RELATED,ESTABLISHED
2    ACCEPT     icmp --  0.0.0.0/0            0.0.0.0/0
3    ACCEPT     all  --  0.0.0.0/0            0.0.0.0/0
4    ACCEPT     tcp  --  0.0.0.0/0            0.0.0.0/0           state NEW tcp dpt:22
5    REJECT     all  --  0.0.0.0/0            0.0.0.0/0           reject-with icmp-host-prohibited

Chain FORWARD (policy ACCEPT)
num  target     prot opt source               destination
1    REJECT     all  --  0.0.0.0/0            0.0.0.0/0           reject-with icmp-host-prohibited

Chain OUTPUT (policy ACCEPT)
num  target     prot opt source               destination

2.临时关闭防火墙
 [[email protected] ~]# /etc/init.d/iptables stop
iptables: Setting chains to policy ACCEPT: filter          [  OK  ]
iptables: Flushing firewall rules:                         [  OK  ]
iptables: Unloading modules:                               [  OK  ]
上面虽然关闭了,但是由于在在即启动中,所以下次开机还会启动
 [[email protected] ~]#
[[email protected] ~]# chkconfig --list|grep iptables
iptables        0:off   1:off   2:on    3:on    4:on    5:on    6:off

3.永久关闭防火墙
[[email protected] ~]# chkconfig iptables off
[[email protected] ~]# chkconfig --list|grep iptables
iptables        0:off   1:off   2:off   3:off   4:off   5:off   6:off
[[email protected] ~]#
2.4中文乱码的排查过程
1.什么是字符集
表示字符 文字的方法
UTF-8系统默认的
GBK GB2132

2.查看字符集
[[email protected] ~]# echo $LANG
en_US.UTF-8

3.修改字符集
临时修改
[[email protected] ~]# export LANG=zh_CN.UTF-8
[[email protected] ~]# echo $LANG
zh_CN.UTF-8
查看是否修改成功:执行setup

永久修改
[[email protected] ~]# cat /etc/sysconfig/i18n
LANG="en_US.UTF-8"
SYSFONT="latarcyrheb-sun16"
[[email protected] ~]# source /etc/sysconfig/i18n

4.显示中文乱码的原因?
Linux使用的字符集与远程工具使用的字符集不同,会导致乱码

5.排查
查看linux的字符集
echo $LANG
查看xshell的字符集
6.解决
方法一:修改远程工具的字符集
方法二:修改Linux系统的字符集
        1、如何修改字符集-临时
        2、如何修改字符集-永久
        3、生效
2.5su与su-的区别
1.su切换只是切换了用户身份,但是shell环境等都没有切换,还是当前用户
使用pwd命令可看到,当前目录还是root用户的家目录
echo $PATH,PATH环境变量还是root用户登录时的变量值

2.su - 切换,即切换了用户身份,shell环境也切换了
使用pwd命令可看到,当前目录是该用户的家目录
echo $PATH,PATH环境变量也变了

[[email protected] ~]# echo $PATH
/usr/local/sbin:/usr/local/bin:/sbin:/bin:/usr/sbin:/usr/bin:/root/bin

[[email protected] ~]# su appman
[[email protected] root]$ pwd
/root
[[email protected] root]$ echo $PATH
/usr/local/sbin:/usr/local/bin:/sbin:/bin:/usr/sbin:/usr/bin:/root/bin
[[email protected] root]$ exit

[[email protected] ~]# su - appman
[[email protected] ~]$ pwd
/home/appman
[[email protected] ~]$ echo $PATH
/usr/local/bin:/bin:/usr/bin:/usr/local/sbin:/usr/sbin:/sbin:/home/appman/bin
[[email protected] ~]$
3.linux目录结构介绍
3.1目录结构的特点
1、一切从根开始,一切皆文件
2、Linux设备(光盘/磁盘分区)不挂载无法使用
3、挂载相当于给磁盘分区/设备开了一个入口,通过入口进入到光盘/磁盘分区
4、入口-挂载点-目录
举例--linux下使用光盘
1.把光盘放在光驱中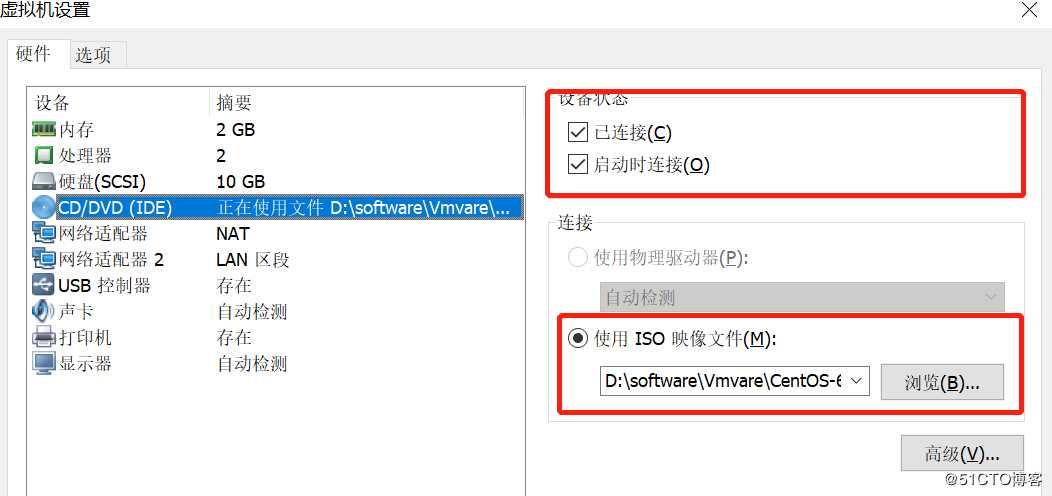
2.把光盘挂载到系统里面
[[email protected] ~]# mount /dev/cdrom /mnt
mount: block device /dev/sr0 is write-protected, mounting read-only
read-only是正常的,磁盘是只读的。
 [[email protected] ~]# cd /mnt/
[[email protected] mnt]# ll
total 564
-r--r--r--. 2 root root     14 Mar 29  2017 CentOS_BuildTag
dr-xr-xr-x. 3 root root   2048 Mar 29  2017 EFI
-r--r--r--. 2 root root    212 Nov 27  2013 EULA
3.2核心目录简介
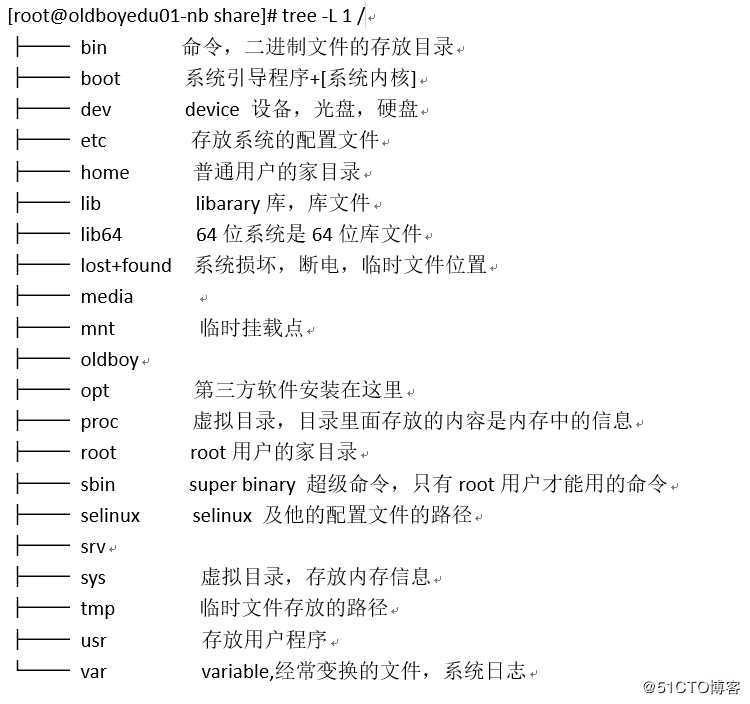
3.3目录详解
3.3.1/etc下面的目录
/etc/sysconfig/network-scripts/ifcfg-eth0
/etc/resolv.conf
/etc/hosts
/etc/sysconfig/network
/etc/fstab
/etc/rc.local
/etc/inittab
/etc/profile
/etc/init.d
~/.bashrc
~/.bash_profile
3.3.2网卡文件
/etc/sysconfig/network-scripts/ifcfg-eth0
DEVICE=eth0   --网卡的名字
HWADDR=00:0c:29:46:26:0c  --hardware address硬件地址,mac地址
TYPE=Ethernet  --网络类型,因特网
UUID=36227cea-7fc3-4199-b2b0-d0697d9c2eba  --UUID系统中唯一的标识
ONBOOT=yes  --启动的时候是否开启网卡
NM_CONTROLLED=yes  --是否能被network软件管理
BOOTPROTO=none  --网卡获取ip地址的方式
 none/static ip地址是固定的
 dhcp自动获取Ip
IPADDR=10.0.0.200  --ip地址
NETMASK=255.255.255.0  --子网掩码,在一个局域网中,最多能有多少台机器
GATEWAY=10.0.0.2  --网关,网络出口
USERCTL=no  --是否允许普通用户管理网卡 开 关 重启
PEERDNS=yes  --为yes或删除这行,意思是网卡配置文件中的DNS优先于/etc/resolv.conf
IPV6INIT=no
#阿里云的DNS
DNS1=223.5.5.5
DNS2=223.6.6.6
3.3.3DNS
1.常用的DNS
#阿里云的DNS
DNS1=223.5.5.5
DNS2=223.6.6.6

114.114.114.114
114.114.115.115
谷歌的DNS
8.8.8.8

2.如何修改DNS
在网卡配置文件/etc/sysconfig/network-scripts/ifcfg-eth0中添加上DNS配置
DNS1=223.5.5.5
DNS2-223.6.6.6
重启
ifdown eth0 &&ifup eth0 或/etc/init.d/network restart
先执行ifdown eth0,xshell就连接不到虚拟机了
验证
[[email protected] ~]# ping www.baidu.com
PING www.a.shifen.com (180.97.33.108) 56(84) bytes of data.
64 bytes from 180.97.33.108: icmp_seq=1 ttl=128 time=9.59 ms

3./etc/resolv.conf中也可配置DNS
如果网卡配置文件中配置了DNS,那么即使在/etc/resolv.conf中配置了DNS,重启网卡后也会失效。
为什么网卡配置文件中DNS配置优先于resolv.conf,是因为网卡配置文件中配置了PEERDNS=yes

4./etc/hosts 测试的时候使用
10.0.0.200 www.oldboyedu.com
[[email protected] data]# ping www.oldboyedu.com
PING www.oldboyedu.com (10.0.0.200) 56(84) bytes of data.
64 bytes from www.oldboyedu.com (10.0.0.200): icmp_seq=1 ttl=64 time=0.017 ms
3.3.4修改主机名
1.查看主机名
[[email protected] ~]# hostname
oldboyedu-01

2.临时修改主机名--重启主机后就失效了
[[email protected] ~]# hostname oldboyedu01-nb

3.永久修改主机名--重启服务器后,同样生效
[[email protected] ~]# cat /etc/sysconfig/network
NETWORKING=yes
HOSTNAME= oldboyedu01-nb
3.3.5开机自动挂载
/etc/fstab 开机的时候自动挂载的文件,开机的时候给每个磁盘分区一个入口
第一列表示设备/分区
第二列表示入口/目录/挂载点
3.3.6运行级别
/etc/rc.local
开机的时候自动运行的文件 需要开机自启动的软件、命令、服务
如何让一个软件/脚本/服务开机自动运行?
1、/etc/rc.local
2、通过chkconfig管理,开机自启动

/etc/inittab开机的时候运行级别的配置文件
运行级别讲解
#   0 - halt (Do NOT set initdefault to this) 关机状态,一直启动不起来,不要设置为0
#   1 - Single user mode 单用户模式,没有网络,root用户密码忘记了,可以单用户模式改
#   2 - Multiuser, without NFS (The same as 3, if you do not have networking) 多用户模式,没有nfs软件
#   3 - Full multiuser mode 完全的多用户模式
#   4 - unused  未使用
#   5 - X11  桌面模式,图形化界面模式。需要桌面的一些软件已经安装
#   6 - reboot (Do NOT set initdefault to this) 重启,一直重启,不要设置为6

查看运行级别
[[email protected] data]# runlevel
N 3
N表示上一次使用的运行级别
3表示当前使用的运行级别
切换运行级别-临时
[[email protected] data]# runlevel
N 3
[[email protected] data]# init 5
[[email protected] data]# runlevel
3 5
永久修改运行级别--重启后生效
修改/etc/inittab
3.3.7环境变量别名
1.哪里都生效
/etc/profile系统环境变量,别名
/etc/bashrc  别名

2.当前用户生效
~/.bashrc
~/.bash_profile

3.~表示当前用户的家目录
root   ~   /root
oldboy  ~  /home/oldboy
3.3.8安装软件的方法
/usr/local 编译安装的软件默认的位置
/usr/share
1、yum (自动解决安装依赖的软件)
yum install -y tree
2、rpm(半成品,缺少东西自己解决)
[[email protected] share]# rpm -qa|grep tree --查看软件是否安装
tree-1.5.3-3.el6.x86_64
3、编译(完全按照自己的需要设置)
3.3.9系统日志级别
/var/log/messages系统默认日志信息
/var/log/secure系统用户的登录信息(谁 什么时候 从哪里登录 是否成功)
3.3.10虚拟目录
/proc/meminfo  查看内存信息
/proc/cpuinfo   查看cpu信息
/proc/loadavg   查看负载
[[email protected] proc]# cat /proc/loadavg
0.00 0.00 0.00 1/166 4171
[[email protected] proc]# w
 05:41:49 up 16:48,  4 users,  load average: 0.00, 0.00, 0.00
USER     TTY      FROM              [email protected]   IDLE   JCPU   PCPU WHAT
root     tty1     -                02:12    3:29m  0.03s  0.03s -bash
root     pts/0    10.0.0.1         02:12    1:38m  0.08s  0.08s -bash
root     pts/1    10.0.0.1         04:25    0.00s  0.13s  0.02s w
root     pts/2    10.0.0.1         05:13   26:14   0.04s  0.04s -bash
/proc/mounts   查看挂载
4.linux开机启动流程
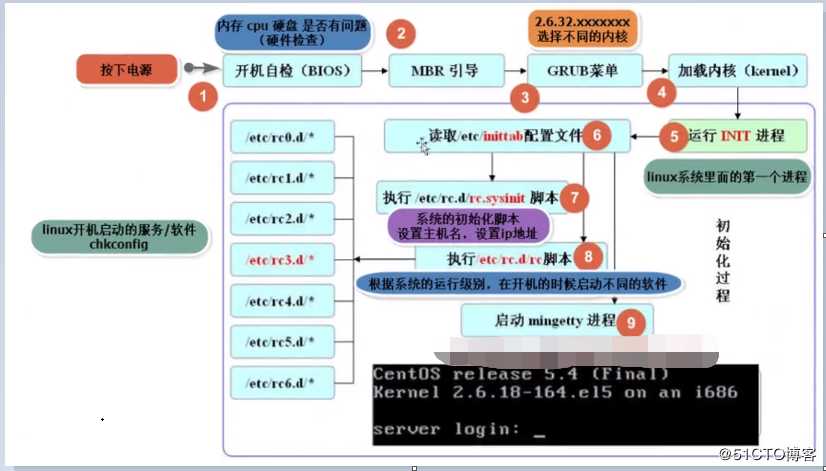
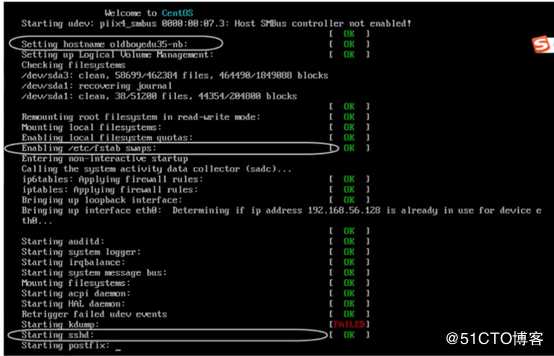
1.打开电源
2.Bios(basic input output system)-基本输入输出设备检查,检查磁盘,CPU,内存等相关硬件。
3.读取MBR(master boot record)-主引导记录。MBR是磁盘的0扇区,0磁盘,1扇区的512字节。
4.GRUB(grand unified bootloader)-GRUB菜单列表
5.加载内核
6.启动init程序,这是一个守护进程,Linux开机的时候启动,直到Linux关机才停止
7.读取/etc/inittab,设置Linux的启动级别
8.读取/etc/rc.d/rc.sysinit,初始化系统,设置主机名和ip
9.根据启动级别,启动/etc/rc.d/rc*.d/下的程序
10.启动mingetty程序,进入欢迎界面
5.PATH环境变量
第一个里程碑:什么是环境变量
1、大写
2、在系统大部分地方都可以使用,含义相同,
LANG  PS1  PATH
第二个里程碑:PATH含义:
存放的是linux命令的位置/路径
[[email protected] rc3.d]# echo $PATH
/usr/local/sbin:/usr/local/bin:/sbin:/bin:/usr/sbin:/usr/bin:/root/bin
第三个里程碑:Linux下运行命令的过程
1、输入命令
2、在PATH里面进行查找
3、找到了就运行
4、找不到就提示Command not found
以上是关于2.系统目录介绍的主要内容,如果未能解决你的问题,请参考以下文章