ELK搭建
Posted
tags:
篇首语:本文由小常识网(cha138.com)小编为大家整理,主要介绍了ELK搭建相关的知识,希望对你有一定的参考价值。
ELK搭建一、elasticsearch
环境安装:
node1 和node2都装上
rpm --import https://packages.elastic.co/GPG-KEY-elasticsearch
#安装yum源
cat  >> /etc/yum.repos.d/elaticsearch.repo  <<EOF
[elasticsearch-2.x]
name=Elasticsearch repository for 2.x packages
baseurl=http://packages.elastic.co/elasticsearch/2.x/centos
gpgcheck=1
gpgkey=http://packages.elastic.co/GPG-KEY-elasticsearch
enabled=1
EOF
#安装
yum -y install elasticsearch redis nginx java#生成缓存
yum makecache#测试java
[[email protected]_node1 ~]# java -version
openjdk version "1.8.0_212"
OpenJDK Runtime Environment (build 1.8.0_212-b04)
OpenJDK 64-Bit Server VM (build 25.212-b04, mixed mode)

[[email protected]_node2 ~]# java -version
openjdk version "1.8.0_212"
OpenJDK Runtime Environment (build 1.8.0_212-b04)
OpenJDK 64-Bit Server VM (build 25.212-b04, mixed mode)
配置文件设置
修改/etc/elasticsearch/elasticsearch.yml配置文件
node1配置文件
[[email protected]_node1 ~]# grep ‘^[a-Z]‘ /etc/elasticsearch/elasticsearch.yml
cluster.name: huanqiu               ##集群名字
node.name: elk_node1                ##节点名字
path.data: /data/es-data                ##储存数据路径
path.logs: /var/log/elasticsearch/      ##日志路径
bootstrap.memory_lock: true         ##锁定内存,不被使用到交换分区去(通常内存不足时,休眠程序内存信息会交换到交换分区)
network.host: 0.0.0.0               ##所有网络
http.port: 9200                 ##端口
node2配置文件
[[email protected]_node2 ~]# grep ‘^[a-z]‘ /etc/elasticsearch/elasticsearch.yml
cluster.name: huanqiu
node.name: elk_node2
path.data: /data/es-data
path.logs: /var/log/elasticsearch/
bootstrap.memory_lock: true
network.host: 0.0.0.0
http.port: 9200
discovery.zen.ping.multicast.enabled: false
discovery.zen.ping.unicast.hosts: ["172.16.10.76", "172.16.10.63"]
mkdir -p /data/es-data #创建数据存放路径
chown -R elasticsearch.elasticsearch /data/es-data #授权
systemctl start elasticsearch #开启服务
systemctl enable elasticsearch #设置开机自启动
ss -lntup|grep 9200 #查看端口
tcp LISTEN 0 50 :::9200 :::* users:(("java",pid=3216,fd=93))
ss -lntup|grep 9300
tcp LISTEN 0 50 :::9300 :::* users:(("java",pid=3216,fd=81))测试
[[email protected]_node1 ~]# curl -I 172.16.10.76:9200
HTTP/1.1 200 OK
Content-Type: text/plain; charset=UTF-8
Content-Length: 0
[[email protected]_node2 ~]# curl -I 172.16.10.63:9200
HTTP/1.1 200 OK
Content-Type: text/plain; charset=UTF-8
Content-Length: 0
web测试: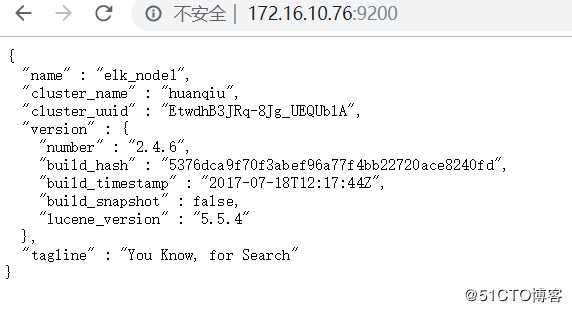
安装插件
安装head插件
[[email protected]_node1 ~]# /usr/share/elasticsearch/bin/plugin install mobz/elasticsearch-head
-> Installing mobz/elasticsearch-head...
Trying https://github.com/mobz/elasticsearch-head/archive/master.zip ...
Downloading ..............................................................................................................................................................................................................................................................................................................................................................................................................................................................................................................................................................................................................................................................................................DONE
Verifying https://github.com/mobz/elasticsearch-head/archive/master.zip checksums if available ...
NOTE: Unable to verify checksum for downloaded plugin (unable to find .sha1 or .md5 file to verify)
Installed head into /usr/share/elasticsearch/plugins/head
##授权
[[email protected]_node1 ~]# chown -R elasticsearch.elasticsearch /usr/share/elasticsearch/plugins/安装kopf插件
[[email protected]_node1 ~]#search-kopf
-> Installing lmenezes/elasticsearch-kopf...
Trying https://github.com/lmenezes/elasticsearch-kopf/archive/master.zip ...
Downloading .................................................................................................................................................................................................................................................................................................................................................................................................................................................................................................................................................................................................................................................................................................................................................................................................................................................................................................................................................................................................................................................................................................................................................................................................................................................................................................................................................................................................................................................................................................................................................................................................................................................................................................DONE
Verifying https://github.com/lmenezes/elasticsearch-kopf/archive/master.zip checksums if available ...
NOTE: Unable to verify checksum for downloaded plugin (unable to find .sha1 or .md5 file to verify)
Installed kopf into /usr/share/elasticsearch/plugins/kopf
[[email protected]_node1 ~]# systemctl restart elasticsearch
[[email protected]_node1 ~]# ll /usr/share/elasticsearch/plugins/
总用量 4
drwxr-xr-x 6 elasticsearch elasticsearch 4096 6月   9 12:47 head
drwxr-xr-x 8 root          root           230 6月   9 13:04 kopf
测试验证head插件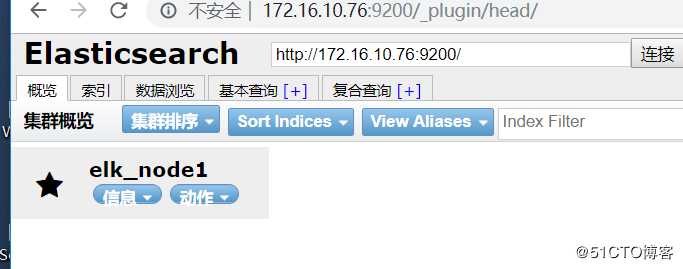
测试kopf插件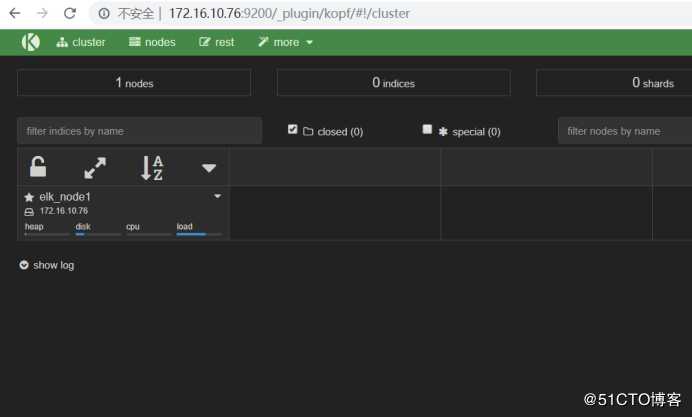
二、logstash
环境安装:
[[email protected]_node1 ~]# vim /etc/yum.repos.d/logstash.repo
[logstash-2.1]
name=Logstash repository for 2.1.x packages
baseurl=http://packages.elastic.co/logstash/2.1/centos
gpgchech=1
gpgkey=http://packages.elastic.co/GPG-KEY-elasticsearch
enabled=1
yum -y install logstash命令行输入:
标准输入,标准输出
/opt/logstash/bin/logstash -e ‘input stdin output stdout ‘OpenJDK 64-Bit Server VM warning: If the number of processors is expected to increase from one, then you should configure the number of parallel GC threads appropriately using -XX:ParallelGCThreads=N
aaa
bbb
ccc
Settings: Default filter workers: 1
Logstash startup completed
2019-06-09T08:42:01.876Z elk_node2 aaa
2019-06-09T08:42:01.877Z elk_node2 bbb
2019-06-09T08:42:01.878Z elk_node2 ccc
标准输入,输出rubydebug格式
/opt/logstash/bin/logstash -e ‘input stdin output stdout codec => rubydebug ‘aaa
Settings: Default filter workers: 1
Logstash startup completed
"message" => "aaa",
"@version" => "1",
"@timestamp" => "2019-06-09T08:49:48.841Z",
"host" => "elk_node2"
标准输入,在另一台主机上输出
/opt/logstash/bin/logstash -e ‘input stdin output elasticsearch hosts => ["172.16.10.76"] ‘logstash配置文件模式
[[email protected]_node1 ~]# vim /etc/logstash/conf.d/logstash.conf
input  stdin
output  elasticsearch hosts=> ["172.16.10.76:9200"]
#执行命令
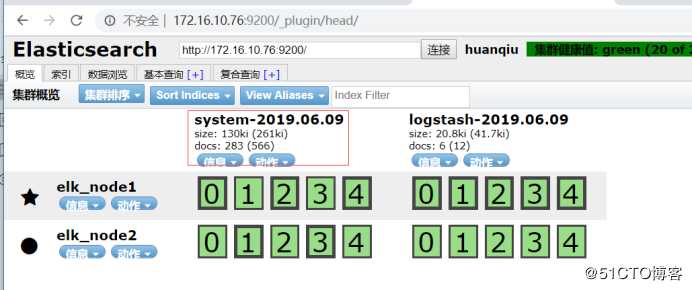
/opt/logstash/bin/logstash -f /etc/logstash/conf.d/logstash.conf例2:
[[email protected]_node1 ~]# vim /data/file.conf
input
   file
        path => "/var/log/messages"
        type => "system"
        start_position => "beginning"


output
   elasticsearch
        hosts => ["172.16.10.76:9200"]
        index => "system-%+YYYY.MM.dd"
例2:
[[email protected]_node1 ~]# vim /data/file.conf
input
file
path => "/var/log/messages"
type => "system"
start_position => "beginning"
input
file
path => "/var/log/elasticsearch/huanqiu.log"
type => "es-error"
start_position => "beginning"
output
if [type] == "system"
elasticsearch
hosts => ["172.16.10.76:9200"]
index => "system-%+YYYY.MM.dd"
三、kibana
环境安装:
node1和node2安装都一样
官网地址:https://www.elastic.co/cn/downloads/past-releases#kibana
[[email protected]_node2 tools]# wget https://www.elastic.co/downloads/past-releases/kibana-4-3-1

[[email protected]_node2 tools]# ls
kibana-4.3.1-linux-x64.tar.gz  mongodb-linux-x86_64-3.6.12.tgz
[[email protected]_node2 tools]# tar xf kibana-4.3.1-linux-x64.tar.gz
[[email protected]_node2 tools]# mv kibana-4.3.1-linux-x64 /usr/local/
[[email protected]_node2 tools]# ln -s /usr/local/kibana-4.3.1-linux-x64/ /usr/local/kibana
[[email protected]_node2 tools]# cd /usr/local/kibana
[[email protected]_node2 kibana]# ls
bin     installedPlugins  node          optimize      README.txt  webpackShims
config  LICENSE.txt       node_modules  package.json  src
[[email protected]_node2 kibana]# cp config/kibana.yml config/kibana.yml.bak
#修改kibana.yml配置
[[email protected]_node2 kibana]# grep ‘^[a-z]‘ config/kibana.yml
server.port: 5601
server.host: "0.0.0.0"
elasticsearch.url: "http://172.16.10.76:9200"           #那个节点的IP都行
kibana.index: ".kibana"
##启动服务
[[email protected]_node2 ~]# /usr/local/kibana/bin/kibana
[[email protected]_node2 ~]# screen -ls          #屏风模式
There is a screen on:
        5480.pts-1.elk_node2    (Detached)
1 Socket in /var/run/screen/S-root.

[[email protected]_node2 ~]# screen -r 5480
  log   [19:21:29.954] [info][status][plugin:markdown_vis] Status changed from uninitialized to green - Ready
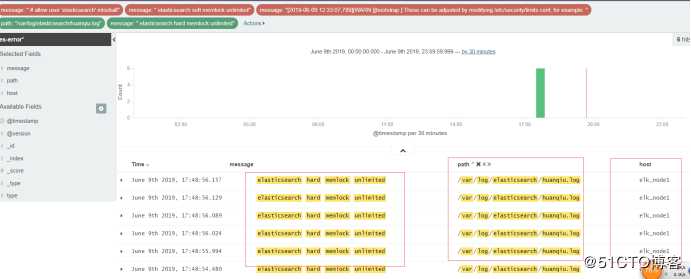
添加索引
查看数据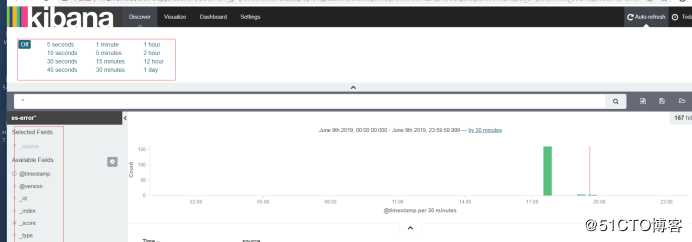
添加可选项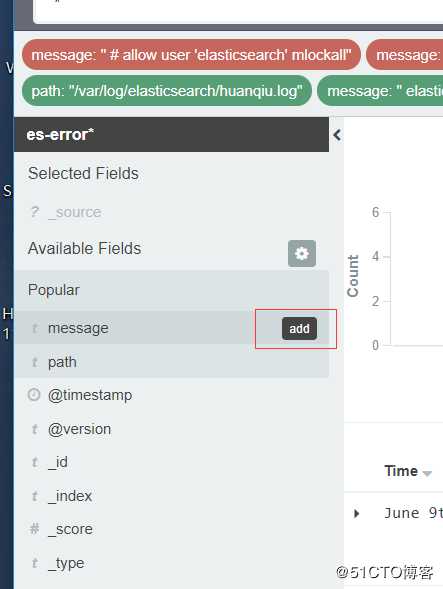
以上是关于ELK搭建的主要内容,如果未能解决你的问题,请参考以下文章