安装ATS(apache traffic server)正向代理
Posted zyxnhr
tags:
篇首语:本文由小常识网(cha138.com)小编为大家整理,主要介绍了安装ATS(apache traffic server)正向代理相关的知识,希望对你有一定的参考价值。
一 traffic server简介
Traffic Server是一种高性能Web代理缓存,可通过在网络边缘缓存频繁访问的信息来提高网络效率和性能。这使内容在物理上更接近最终用户,同时实现更快的交付和更少的带宽使用。Traffic Server旨在通过最大化现有和可用带宽来改善企业,Internet服务提供商(ISP),骨干提供商和大型Intranet的内容交付。
实现功能
作为Web代理缓存
作为Web代理缓存,Traffic Server会在这些请求前往目标Web服务器(源服务器)时接收用户对Web内容的请求。如果Traffic Server包含所请求的内容,则它直接提供内容。如果请求的内容在缓存中不可用,则Traffic Server充当代理:它代表用户从源服务器获取内容,并保留副本以满足将来的请求。
作为反向代理
反向代理对外部用户来说就好像它是原始服务器一样,尽管它不会自己生成内容。相反,它拦截请求,并根据配置的规则和缓存内容,提供所请求内容本身的缓存副本,或将请求转发给源服务器,可能缓存返回的内容以供将来的请求使用。
透明代理
透明代理可以是反向代理或正向代理(尽管几乎所有反向代理都是透明部署的),定义功能是使用网络路由通过代理发送请求,而无需客户端自行配置,以及通常没有这些客户端绕过代理的能力。
原始服务器
生成您希望使用Traffic Server代理(并可选择缓存)的内容的服务器。在转发代理配置中,源服务器可以是代理客户端尝试连接的任何远程服务器。在反向代理配置中,源服务器通常是一组已知的服务器,您使用Traffic Server作为性能增强的缓存层。
转发代理
转发代理代理访问外部资源,拦截来自网络的所有匹配的出站流量。转发代理可用于加速具有慢速连接的位置的外部访问(通过高速缓存外部资源并使用这些高速缓存的副本直接在将来为请求提供服务),或者可用于限制或监视外部访问。
二 安装
使用源码安装
2.1 安装依赖
pkgconfig libtool gcc (>= 4.3 or clang > 3.0) GNU make openssl tcl pcre libcap flex (for TPROXY) hwloc lua curses (for traffic_top) curl (for traffic_top)
先yum 安装
[[email protected] ~]# yum -y install pkgconfig libtool gcc make openssl tcl pcre libcap flexhwloc lua curses curl
2.2 使用git下载源码
安装相关包
[[email protected] ~]# yum -y install git autoconf automake
Traffic Server将构建为使用默认nobody用户和组,并将安装到/opt/ts
git下载存储库
[[email protected] ~]# cd /usr/local/src/
[[email protected] src]# git clone https://git-wip-us.apache.org/repos/asf/trafficserver.git
切换带克隆目录
[[email protected] src]# cd trafficserver/
如果是从Git克隆了存储库,则需要configure在继续之前生成 脚本
[[email protected] trafficserver]# autoreconf -if
libtoolize: putting auxiliary files in AC_CONFIG_AUX_DIR, `build/_aux‘.
libtoolize: copying file `build/_aux/ltmain.sh‘
libtoolize: putting macros in AC_CONFIG_MACRO_DIR, `build‘.
libtoolize: copying file `build/libtool.m4‘
libtoolize: copying file `build/ltoptions.m4‘
libtoolize: copying file `build/ltsugar.m4‘
libtoolize: copying file `build/ltversion.m4‘
libtoolize: copying file `build/lt~obsolete.m4‘
configure.ac:747: installing ‘build/_aux/ar-lib‘
configure.ac:654: installing ‘build/_aux/compile‘
configure.ac:107: installing ‘build/_aux/config.guess‘
configure.ac:107: installing ‘build/_aux/config.sub‘
configure.ac:46: installing ‘build/_aux/install-sh‘
configure.ac:46: installing ‘build/_aux/missing‘
parallel-tests: installing ‘build/_aux/test-driver‘
example/Makefile.am: installing ‘build/_aux/depcomp‘
configure.ac: installing ‘build/_aux/ylwrap‘
2.3 配置源树
[[email protected] trafficserver]# ./configure --prefix=/opt/ts
configure: error: in `/usr/local/src/trafficserver‘:      #报错,没有安装C++
configure: error: C++ preprocessor "/lib/cpp" fails sanity check
安装gcc-c++
[[email protected] trafficserver]# yum -y install gcc-c++
再次执行,急促报错
[[email protected] trafficserver]# ./configure --prefix=/opt/ts
checking checking whether c++ -std=c++17 supports -std=c++17... no
configure: error: *** A compiler with support for -std=c++17 is required.
查看GCC版本
[[email protected] trafficserver]# gcc --version
gcc (GCC) 4.8.5 20150623 (Red Hat 4.8.5-36)
Copyright (C) 2015 Free Software Foundation, Inc.
This is free software; see the source for copying conditions.  There is NO
warranty; not even for MERCHANTABILITY or FITNESS FOR A PARTICULAR PURPOSE.
三 编译安装gcc 7.30版本
3.1 下载源码包
[[email protected] trafficserver]# cd ../
[[email protected] src]# wget https://mirrors.ustc.edu.cn/gnu/gcc/gcc-7.3.0/gcc-7.3.0.tar.gz
解压
[[email protected] src]# tar -xf gcc-7.3.0.tar.gz
3.2 运行 download_prerequisites 脚本
[[email protected] src]# cd gcc-7.3.0
[email protected] gcc-7.3.0]# yum -y install bzip2
[[email protected] gcc-7.3.0]# ./contrib/download_prerequisites
gmp-6.1.0.tar.bz2: OK
mpfr-3.1.4.tar.bz2: OK
mpc-1.0.3.tar.gz: OK
isl-0.16.1.tar.bz2: OK
All prerequisites downloaded successfully.
将所有的中间文件都放到该目录
[[email protected] gcc-7.3.0]# mkdir gcc-build-7.3.0
[[email protected] gcc-7.3.0]# cd gcc-build-7.3.0
3.3 配置
[[email protected] gcc-build-7.3.0]# ../configure --enable-checking=release --enable-languages=c,c++ --disable-multilib
编译,时间比较长
[[email protected] gcc-build-7.3.0]# make
删除旧版的gcc和c++
[[email protected] gcc-build-7.3.0]# rpm -q gcc

[[email protected] gcc-build-7.3.0]# rpm -q gcc-c++

[[email protected] gcc-build-7.3.0]# rpm -e gcc-c++-4.8.5-16.el7_4.2.x86_64

[[email protected] gcc-build-7.3.0]# yum remove gcc
3.4 安装
[[email protected] gcc-build-7.3.0]# make install
3.5 检查版本
[[email protected] gcc-build-7.3.0]# which gcc
/usr/local/bin/gcc
[[email protected] gcc-build-7.3.0]# gcc --version
-bash: /usr/bin/gcc: No such file or directory
[[email protected] gcc-build-7.3.0]# ln -s /usr/local/bin/gcc /usr/bin/gcc
[[email protected] gcc-build-7.3.0]# gcc --version
gcc (GCC) 7.3.0
Copyright (C) 2017 Free Software Foundation, Inc.
This is free software; see the source for copying conditions.  There is NO
warranty; not even for MERCHANTABILITY or FITNESS FOR A PARTICULAR PURPOSE.
四 、继续安装apache traffic server
[[email protected] gcc-build-7.3.0]# cd ../../trafficserver/
[[email protected] trafficserver]# ./configure --prefix=/opt/ts
checking whether compiling and linking against OpenSSL works... no
configure: error: failed to find OpenSSL
安装Opsnssl
[[email protected] trafficserver]# yum -y install openssl openssl-devel
[[email protected] trafficserver]# ./configure --prefix=/opt/ts
4.1 编译
[[email protected] trafficserver]# make
[[email protected] trafficserver]# make check
4.2 安装
[[email protected] trafficserver]# make install
4.3 配置正向代理
与反向代理相反,在反向代理中,您具有要为其代理(并且可选地缓存)的源服务器的已定义列表,正向代理用于代理(并且可选地缓存)任意远程主机。因此,以下设置records.config是最小转发代理的基本配置:
[[email protected] ~]# cd /opt/ts/
[[email protected] ts]# vim etc/trafficserver/records.config
最低配置
CONFIG proxy.config.url_remap.remap_required INT 0      #禁用重映射规则存在的要求,并在Traffic Server将请求代理到远程主机之前匹配传入请求
CONFIG proxy.config.http.cache.http INT 1               #启用代理HTTP请求的缓存。
CONFIG proxy.config.reverse_proxy.enabled INT 0         #禁用反向代理
CONFIG proxy.config.http.server_ports STRING 10001 10001:ipv6 #修改端口
4.4 启动
[[email protected] ts]# ./bin/trafficserver restart
Stopping traffic_manager:                                  [  OK  ]
Stopping traffic_server:                                   [  OK  ]
Starting Apache Traffic Server:                            [  OK  ]
[[email protected] ts]# netstat -ntlp
Active Internet connections (only servers)
Proto Recv-Q Send-Q Local Address           Foreign Address         State       PID/Program name
tcp        0      0 0.0.0.0:10001           0.0.0.0:*               LISTEN      21866/traffic_manag
tcp        0      0 0.0.0.0:22              0.0.0.0:*               LISTEN      2756/sshd
tcp6       0      0 :::10001                :::*                    LISTEN      21866/traffic_manag
tcp6       0      0 :::22                   :::*                    LISTEN      2756/sshd
4.5 配置完成,客户端检测
在配置代理的位置完成
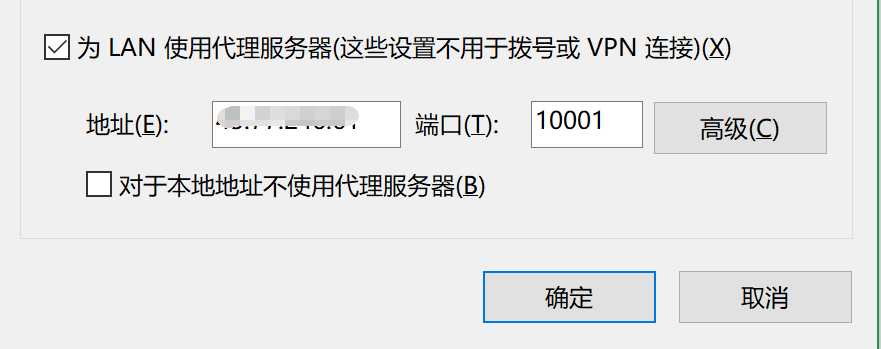
使用cip.cc查看IP
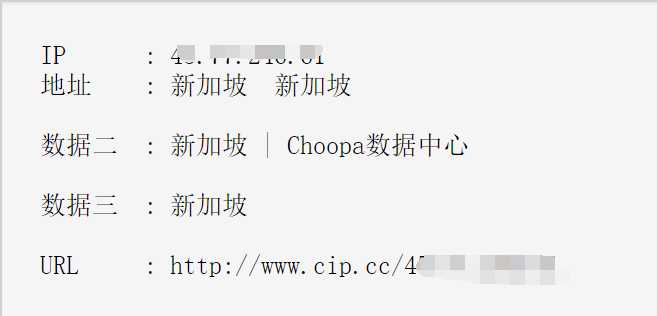
正向代理配置成功!!!
以上是关于安装ATS(apache traffic server)正向代理的主要内容,如果未能解决你的问题,请参考以下文章