Android Studio编译并集成SO文件
Posted dxcyber409
tags:
篇首语:本文由小常识网(cha138.com)小编为大家整理,主要介绍了Android Studio编译并集成SO文件相关的知识,希望对你有一定的参考价值。
0x00 本文目标
让Java层代码与Native层代码交互
编译Native代码为SO文件
将SO文件集成到最终的APK文件中
为此你需要android Studio和NDK套装,百度搜索后直接到官网下载。
0x01 Java层
为了让Java层与JNI层交互,来个简单的测试代码。hello方法用于获取从native返回的字符串,并显示到TextView中,没有TextView的同学自己在布局文件中新建一个就行了。
package com.example.androidtest;

import android.support.v7.app.AppCompatActivity;
import android.os.Bundle;
import android.widget.TextView;

public class MainActivity extends AppCompatActivity
    private TextView txt_jni;

    static
        System.loadLibrary("test");


    @Override
    protected void onCreate(Bundle savedInstanceState)
        super.onCreate(savedInstanceState);
        setContentView(R.layout.activity_main);

        txt_jni = findViewById(R.id.txt_jni);
        txt_jni.setText(hello(1, "2"));


    private native String hello(int a, String b);
接下来实现JNI层代码,在Android Studio中新建一个空白工程,File->New->Folder->JNI Folder创建一个JNI源码文件夹,默认路径在/src/main/jni。
博主另一篇文章演示了纯Java生成SO文件:https://www.cnblogs.com/DXCyber409/p/10854415.html。
在安卓中同样有这两种方式:Java_固定路径方式,和JNI_OnLoad动态注册方式。
0x02 JNI固定前缀写法
本质就是生成一个固定前缀的函数名称和相关参数,最后在c/cpp文件中实现它。
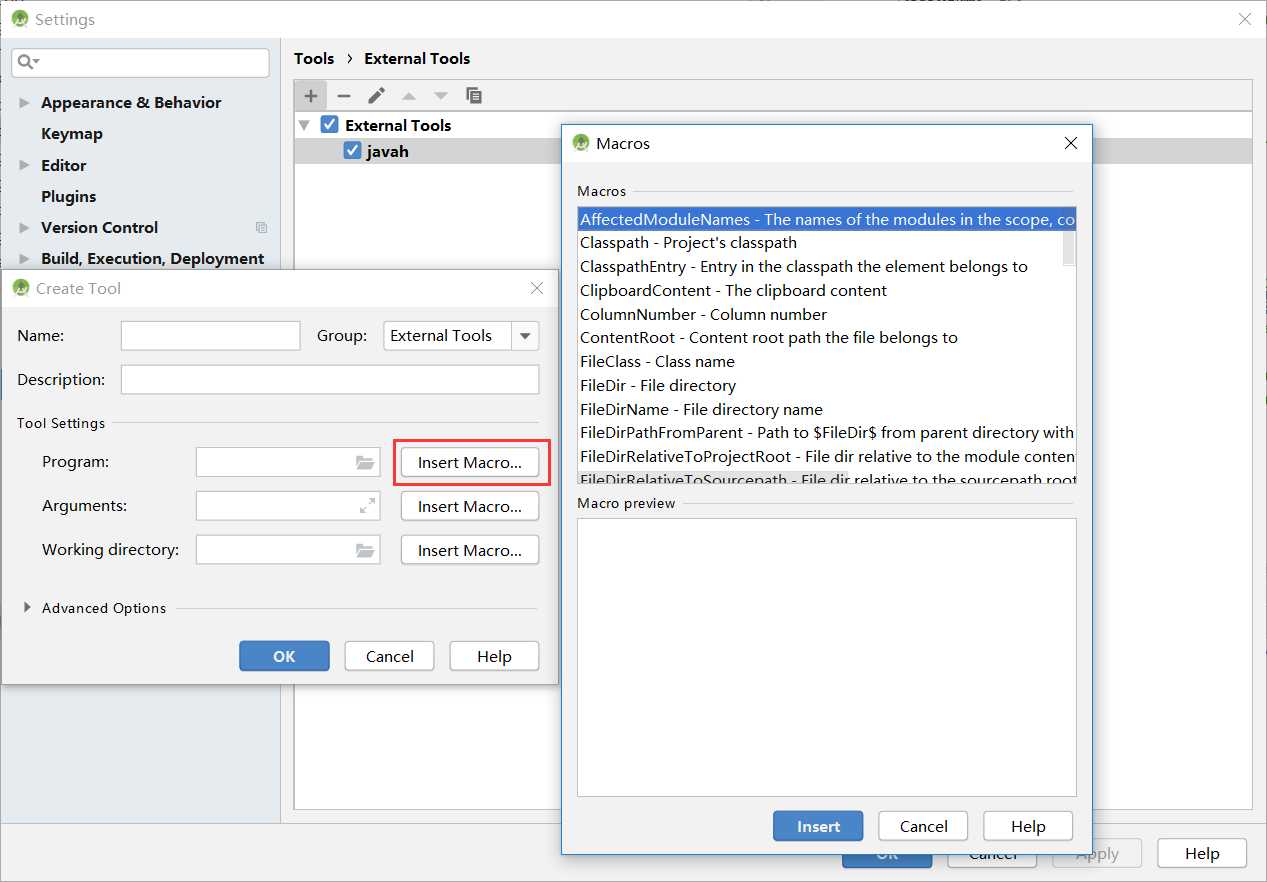
可以手动生成.h文件,不再演示。本文使用Android Studio提供的External Tools来实现一键生成.h头文件,这将大大提高开发效率。
File->Settings->Tools->Extenal Tools,点个加号创建一个新的项。该命令实际上会执行命令行指令传递相关参数,结合手写的写法:
D:\\RTEws\\Java\\jdk1.8.0_121\\bin>javah -d "E:\\Workspace\\NetBeans\\DXCyber409\\src\\main\\java\\dxcyber409\\jni" -classpath "E:\\Workspace\\NetBeans\\DXCyber409\\target\\classes" -jni dxcyber409.Test$Cls
Insert Marcros是内置环境变量参考窗口,不要错过:

最终路径参数方案调整如下:
Name:javah
Program:$JDKPath$\\bin\\javah.exe
Arguments:-d "$ModuleFileDir$\\src\\main\\jni" -classpath "$OutputPath$;$ModuleSdkPath$\\platforms\\android-28\\android.jar;$ModuleSdkPath$\\extras\\android\\android-support-v4.jar;$ModuleSdkPath$\\extras\\android\\android-support-v7.jar" -jni $FileClass$
Working directory:
在Arguments中-classpath选项除了自己代码中已编译的classes目录外,还加入android.jar,android-support-v4.jar,android-support-v7.jar等依赖包,不加会缺少实现类而报错。
写法不止一种,博主在Arguments中已经把所有相关路径都拼接完成了,因此Working directory没啥用留空就行。
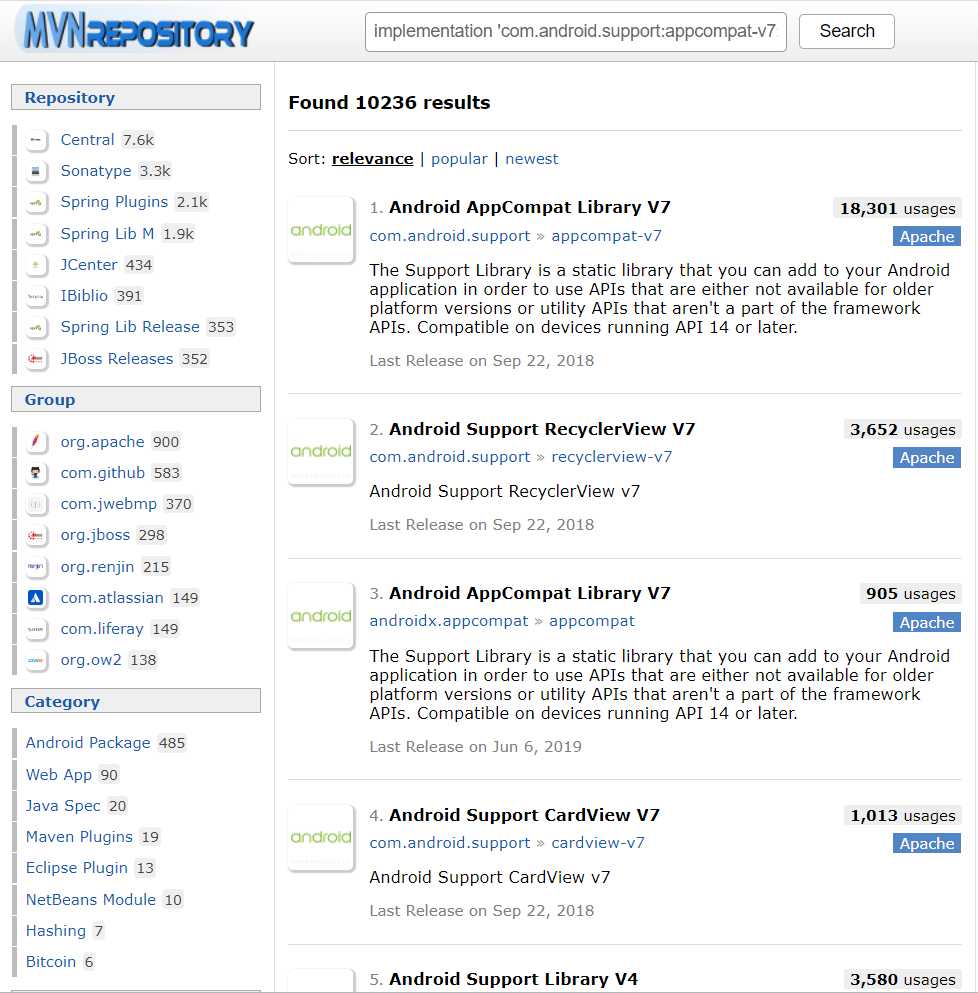
Ps.博主的Android SDK貌似不完整的样子,在Android SDK中找不到appcompat相关依赖包。如果你也不想重新安装Android SDK的话这里有个小技巧,到Maven Repository上缺啥下啥,自己动手丰衣足食。下载了丢到目录中引用路径就行,位置没有强硬要求。

随后在/src/main/jni目录中就得到了.h头文件,按惯例新建一个cpp文件包含此文件照着写就行,完整代码如下:
/* DO NOT EDIT THIS FILE - it is machine generated */
#include <jni.h>
/* Header for class com_example_androidtest_MainActivity */

#ifndef _Included_com_example_androidtest_MainActivity
#define _Included_com_example_androidtest_MainActivity
#ifdef __cplusplus
extern "C"
#endif
#undef com_example_androidtest_MainActivity_BIND_ABOVE_CLIENT
#define com_example_androidtest_MainActivity_BIND_ABOVE_CLIENT 8L
#undef com_example_androidtest_MainActivity_BIND_ADJUST_WITH_ACTIVITY
#define com_example_androidtest_MainActivity_BIND_ADJUST_WITH_ACTIVITY 128L
#undef com_example_androidtest_MainActivity_BIND_ALLOW_OOM_MANAGEMENT
#define com_example_androidtest_MainActivity_BIND_ALLOW_OOM_MANAGEMENT 16L
#undef com_example_androidtest_MainActivity_BIND_AUTO_CREATE
#define com_example_androidtest_MainActivity_BIND_AUTO_CREATE 1L
#undef com_example_androidtest_MainActivity_BIND_DEBUG_UNBIND
#define com_example_androidtest_MainActivity_BIND_DEBUG_UNBIND 2L
#undef com_example_androidtest_MainActivity_BIND_EXTERNAL_SERVICE
#define com_example_androidtest_MainActivity_BIND_EXTERNAL_SERVICE -2147483648L
#undef com_example_androidtest_MainActivity_BIND_IMPORTANT
#define com_example_androidtest_MainActivity_BIND_IMPORTANT 64L
#undef com_example_androidtest_MainActivity_BIND_NOT_FOREGROUND
#define com_example_androidtest_MainActivity_BIND_NOT_FOREGROUND 4L
#undef com_example_androidtest_MainActivity_BIND_WAIVE_PRIORITY
#define com_example_androidtest_MainActivity_BIND_WAIVE_PRIORITY 32L
#undef com_example_androidtest_MainActivity_CONTEXT_IGNORE_SECURITY
#define com_example_androidtest_MainActivity_CONTEXT_IGNORE_SECURITY 2L
#undef com_example_androidtest_MainActivity_CONTEXT_INCLUDE_CODE
#define com_example_androidtest_MainActivity_CONTEXT_INCLUDE_CODE 1L
#undef com_example_androidtest_MainActivity_CONTEXT_RESTRICTED
#define com_example_androidtest_MainActivity_CONTEXT_RESTRICTED 4L
#undef com_example_androidtest_MainActivity_MODE_APPEND
#define com_example_androidtest_MainActivity_MODE_APPEND 32768L
#undef com_example_androidtest_MainActivity_MODE_ENABLE_WRITE_AHEAD_LOGGING
#define com_example_androidtest_MainActivity_MODE_ENABLE_WRITE_AHEAD_LOGGING 8L
#undef com_example_androidtest_MainActivity_MODE_MULTI_PROCESS
#define com_example_androidtest_MainActivity_MODE_MULTI_PROCESS 4L
#undef com_example_androidtest_MainActivity_MODE_NO_LOCALIZED_COLLATORS
#define com_example_androidtest_MainActivity_MODE_NO_LOCALIZED_COLLATORS 16L
#undef com_example_androidtest_MainActivity_MODE_PRIVATE
#define com_example_androidtest_MainActivity_MODE_PRIVATE 0L
#undef com_example_androidtest_MainActivity_MODE_WORLD_READABLE
#define com_example_androidtest_MainActivity_MODE_WORLD_READABLE 1L
#undef com_example_androidtest_MainActivity_MODE_WORLD_WRITEABLE
#define com_example_androidtest_MainActivity_MODE_WORLD_WRITEABLE 2L
#undef com_example_androidtest_MainActivity_RECEIVER_VISIBLE_TO_INSTANT_APPS
#define com_example_androidtest_MainActivity_RECEIVER_VISIBLE_TO_INSTANT_APPS 1L
#undef com_example_androidtest_MainActivity_DEFAULT_KEYS_DIALER
#define com_example_androidtest_MainActivity_DEFAULT_KEYS_DIALER 1L
#undef com_example_androidtest_MainActivity_DEFAULT_KEYS_DISABLE
#define com_example_androidtest_MainActivity_DEFAULT_KEYS_DISABLE 0L
#undef com_example_androidtest_MainActivity_DEFAULT_KEYS_SEARCH_GLOBAL
#define com_example_androidtest_MainActivity_DEFAULT_KEYS_SEARCH_GLOBAL 4L
#undef com_example_androidtest_MainActivity_DEFAULT_KEYS_SEARCH_LOCAL
#define com_example_androidtest_MainActivity_DEFAULT_KEYS_SEARCH_LOCAL 3L
#undef com_example_androidtest_MainActivity_DEFAULT_KEYS_SHORTCUT
#define com_example_androidtest_MainActivity_DEFAULT_KEYS_SHORTCUT 2L
#undef com_example_androidtest_MainActivity_RESULT_CANCELED
#define com_example_androidtest_MainActivity_RESULT_CANCELED 0L
#undef com_example_androidtest_MainActivity_RESULT_FIRST_USER
#define com_example_androidtest_MainActivity_RESULT_FIRST_USER 1L
#undef com_example_androidtest_MainActivity_RESULT_OK
#define com_example_androidtest_MainActivity_RESULT_OK -1L
#undef com_example_androidtest_MainActivity_HONEYCOMB
#define com_example_androidtest_MainActivity_HONEYCOMB 11L
#undef com_example_androidtest_MainActivity_MSG_REALLY_STOPPED
#define com_example_androidtest_MainActivity_MSG_REALLY_STOPPED 1L
#undef com_example_androidtest_MainActivity_MSG_RESUME_PENDING
#define com_example_androidtest_MainActivity_MSG_RESUME_PENDING 2L
/*
 * Class:     com_example_androidtest_MainActivity
 * Method:    hello
 * Signature: (ILjava/lang/String;)Ljava/lang/String;
 */
JNIEXPORT jstring JNICALL Java_com_example_androidtest_MainActivity_hello
  (JNIEnv *, jobject, jint, jstring);

#ifdef __cplusplus

#endif
#endif
0x03 JNI动态注册写法
本质是向RegisterNatives
0x04 编译SO文件
0x05 集成SO文件
0x06 测试结果
NDK官方指定使用Makefile来进行SO文件编译,那么新建一个文件重命名Android.mk。
目前最重要的是编译出一个SO成品来,一切配置最简单化。后续有详细需要各个编译选项的可以参考官方文档:https://developer.android.com/ndk/guides/android_mk.html?hl=zh-cn。
参考源
https://www.jianshu.com/p/faa3eebbd401
以上是关于Android Studio编译并集成SO文件的主要内容,如果未能解决你的问题,请参考以下文章